Registering a Network Library
A Network Library is a library that you register when you want to use a shared folder to share documents with other users.
1.
Click  (Library Management) on the ribbon.
(Library Management) on the ribbon.Or, follow one of the steps described below.
Right-click the Navigation Window and select [Library Management]
Select the [File] menu > [Library Management]
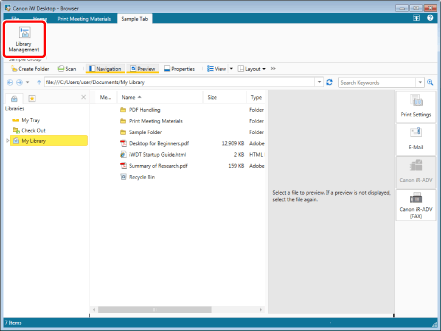
The [Library Management] dialog box is displayed.
|
NOTE
|
|
If commands are not displayed on the ribbon of Desktop Browser, see the following to display them.
This operation can also be performed with the tool buttons on the toolbar. If tool buttons are not displayed on the toolbar of Desktop Browser, see the following to display them.
|
2.
Click [Register Library].
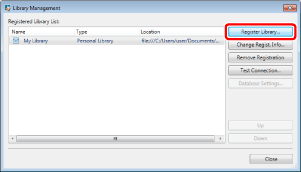
The [Select Library to Register] dialog box is displayed.
3.
Select [Network Library] and click [OK].
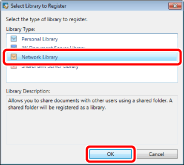
The [Register Network Library] dialog box is displayed.
4.
Click [Browse].
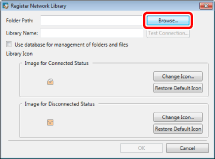
The [Browse For Folder] dialog box is displayed.
5.
Select a folder to use as a Network Library and click [OK].
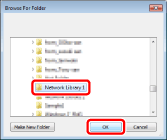
The path to the selected folder is displayed in [Folder Path].
The name of the selected folder is displayed in [Library Name].
6.
To use a database to manage folders and files, select the [Use database for management of folders and files] check box.
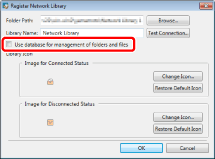
For details on the [Use database for management of folders and files] check box, see the following.
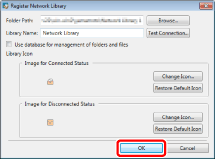
7.
If necessary, change the library settings and click [OK].
For information on how to change the name of the displayed library, see the following.
When setting the library icon, see the following.
The [Library Management] dialog box is displayed again.
8.
Test the connection to the registered library.
For more information on testing the connection to the library, see the following.
9.
Click [Close].