Setting Department ID Management
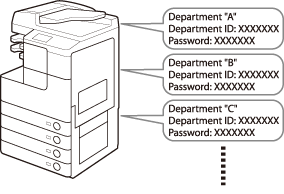
You can register a Department ID and password for each department, and manage the machine by limiting its use to only those who enter the correct Department ID and password. This is called Department ID Management. Department IDs and passwords for up to 1000 departments can be registered. Use Department ID Management to keep track of the copy, scan, and print totals for each department.
 |
|
 |
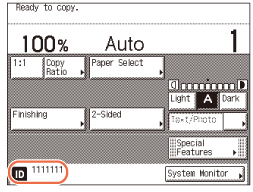
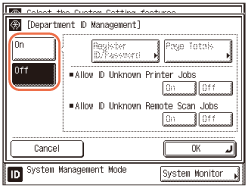
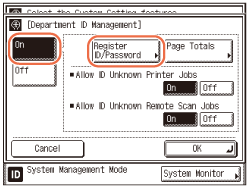
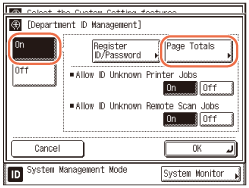
Top screen when Department ID Management is enabled
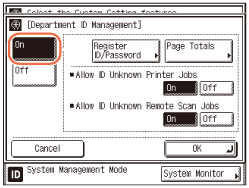
With Department ID Management, the following settings can be specified:
Register the Department ID and password.
Set page limits for scans, prints, and copies.
Accept or reject print and scan jobs from computers with unknown IDs.
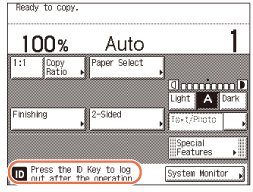
After editing settings on Department ID Management, be sure to press  (Log In/Out) to return to the screen for entering the Department ID and password.
(Log In/Out) to return to the screen for entering the Department ID and password.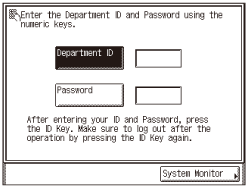
|
IMPORTANT
|
|
To use the optional Copy Card Reader-F1, Department ID Management must be activated.
Do not change the password when using a control card. The control card will become unusable if the password for the Department ID is changed.
If you enable both Department ID Management and User ID Management, be sure to assign a Department ID (and the password for the Department ID) to each User ID. Users can log in to the machine by entering their User ID that belongs to a Department ID. For instructions on how to register User IDs, see Specifying Department ID and User Management.
|
|
NOTE
|
|
When the optional Copy Card Reader-F1 is attached to the machine, some screens that appear are different from those shown in the following procedures for Department ID Management.
The default setting is ‘Off’.
|
Registering the Department ID, Password, and Page Limit
1
Press  (Additional Functions) → [System Settings] → [Department ID Management].
(Additional Functions) → [System Settings] → [Department ID Management].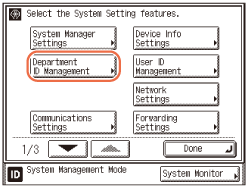
2
Press [On] or [Off].
If you want to use the Department ID Management:
|
1
|
Press [On].
|
|
2
|
Proceed to step 3.
|
If you do not want to use the Department ID Management:
|
1
|
Press [Off].
|
|
2
|
Proceed to step 11.
|
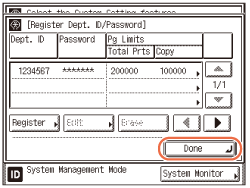
3
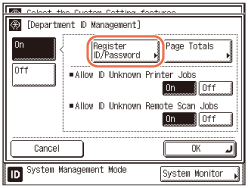
Press [Register ID/Password].
4
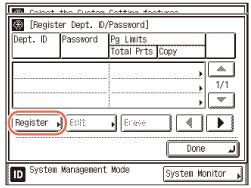
Press [Register].
5
Enter the Department ID and password using  -
-  (numeric keys).
- (numeric keys).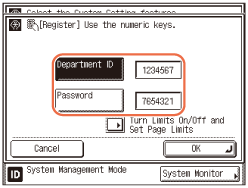
|
1
|
Press [Department ID] → enter the Department ID.
|
|
2
|
Press [Password] → enter the password.
You cannot store a Department ID or password that only consists of zeros, such as <0000000>.
If you enter fewer than seven digits, the machine stores them with leading zeros. Example: If <02> or <002> is entered, <0000002> is stored.
NOTE:
If you make a mistake when entering a number, press
If you do not want to set a password, you can use the machine by entering only the Department ID.
|
6
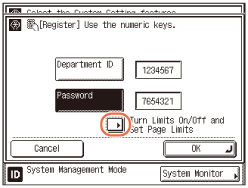
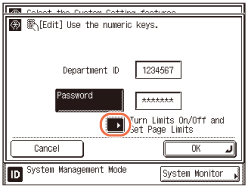
If you want to set a page limit restriction, press [Turn Limits On/Off and Set Page Limits].
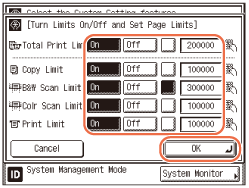
7
Press [On] under the desired function(s).

If you do not want to set a page limit restriction for the function, press [Off].
NOTE:
<Total Print Lim> is the sum of <Copy Limit> and <Print Limit>.
<B&W Scan Limit> is available only when the Send function (optional for the imageRUNNER 2545/2535/2530/2525/2520) is activated or the optional Super G3 Fax Board-AG1 is attached to the machine.
<Color Scan Limit> is available only when the Send function (optional for the imageRUNNER 2545/2535/2530/2525/2520) is activated.
<Color Scan Limit> is available only when the Send function (optional for the imageRUNNER 2545/2535/2530/2525/2520) is activated.
8
Press [ ] (Page Limit) next to [On]/[Off] of the desired function(s) → enter the page limit restriction using - (numeric keys).
] (Page Limit) next to [On]/[Off] of the desired function(s) → enter the page limit restriction using - (numeric keys).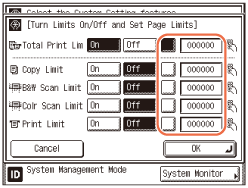
IMPORTANT:
The machine stops sending a fax if the Scan Limit is reached while faxing a document either from memory or directly to the recipient.
The machine stops scanning if the Scan Limit is reached while the machine is scanning originals that are being fed from the feeder. (Those originals that were scanned before the limit was reached are not added to the scan count.)
NOTE:
If you make a mistake when entering a number, press  (Clear) → enter the correct number.
You can set the page limit from 0 to 999,999 pages. Once the page limit is reached, copying, scanning, or printing is not possible.
The page limit refers to the number of printed surfaces. Therefore, a two-sided print is counted as two pages.
9
Press [OK] → [OK].
10
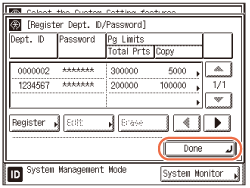
Press [Done].

11
Press [OK].
NOTE:
If you selected [On] in step 2, pressing [OK] activates Department ID Management.
12
Press  (Reset) to return to the top screen.
(Reset) to return to the top screen.Changing the Password and Page Limit
You can change the password and page limit settings that you have registered.
1
Press (Additional Functions) → [System Settings] → [Department ID Management].
(Additional Functions) → [System Settings] → [Department ID Management].For help, see step 1 in Registering the Department ID, Password, and Page Limit.
2
Press [On] → [Register ID/Password].
3
Press [ ] or [
 ] to display the Department ID whose password you want to change → select the Department ID → press [Edit].
] or [] to display the Department ID whose password you want to change → select the Department ID → press [Edit].
NOTE:
Press and hold down [ ] or [
 ] to quickly and continuously scroll through the available Department ID pages. Continuous scrolling is useful when a large number of Department IDs are registered.
] or [] to quickly and continuously scroll through the available Department ID pages. Continuous scrolling is useful when a large number of Department IDs are registered.4
Enter the new password (up to seven digits) using - (numeric keys).
- (numeric keys).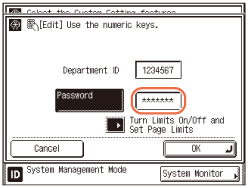
You cannot store a password that only consists of zeros, such as <0000000>. If you enter fewer than seven digits, the machine stores the password with leading zeros.
Example: If <02> or <002> is entered, <0000002> is stored.
NOTE:
If you make a mistake when entering the password, press (Clear) → enter the correct password.
You cannot change the Department ID.
5
If you want to change or set a page limit restriction, press [Turn Limits On/Off and Set Page Limits].
6
Change the page limit restriction if necessary.
|
1
|
Press [On] under the desired function(s).
|
|
2
|
Press [
 ] (Page Limit) next to [On]/[Off] of the desired function(s) → enter the page limit restriction using - (numeric keys). ] (Page Limit) next to [On]/[Off] of the desired function(s) → enter the page limit restriction using - (numeric keys). |
|
3
|
Press [OK] → [OK].
If you do not want to set a page limit restriction for a function, press [Off] under the desired function’s name. The page limit(s) for the selected function(s) are set.
|
NOTE:
If you make a mistake when entering a number, press (Clear) → enter the correct number.
You can set the page limit from 0 to 999,999 pages. Once the page limit is reached, copying, scanning, or printing is not possible.
The page limit refers to the number of printed surfaces. Therefore, a two-sided print is counted as two pages.
7
Press [Done].
8
Press [OK].

9
Press (Reset) to return to the top screen.
(Reset) to return to the top screen.Erasing the Department ID and Password
You can erase the Department ID and password that you have registered.
|
NOTE
|
|
If Department ID Management is activated through the optional Copy Card Reader-F1, you cannot delete the Department IDs from the touch panel display.
|
1
Press (Additional Functions) → [System Settings] → [Department ID Management].
(Additional Functions) → [System Settings] → [Department ID Management].For help, see step 1 in Registering the Department ID, Password, and Page Limit.
2
Press [On] → [Register ID/Password].
3
Press [] or [] to display the Department ID that you want to erase → select the Department ID → press [Erase].
] or [] to display the Department ID that you want to erase → select the Department ID → press [Erase].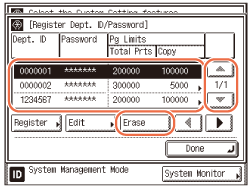
NOTE:
Press and hold down [] or [] to quickly and continuously scroll through the available Department ID pages. Continuous scrolling is useful when a large number of Department IDs are registered.
] or [] to quickly and continuously scroll through the available Department ID pages. Continuous scrolling is useful when a large number of Department IDs are registered.4
Press [Yes].
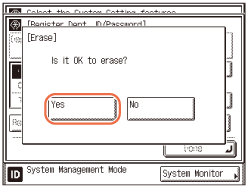
If you do not want to erase the selected Department ID and all of its settings, press [No].
The selected Department ID and all of its settings are erased.
5
Press [Done].
6
Press [OK].

7
Press (Reset) to return to the top screen.
(Reset) to return to the top screen.Checking and Printing Counter Information
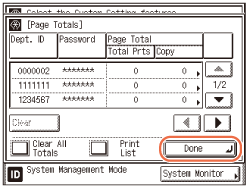
You can display and print a list of page totals for each department.
1
Press (Additional Functions) → [System Settings] → [Department ID Management].
(Additional Functions) → [System Settings] → [Department ID Management].For help, see step 1 in Registering the Department ID, Password, and Page Limit.
2
Press [On] → [Page Totals].
3
Check or print the page total count.
If you only want to check the counter information:
|
1
|
Press [
] or [] to display the desired Department ID → press [ ] or [ ] or [ ] to display and view the desired page totals. ] to display and view the desired page totals.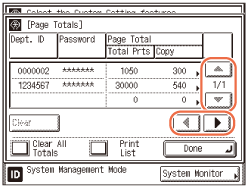 |
NOTE:
Press and hold down [] or [] to quickly and continuously scroll through the available Department ID pages. Continuous scrolling is useful when a large number of Department IDs are registered.
] or [] to quickly and continuously scroll through the available Department ID pages. Continuous scrolling is useful when a large number of Department IDs are registered.The print page totals that belong to print jobs without a Department ID (left blank) are the number of prints from computers that do not correspond with a registered Department ID. These prints are referred to as prints with unknown IDs.
The scan page totals that belong to scan jobs without a Department ID (left blank) are the number of pages that have been scanned from computers that do not correspond with a registered Department ID. The scanned pages from computers are referred to as network scans with unknown IDs.
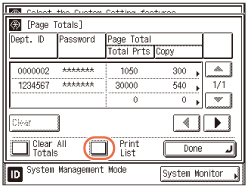
If you want to print the displayed list:
|
1
|
Press [Print List].
 |
|
2
|
Press [Yes].
If you do not want to print the displayed list, press [No].
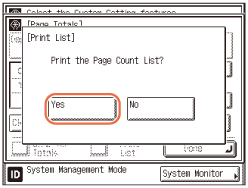 Printing starts.
|
NOTE:
To cancel printing, press [Cancel].
To close the screen that is displayed while the machine is printing the Page Count List, press [Done].
The counter information can be printed only if A3, B4, A4, or A4R (plain, recycled, or color paper) is loaded in a paper source whose settings in Other in Drawer Eligibility For APS/ADS in Common Settings (from the Additional Functions screen) are set to ‘On’. (Configuring the Machine's Basic Settings)
4
Press [Done].

5
Press [OK].

6
Press (Reset) to return to the top screen.
(Reset) to return to the top screen.Clearing Page Totals
You can clear the page totals made for all departments or for specific departments.
1
Press (Additional Functions) → [System Settings] → [Department ID Management].
(Additional Functions) → [System Settings] → [Department ID Management].For help, see step 1 in Registering the Department ID, Password, and Page Limit.
2
Press [On] → [Page Totals].
For help, see step 2 in Checking and Printing Counter Information.
3
Press [Clear All Totals].
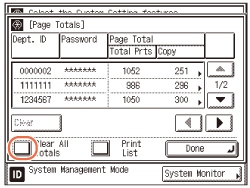
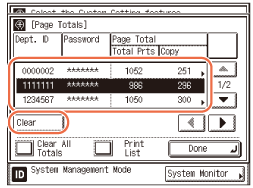
If you want to clear page totals for each Department ID, press [] or [] to display the desired Department ID → select the Department ID → press [Clear].
] or [] to display the desired Department ID → select the Department ID → press [Clear].4
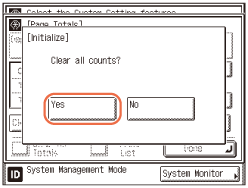
Press [Yes].
If you do not want to clear the page totals, press [No].
The message <Erased.> appears for approximately two seconds on the touch panel display.
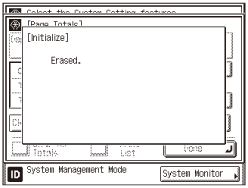
The page totals are cleared.
5
Press [Done].
6
Press [OK].

7
Press (Reset) to return to the top screen.
(Reset) to return to the top screen.Accepting Print and Scan Jobs with Unknown IDs
You can specify whether to accept or reject print and network scan jobs that do not correspond to any registered Department ID.
|
NOTE
|
|
The default settings are as follows:
Allow ID Unknown Printer Jobs: On
Allow ID Unknown Remote Scan Jobs: On
|
1
Press (Additional Functions) → [System Settings] → [Department ID Management].
(Additional Functions) → [System Settings] → [Department ID Management].For help, see step 1 in Registering the Department ID, Password, and Page Limit.
2
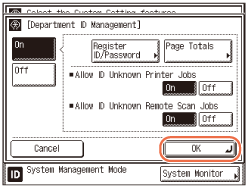
Press [On].
3
Press [On] or [Off] for <Allow ID Unknown Printer Jobs> and <Allow ID Unknown Remote Scan Jobs> → [OK].
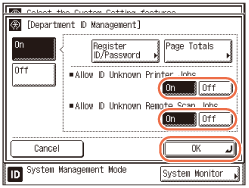
<Allow ID Unknown Printer Jobs>
|
|
[On]:
|
The machine accepts print jobs that do not correspond with a registered Department ID.
|
|
[Off]:
|
The machine does not accept print jobs that do not correspond with a registered Department ID, and you must enter a Department ID and password to operate the machine.
|
<Allow ID Unknown Remote Scan Jobs>
|
|
[On]:
|
The machine accepts remote scan jobs that do not correspond with a registered Department ID.
|
|
[Off]:
|
The machine does not accept remote scan jobs that do not correspond with a registered Department ID.
|
4
Press (Reset) to return to the top screen.
(Reset) to return to the top screen.