LDAP Server
You can specify e-mail addresses and fax numbers by searching the directory listings on the network using LDAP (Lightweight Directory Access Protocol) servers. E-mail addresses and fax numbers obtained via the server can be specified as destinations or stored in the Address Book.
|
IMPORTANT
|
|
If the Language Switch setting is set to ‘On’, some characters are restricted and cannot be entered. To enter all characters, set the Language Switch setting to ‘Off’. (Configuring the Machine's Basic Settings)
You may have to set up the LDAP servers beforehand, depending on the network environment.
If you want to specify or register destinations via an LDAP server, the LDAP server settings must be specified in the machine beforehand. (Setting up the Machine for Your Network Environment)
|
|
NOTE
|
|
The information that can be obtained through the LDAP server varies, as follows:
If only the Send function (optional for the imageRUNNER 2545/2535/2530/2525/2520) is activated: Names and e-mail addresses
If only the optional Super G3 Fax Board-AG1 is attached to the machine: Names and fax numbers
If both the Send function (optional for the imageRUNNER 2545/2535/2530/2525/2520) is activated and the optional Super G3 Fax Board-AG1 is attached to the machine: Names, e-mail addresses, and fax numbers
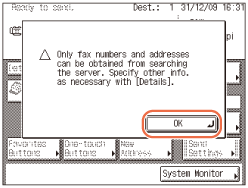
You cannot directly specify a destination that is obtained via a server as a forwarding destination. To specify the destination as a forwarding destination, you must first store it in the Address Book. (Registering Addresses Obtained via an LDAP Server)
|
Specifying Addresses via an LDAP Server
Follow this procedure to specify the destinations via an LDAP server.
1
Press  (SEND) → [Network Add. Book].
(SEND) → [Network Add. Book].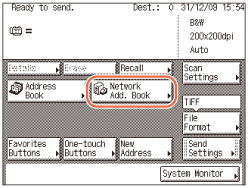
2
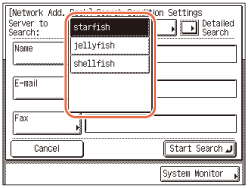
Press the Server to Search drop-down list → select the desired server to search.
3
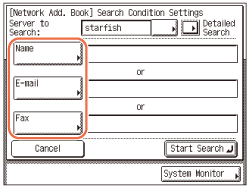
Specify the search criteria.
NOTE:
If a destination has both a registered e-mail address and fax number, you can search for it by entering either the e-mail address or the fax number as the search criterion.
To use Simple Search:
|
1
|
Select [Name], [E-mail], or [Fax].
 |
|
2
|
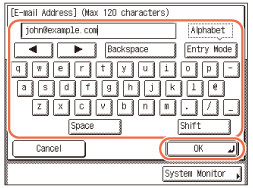
Enter the name, e-mail address, or fax number → press [OK].
 The search criteria boxes that are not filled out, are not searched.
To make a more detailed search with multiple search conditions, press [Detailed Search], and follow the directions below. The search criteria you entered for Simple Search are continuously used in Detailed Search.
|
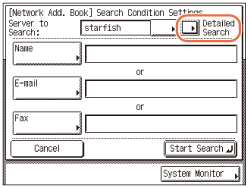
To use Detailed Search:
|
1
|
Press [Detailed Search].
 |
||||||||||||
|
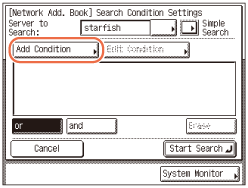
2
|
Press [Add Condition].
 |
||||||||||||
|
3
|
Press the search category drop-down list → select the desired search category.
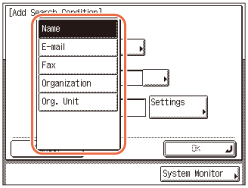
For example, if cn(common name)=user1, ou(organization unit)=salesdept, o(organization)=canon, c(country)=jp is the distinguished name in the directory, enter [Organization]/[Org. Unit] of the user as follows:
[Organization]=canon [Org. Unit]=salesdept NOTE:
[Oganization]/[Org. Unit] can be used as search categories only if the information has been registered on the LDAP Server.
Detailed Search by [Oganization]/[Org. Unit] may not be performed, depending on whether the attribute types have been registered on the LDAP server and depending on the type of application on the server.
You can also add additional user-defined search attributes. For instructions on how to register or edit a search attribute, see Setting up the Machine for Your Network Environment.
|
||||||||||||
|
4
|
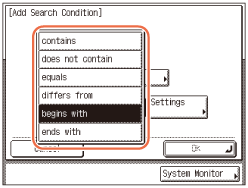
Press the search condition drop-down list → select the desired search condition.
|
||||||||||||
|
5
|
Press [Settings].
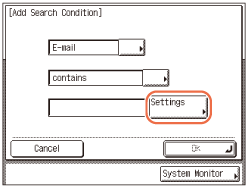 |
||||||||||||
|
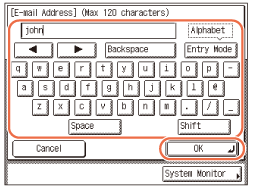
6
|
Enter the search criterion → press [OK].
 |
||||||||||||
|
7
|
Press [OK].
 |
||||||||||||
|
8
|
To continue adding more search criteria, press [or] or [and] → repeat step 3.
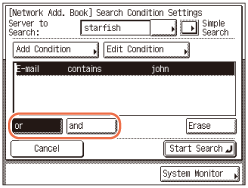
To edit the search criteria, select the search criterion that you want to edit → press [Edit Condition] → [Settings].
To delete the search criteria, select the criterion that you want to delete → press [Erase].
NOTE:
You can specify up to four different search criteria at a time.
If you specify three or more search criteria, you cannot use both [or] and [and] together.
If you press [Simple Search] → [Yes] after specifying search criteria on the Detailed Search screen, the display changes to the Simple Search screen and the specified detailed search criteria are deleted.
|
4
Press [Start Search].

To cancel searching while the machine is searching for your criteria, press [Cancel]. If the machine finds some results before you press [Cancel], these search results are displayed.
IMPORTANT:
Searching for a destination via an LDAP server is not possible if the time setting of the server and the time setting of the machine are more than five minutes apart. If you cannot send even when the user name and password are correct, check the time settings on the server and the machine.
The number of search results displayed will not exceed the maximum limit set in Register LDAP Server in System Settings. (Setting up the Machine for Your Network Environment) If the desired destination is not displayed, either increase the maximum number of addresses to search, or change the search criteria.
NOTE:
If you press [Start Search] without specifying any search criteria, all of the addresses stored on the LDAP server are displayed.
If the Enter Network Password screen is displayed, enter your user name and network password → press [OK].
The Enter Network Password screen is displayed if either one of the following is true:
If <Login Information> in Register LDAP Server in System Settings is set to ‘Use’ or ‘Use (security authent.)’, and <Display authentication screen> is set to ‘On’. (Setting up the Machine for Your Network Environment)
If the user name, password, and domain name specified in Register LDAP Server in System Settings are incorrect. (Setting up the Machine for Your Network Environment)
5
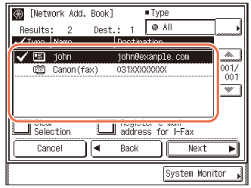
Select the desired destination from the search results → press [OK].
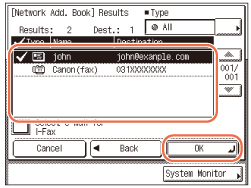
You can select up to 32 destinations.
If you press [Select e-mail for I-Fax], the selected e-mail address can be specified as an I-fax destination.
To continue searching, press [Back].
NOTE:
To cancel a selected destination, select the destination again to clear the check mark.
If both the Send function (optional for the imageRUNNER 2545/2535/2530/2525/2520) is activated and the optional Super G3 Fax Board-AG1 is attached to the machine, you can sort and limit the view of the displayed addresses by using the Type drop-down list.
The destinations you can specify may vary depending on the settings under <Send Restriction Settings>. (Customizing Settings) For example, if E-mail Send is set to ‘Do not allow’ or ‘Only allow sending to own address’, e-mail addresses are not displayed as the search results.
If a fax number or I-fax address is specified as the destination, read the displayed message → press [OK].
Registering Addresses Obtained via an LDAP Server
Follow this procedure to register the destinations that are obtained by searching the directory listings on the network using LDAP (Lightweight Directory Access Protocol) servers.
Registering in the Address Book
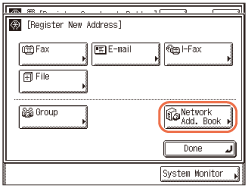
1
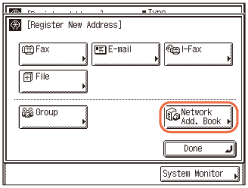
Display the Register Address screen → press [Register New Add].
For help, see steps 1 and 2 in E-Mail Addresses.
2
Press [Network Add. Book].
3
Follow steps 2 to 4 in Specifying Addresses via an LDAP Server to search destinations.
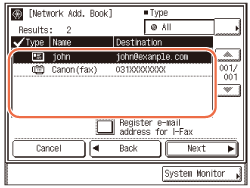
4
Select the desired destination from the search results.
You can select up to 32 destinations.
If you want to select the first 32 destinations, press [Select All (Max 32)]. (If a destination is selected, the key changes to [Clear Selection].)
If you press [Register e-mail address for I-Fax], the selected e-mail address can be registered as an I-fax destination. To register e-mail addresses as I-fax addresses, register one e-mail address at a time.
To continue searching, press [Back].
NOTE:
To cancel a selected destination, select the destination again to clear the check mark.
If both the Send function (optional for the imageRUNNER 2545/2535/2530/2525/2520) is activated and the optional Super G3 Fax Board-AG1 is attached to the machine, you can sort and limit the view of the displayed addresses by using the Type drop-down list.
The destinations you can specify may vary depending on the settings under <Send Restriction Settings>. (Customizing Settings) For example, if E-mail Send is set to ‘Do not allow’ or ‘Only allow sending to own address’, e-mail addresses are not displayed as the search results.
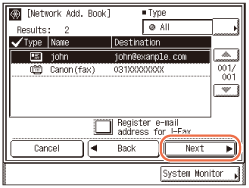
5
Press [Next] to register the selected destination.

If only one destination is selected:
|
1
|
Confirm the address → press [Next].
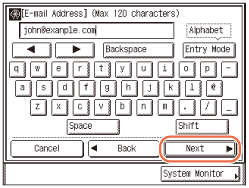 If necessary, edit the address. (Editing/Deleting the Registered Information in the Address Book)
|
|
2
|
Enter the register name (up to 16 characters) using the on-screen keyboard → press [OK].
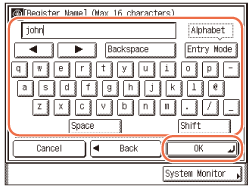 NOTE:
For instructions on how to enter characters, see Basic Operations.
The first character of the register name is used for sorting the address list when you press keys, such as [ABC] and [DEF], on the Address Book screen. For instructions on how to use the Address Book, see Using the Address Book.
|
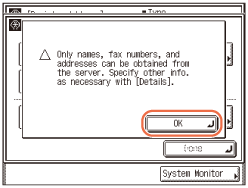
If multiple destinations are selected:
|
1
|
Confirm the displayed message → press [OK].
 |
6
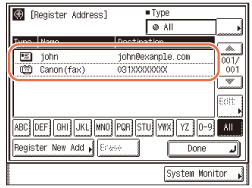
Press [Done].
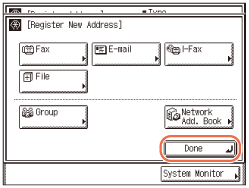
The display returns to the Register Address screen.
The address and register name you specified appear on the Register Address screen as follows:
7
Press  (Reset) to return to the top screen.
(Reset) to return to the top screen.Registering in the One-Touch Button
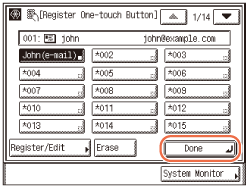
1
Display the Register One-touch Button screen → press [Register/Edit].
For help, see steps 1 and 2 in Registering the One-Touch Buttons.
2
Press [Network Add. Book].
3
Follow steps 2 to 4 in Specifying Addresses via an LDAP Server to search destinations.
4
Select the desired destination from the search results.
You cannot select multiple destinations at a time.
If you press [Register e-mail address for I-Fax], the selected e-mail address can be registered as an I-fax destination. To register e-mail addresses as I-fax addresses, register one e-mail address at a time.
To continue searching, press [Back].
NOTE:
To cancel a selected destination, select the destination again to clear the check mark.
If both the Send function (optional for the imageRUNNER 2545/2535/2530/2525/2520) is activated and the optional Super G3 Fax Board-AG1 is attached to the machine, you can sort and limit the view of the displayed addresses by using the Type drop-down list.
The destinations you can specify may vary depending on the settings under <Send Restriction Settings>. (Customizing Settings) For example, if E-mail Send is set to ‘Do not allow’ or ‘Only allow sending to own address’, e-mail addresses are not displayed as the search results.
5
Press [Next] to register the selected destination.
6
Confirm the address → press [Next].

If necessary, edit the address. (Editing/Deleting the Registered Information in the Address Book)
7
Enter the register name (up to 16 characters) using the on-screen keyboard → press [Next].

NOTE:
For instructions on how to enter characters, see Basic Operations.
The first character of the register name is used for sorting the address list when you press keys, such as [ABC] and [DEF], on the Address Book screen. For instructions on how to use the Address Book, see Using the Address Book.
8
Enter the one-touch button name (up to 12 characters) → press [OK].

9
Press [Done].
10
Press (Reset) to return to the top screen.
(Reset) to return to the top screen.