Specifying the Authorized Send Settings (imageRUNNER 1435iF Only)
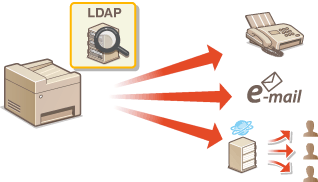
Authorized Send is a security feature that uses an LDAP server in the network to prevent unauthorized e-mails, files, or faxes. With this feature, users are required to authenticate themselves with their own logon information, which is registered to the LDAP server, before sending documents. Authorized Send also enables you to restrict the sending of documents only to registered destinations or completely prohibit users from sending documents.
|
NOTE
System Requirements |
|
LDAP servers that are supported by the machine are Windows Server 2003/Server 2008/Server 2012 Active Directory.
The machine communicates with LDAP servers using LDAPv3.
UTF-8 is the supported character encoding used when the text data is transmitted between the machine and an LDAP server.
Authorized Send is not available in an IPv6 environment.
|
1
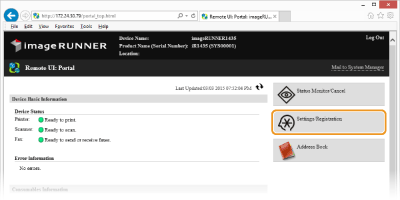
Start the Remote UI and log on in System Manager Mode. Starting the Remote UI
2
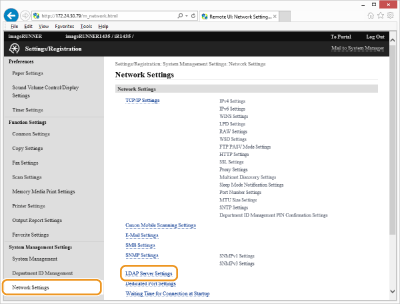
Click [Settings/Registration].
3
Click [Network Settings]  [LDAP Server Settings].
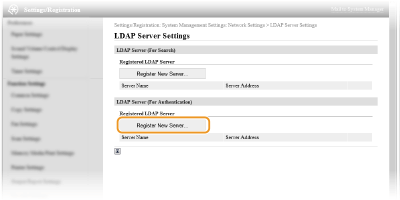
4
Click [Register New Server...] in [LDAP Server (For Authentication)].
NOTE:
To edit registered server information
To edit registered server information
Click a text link under [Server Name] for the edit screen.
To delete registered server information
Click [Delete] on the right of the server name you want to delete click [OK].
5
Specify the required settings.
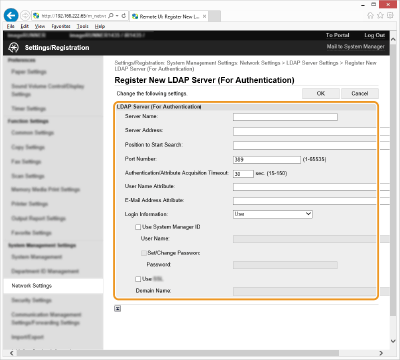
[Server Name]
Enter up to 24 alphanumeric characters for the LDAP server name.
[Server Address]
Enter the IP address of the LDAP server or enter up to 47 alphanumeric characters for the host name of the server (Example: ldap.example.com).
IMPORTANT:
[Server Address] and DNS
[Server Address] and DNS
To prevent errors from occurring when searching for destinations, make sure to check the following:
If the host name is entered for [Server Address], make sure that a DNS server is available in the network.
If the IP address is entered for [Server Address], check whether the DNS server supports only forward lookup. If the server supports only forward lookup, select [Use] for [Login Information:]. If you select [Use (Security Authentication)], make sure that the DNS server supports reverse lookup.
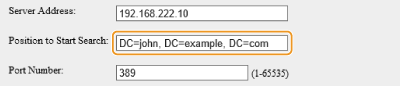
[Position to Start Search:]
Specify the node in the directory information tree (DIT) that you want to start search from. Leaving the text box blank sets the machine to start search from an arbitrary node selected automatically.
Depending on the type of characters used, up to 120 characters can be entered.
When specifying the node, enter "DC=", followed by a host name (a dot-delimited character string in the Active Directory domain name), and separate each of the entries with a comma. If the domain name is "john.example.com", for example, enter "DC=john,DC=example,DC=com."
[Port Number:]
Enter the port number used for communicating with the LDAP server. The default port number is 389 unless the [Use TLS] check box is selected.
[Authentication/Attribute Acquisition Timeout:]
Specify how long the machine searches. Enter between 30 and 300 seconds.
[User Name Attribute:]
Specify the user name attribute for a user to logon to the LDAP server. The setting is validate when you select [Use] in [Login Information:]. Up to 64 characters can be entered. Leaving the text box blank sets the machine to specify the user name attribute automatically.
[E-Mail Address Attribute:]
Specify the e-mail address attribute in the LDAP server. The attribute is used to specify the e-mail address when you select [Only Allow Sending to Myself] in [E-Mail Sending:]. Up to 64 characters can be entered. Leaving the text box blank sets the machine to specify the e-mail address attribute automatically.
[Login Information:]
Select [Use] or [Use (Security Authentication)] depending on the type of authentication implemented by the LDAP server.
|
[Use]
|
Select to authenticate the machine using the login information.
|
|
[Use (Security Authentication)]
|
Select to use data obtained by Kerberos, a network authentication protocol, for the authentication password. If this setting is selected, the clock of the machine needs to be synchronized with that of the LDAP server (Configuring SNTP).
|
[Use System Manager ID]
Select the check box to log on with the user name (DN) of the LDAP server’s administrator. If the check box is selected, the user name and password must be specified.
[User Name]
When the [Use System Manager ID] check box is selected, enter the user name of the LDAP server’s administrator in the form "(user name)" (Example: ldap1).
[Set/Change Password]
To specify or change the password, select the check box and enter up to 24 characters in the [Password:] text box.
[Use TLS]
Select the check box to use TLS for encrypting communication with the LDAP server. If the check box is selected, the [Port Number:] setting changes to "636".
[Domain Name:]
When [Use (Security Authentication)] is selected for [Login Information:], enter up to 120 alphanumeric characters for the directory tree name in Active Directory (Example: example.com).
6
Click [OK].
7
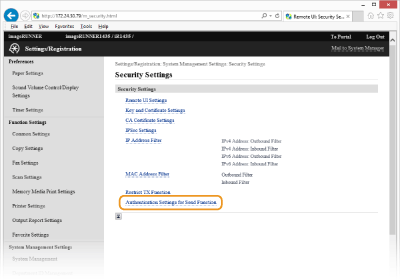
Click [Security Settings] [Authentication Settings for Send Function]
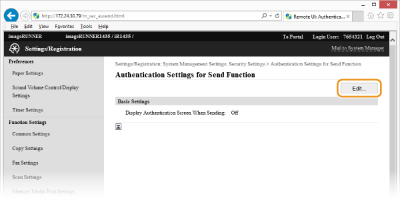
8
Click [Edit...].
9
Select the [Display Authentication Screen When Sending Operation Starts] check box to enable Authorized Send.
If you want the machine to display a confirmation screen when  is pressed to log off, also select the [Display Confirmation Screen When Logging Out] check box.
is pressed to log off, also select the [Display Confirmation Screen When Logging Out] check box.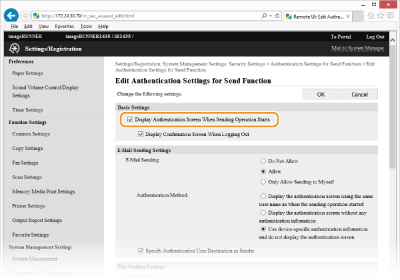
10
Specify the settings as necessary.
 Specifying settings for sending e-mail
Select whether or not to restrict users from sending e-mails, and specify how users authenticate themselves to the SMTP server.
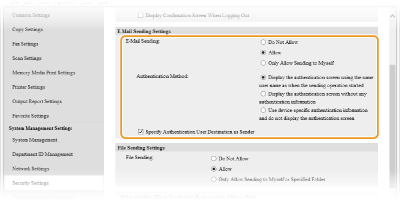
[E-Mail Sending]
Click the radio button for enabling, disabling, or restricting e-mail transmissions.
Click the radio button for enabling, disabling, or restricting e-mail transmissions.
|
[Do Not Allow]
|
Select to disable users from sending e-mails from the machine.
|
|
[Allow]
|
Select to enable users to send e-mails from the machine.
|
|
[Only Allow Sending to Myself]
|
Select to restrict the destination of documents being sent to the e-mail addresses of a logged-on users.
|
[Authentication Method:]
Click the radio button to specify how users authenticate themselves to the SMTP server.
Click the radio button to specify how users authenticate themselves to the SMTP server.
|
[Display the authentication screen using the same user name as when the sending operation started]
|
Select to have users confirm their user names and passwords on the authentication screen before e-mail transmissions. When the screen is displayed, the user name and password of the logged-on user are already entered in the corresponding text boxes.
|
|
[Display the authentication screen without any authentication information]
|
Select to require users to enter their user names and passwords on the authentication screen each time they send e-mails. A screen with blank text boxes is displayed before e-mail transmissions.
|
|
[Use device-specific authentication information and do not display the authentication screen]
|
Select to use the user name and password of the machine for SMTP authentication. The authentication screen for entering the user name and password is not displayed when e-mails are sent. Configuring the Machine for Scanning to E-mail
|
NOTE:
For more information about the SMTP authentication, contact your Internet service provider or your Network Administrator.
[Specify Authentication User Destination as Sender]
Select the check box to use the e-mail address of the user currently logged on. Clear the check box to use the e-mail address of the machine (Configuring E-mail Settings).
Specifying settings for sending files
Select whether or not to restrict users from sending files via SMB/FTP, and specify how users authenticate themselves to the shared folder or the file server.
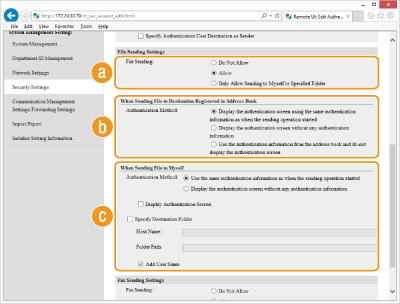
 [File Sending:]
Click the radio button for enabling, disabling, or restricting file transmissions.
|
[Do Not Allow]
|
Select to disable users from sending files from the machine.
|
|
[Allow]
|
Select to enable users to send files from the machine.
|
|
[Only Allow Sending to Myself or Specified Folder]
|
Select to restrict the destination of documents to be sent to the folder of a logged-on user or to the folder specified in the [Specify Destination Folder] setting. The folder location of a logged-on user is defined by the LDAP home directory setting and depends on the [When Sending File to Myself] setting.
|
 [When Sending File to Destination Registered in Address Book]
If [Allow] is selected for [File Sending:], click the radio button to specify how users authenticate themselves to the file server that they selected from the Address Book.
|
[Display the authentication screen using the same authentication information as when the sending operation started]
|
Select to have users confirm their user names and passwords on the authentication screen before file transmissions. When the screen is displayed, the user name and password of the logged-on user are already entered in the corresponding text boxes.
|
|
[Display the authentication screen without any authentication information]
|
Select to require users to enter their user names and passwords on the authentication screen each time they send files. A screen with blank text boxes is displayed before file transmissions.
|
|
[Use the authentication information from the address book and do not display the authentication screen]
|
Select to authenticate users by confirming the user name and password registered in the address book. If you select this setting, the authentication screen is not displayed.
|
 [When Sending File to Myself]
[Authentication Method:]
When [Only Allow Sending to Myself or Specified Folder] is selected for [File Sending:], click the radio button to specify how users authenticate themselves to the file server.
|
[Use the same authentication information as when the sending operation started]
|
Select to automatically authenticate users or have users confirm their user names and passwords on the authentication screen before file transmissions. If this option is selected, also set the [Display Authentication Screen] setting. When the authentication screen is displayed, the user name and password of the logged-on user are already entered in the corresponding text boxes.
|
|
[Display the authentication screen without any authentication information]
|
Select to require users to enter their user names and passwords on the authentication screen each time they send files. A screen with blank text boxes is displayed before file transmissions.
|
[Display Authentication Screen]
Select the check box to display the authentication screen to confirm the user name and password. This setting is available only when [Use the same authentication information as when the sending operation started] is selected for [Authentication Method:].
[Specify Destination Folder]
If you want to manually specify a destination folder when [Only Allow Sending to Myself or Specified Folder] is selected for [File Sending:], select the check box and specify the [Host Name:] and the [Folder Path:] text boxes.
[Host Name:]
Enter the name or the IP address of the computer where the destination folder is located.
[Folder Path:]
Enter the name of (or path to) the destination folder. Note that the valid character limit for the folder name is up to 120 characters including the user name that is added with the [Add User Name:] setting.
[Add User Name:]
Select the check box to add the user name of a logged-on user to the folder path. When the check box is selected, files are sent to a user-specific folder created under the specified destination folder.
Selecting fax sending
You can enable or disable faxing. Select the setting to suit your needs.
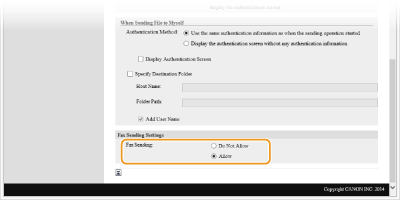
[Fax Sending:]
|
[Do Not Allow]
|
Select to disable users from sending faxes from the machine.
|
|
[Allow]
|
Select to enable users to send faxes from the machine.
|
|
NOTE
|
|
You cannot disable PC faxing by specifying the setting here.
|
11
Click [OK].
12
Restart the machine.
Turn OFF the machine, wait for at least 10 seconds, and turn it back ON.