Registering a Custom Paper Size for the Multi-Purpose Tray
You can register up to three frequently used custom paper sizes.
1
Press  (Paper Selection/Settings).
(Paper Selection/Settings).If the <Select Paper> screen shown below is displayed, use  /
/ to select <Paper Settings>, and press
  .
.
/ to select <Paper Settings>, and press .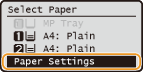
2
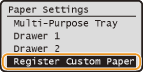
Select <Register Custom Paper>, and press .
.
3
Select <Not Registered>, and press .
.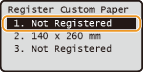
If paper sizes <1> to <3> have already been registered, either change or delete the setting to continue. The procedures for changing and deleting these settings are described below.
 Changing a setting
|
1
|
Select the registered size you want to change, and press
. |
|
2
|
Select <Edit>, press
, and proceed to step 4.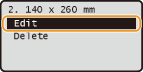 |
Deleting a setting
|
1
|
Select the registered size you want to delete, and press
. |
|
2
|
Select <Delete>, and press
.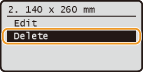 |
|
3
|
Select <Yes>, and press
.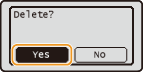 |
4
Specify the paper size.
|
1
|
Specify the length of the <X> (shorter) side.
Select <X>, and press
.Input the length of the <X> side using
/ or the numeric keys, and press .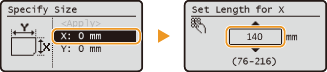 |
|
2
|
Specify the length of the <Y> (longer) side.
Select <Y>, and press
.Input the length of the <Y> side, and press
.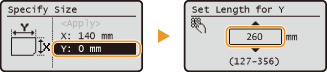 |
|
3
|
Select <Apply>, and press
. |
5
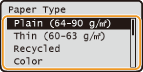
Select the paper type, and press .
.
Selecting a Registered Custom Paper Setting
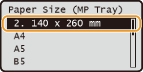
When paper is loaded in the multi-purpose tray, the screen for selecting the paper size for the multi-purpose tray is displayed. The paper sizes registered in the procedure above are displayed on this screen. Specifying Paper Size and Type in the Multi-Purpose Tray
NOTE:
The registered paper sizes are also displayed when you set the default paper settings for the multi-purpose tray. From the screen, you can select one of the displayed sizes as the default paper size for the multi-purpose tray. Registering Default Paper Settings for the Multi-Purpose Tray
The registered paper sizes are also displayed when you set the default paper settings for the multi-purpose tray. From the screen, you can select one of the displayed sizes as the default paper size for the multi-purpose tray. Registering Default Paper Settings for the Multi-Purpose Tray