Monitoring Fax Reception Jobs
The Printer Monitor main icon status is alternately displayed with the fax received notification icon in the Taskbar. The fax received notification message or sound can be set to notify you that a fax has been received.
|
NOTE
|
|
To monitor fax reception with the status display icon on the Taskbar, the following conditions must be met.
The device information was retrieved in Desktop Monitor Setup
The device supports iW Desktop Supported Device
For information on retrieving device information in Desktop Monitor Setup, see the following.
Monitoring can also be performed in the Quick Printing Tool. For more information, see the following.
The default settings of Windows 7/Windows 8/Windows 8.1/Windows 10 restrict icons displayed in the Taskbar notification area. See the following to display the Printer Monitor icons in the Taskbar notification area.
|
1.
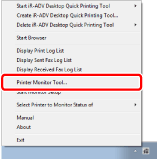
Right-click  (Main) on the Taskbar, and select [Printer Monitor Tool].

The [Printer Monitor Settings] dialog box is displayed.
2.
Select the following check boxes as necessary.

|
[Display notification for received faxes using Printer Monitor icon]
|
When you select this check box, after a fax is received, the status display is displayed alternately with the fax received notification in the main icon on the Taskbar.
|
|
[Notify by message when fax is received]
|
When this check box is selected, the received message is displayed on the desktop.
|
|
NOTE
|
|
For more information on displaying fax received notifications and messages, see the following.
|
3.
Select [Notify by sound when fax is received] to be notified with a sound.

4.
Specify the notification sound in [Notification Sound].
To use the Windows message (information) sound, select [Use default sound]. To use a different sound, select [Change sound].

|
NOTE
|
|
When [Change sound] is selected, the sound file specified for [File Name] is set as the notification sound. The wav/wave format sound files selected by clicking [Browse] are displayed in [File Name] and can be specified as the notification sound.
When [Change sound] is selected, you can confirm the sound by clicking [Play].
If [Change sound] is selected, confirm the following and select the file.
File path: Within 255 characters
File size: Within 10 MB
Click [OK] or [Cancel] to stop the sound.
|
5.
Click [OK].
The notification method of received faxes is configured.
6.
In the [Monitoring Settings] tab on the [imageRUNNER ADVANCE Desktop Quick Printing Tool Settings] dialog box for the device to monitor, select the [Monitor received fax jobs] check box.

The job status will be displayed in Printer Monitor when a fax job is received.
|
NOTE
|
|
For details on the [imageRUNNER ADVANCE Desktop Quick Printing Tool Settings] dialog box, see the following.
|