Making SMB Settings
This section describes setup steps to share files and printers among multiple devices on the network utilizing the SMB protocol. Enabling the SMB server functions makes it possible for the Advanced Space to be used as a SMB file server.
1
Press  .
.
 .
.2
Press <Preferences>  <Network>
  <TCP/IP Settings>
  <SMB Server Settings>.
 <Network>
  <TCP/IP Settings>
  <SMB Server Settings>.
3
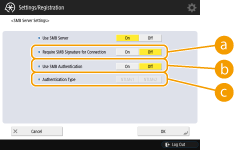
Select <On> in <Use SMB Server> and carry out the necessary setup.

 <Require SMB Signature for Connection>
To set so that an SMB packet signature is requested when connecting to the SMB server, press <On>.
 <Use SMB Authentication>
User authentication is conducted by using user information in the Advanced Space. To conduct user authentication, press <On>.
 <Authentication Type>
Select the version of the authentication protocol. Select <NTLMv1> or <NTLMv2>, according to your operating system. You can also select both.
4
Press <OK>.
5
Press 


 <Apply Set. Changes>
  <Yes>.


 <Apply Set. Changes>
  <Yes>.
 |
|
Depending on the network settings, an error may be displayed when sending to the SMB server. In this case, specify the time settings for SMB client timeout. <SMB Client Timeout>
|