Registering the Paper Size and Type for a Paper Source
You can register the paper size and type for each paper source. This setting enables you to achieve the appropriate print results.
|
IMPORTANT
|
|
Be sure to correctly set the paper type. If the type of paper is not set correctly, it could adversely affect the quality of the image. Moreover, the fixing unit may become dirty and require a service repair, or the paper could jam.
|
1.
Load paper in the paper source.
|
NOTE
|
|
For more information on the available paper for each paper sources, see "Available Paper Stock."
For more information on how to load paper, see "Loading Paper."
|
2.
Press  (Settings/Registration).
(Settings/Registration).3.
Press [Preferences] → [Paper Settings] → [Paper Settings].
4.
Set the loaded paper size in the paper source buttons.
The numbers on the screen represent the following paper sources:
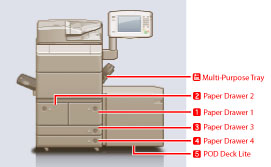
The POD Deck Lite-A1 is attached.
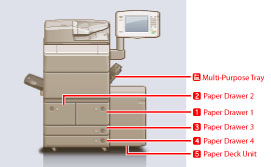
The Paper Deck Unit-C1 is attached.
If you load standard size paper:
Check if the displayed paper size, which is detected automatically, is correct.
|
NOTE
|
|
If the displayed paper size is different from the loaded paper size, paper may not be loaded properly. For more information on loading paper, see "Loading Paper."
If [Custom] is displayed as the paper size when you load standard sized paper, press [Custom Size] → [Cancel Settings]. The proper paper size will be detected automatically and displayed on the screen.
|
If you load custom size paper:
Select the button for the paper source in which you loaded paper → press [Custom Size].
Enter the paper size → press [OK].
|
NOTE
|
|
You can select a button ([S1] to [S5]) containing a stored paper size setting, instead of entering values.
|
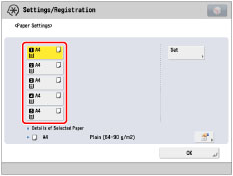
5.
Select the button for the paper source in which you loaded paper → press [Set].
6.
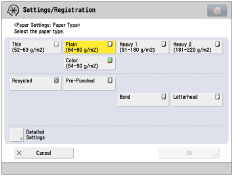
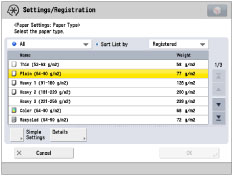
Select the same paper type as the one you loaded → press [OK] → [OK].
To load paper in the POD Deck Lite-A1, press [Register Size] → specify the paper type to load.
You can select the paper type from the simple or detailed setting screen. For paper types that are not displayed on the simple setting screen, press [Detailed Settings] → select the paper type from the detailed setting screen.
 |
 |
|
Simple Settings Screen
|
Detailed Settings Screen
|
If you load tab paper:
Select [Tab] → press [No. of Tabs].
Specify the number of tabs → press [OK] → [OK].
|
NOTE
|
|
You can register paper types if paper types for the loaded paper are not displayed on the detailed setting list. For instructions on registering paper types, see "Registering/Editing Custom Paper Types."
|
|
NOTE
|
|
You can also specify the paper type from the Status Monitor/Cancel screen. (See "Checking the Status of Consumables and Other Information.")
|