Before Using the WSD Scan
To use the WSD Scan function, you must specify the following settings:
Connect the machine to a network (See "Network Environment Setup Procedures.")
|
NOTE
|
|
If you change the network settings, you need to restart the machine. For instructions on turning ON/OFF the machine, see "Main Power and Energy Saver Key."
|
Connect a computer to a same domain as the machine
Set [Department ID Management] to 'Off' (See "Specifying Department ID Management.")
Set [Use WSD Scan Function] to 'On'
|
1.
|
Press
 (Settings/Registration). (Settings/Registration). |
|
2.
|
Press [Preferences] → [Network] → [TCP/IP Settings].
|
|
3.
|
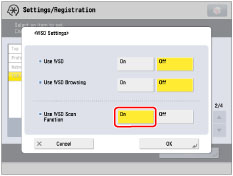
Press [WSD Settings].
|
|
4.
|
Press [On] for <Use WSD Scan Function>.
|
 |
|
|
5.
|
Press [OK] → [Close].
|
Install a driver which supports WSD Scan functions
|
1.
|
Click
 (Start) → [Devices and Printers]. (Start) → [Devices and Printers]. |
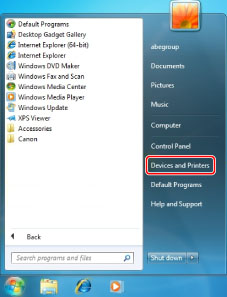 |
|
|
2.
|
Click [Add a device].
|
 |
|
|
3.
|
Select this machine from the displayed list → click [Next].
|
|
IMPORTANT
|
|
If the firewall setting is set to 'On', this machine may not be displayed. In this case, set the firewall setting to 'Off'.
You cannot use the WSD Scan functions in the following cases
When the ACCESS MANAGEMENT SYSTEM KIT is activated
When the imagePASS is used
Scanning from a feeder may stop due to the internal operations of the Windows operating system. In this case, wait for a while and try again.
|