Loading Paper into the Paper Deck Unit-C1/POD Deck Lite-A1 (Optional)
If you attach the Paper Deck Unit-C1 or POD Deck Lite-A1 to the machine, you have one additional source of paper for printing jobs.
The Paper Deck Unit-C1 or POD Deck Lite-A1 hold up to 3,500 sheets of paper (80 g/m2).
|
IMPORTANT
|
|
If the machine is in the Sleep mode (the touch panel is not displayed, and only
 (Energy Saver) is lit), you may be unable to open the paper deck unit. In this case, press (Energy Saver) to reactivate the machine, and then press the open button on the paper deck unit. (Energy Saver) is lit), you may be unable to open the paper deck unit. In this case, press (Energy Saver) to reactivate the machine, and then press the open button on the paper deck unit. |
|
NOTE
|
||||
|
The Paper Deck Unit-C1 and POD Deck Lite-A1 are optional products.
The following paper sizes can be loaded into the Paper Deck Unit-C1 or POD Deck Lite-A1:
The paper size of the Paper Deck Unit-C1 is fixed to A4 or B5. For instructions on changing the paper size that can be loaded in the Paper Deck Unit-C1, contact your local authorized Canon dealer.
|
Loading Paper into the Paper Deck Unit-C1/POD Deck Lite-A1
If you select the paper deck when it has no paper, or if the paper deck runs out of paper during a print job, a screen prompting you to load paper appears on the touch panel display.
Follow the procedure below to load paper into the paper deck.
 CAUTION CAUTION |
|
When handling paper, take care not to cut your hands on the edges of the paper.
|
|
IMPORTANT
|
|
The following paper weight can be loaded into the Paper Deck Unit-C1 and POD Deck Lite-A1:
Paper Deck Unit-C1: 52 to 220 g/m2
POD Deck Lite-A1: 52 to 256 g/m2
If paper runs out and printing is stopped when you are printing in the Staple mode, do not remove the output sheets that are waiting to be stapled. (Printing and stapling resume after you clear the paper jam.)
|
|
NOTE
|
|
If a message prompting you to load paper appears during printing, the remaining prints are automatically made after you load the correct paper. If you select a different paper source, the remaining prints are made after you press [OK].
|
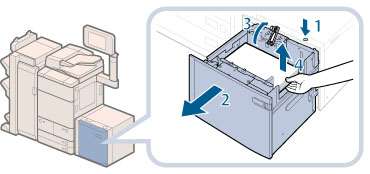
1.
Open the paper deck unit.
 |
1. Press the open button. |
2. Open the paper deck unit.The inside lifter automatically descends to the paper loading position.
|
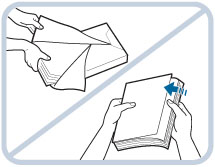
2.
Prepare the paper to load.
|
NOTE
|
|
For high-quality printouts, use paper recommended by Canon.
Before loading paper, always fan the sheets several times, and align the edges to facilitate feeding.
|
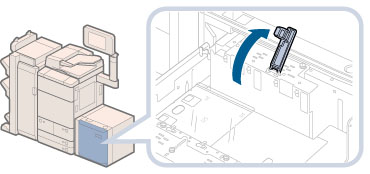
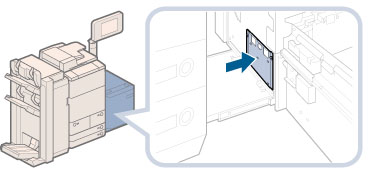
3.
Lift the feeding support roller.
If the Paper Deck Unit-C1 is attached, proceed to step 4.
|
IMPORTANT
|
|
When loading paper, be sure to first lift the feeding support roller. If you load paper without raising the feeding support roller, it may become detached, and paper may not be fed properly.
Use of the paper deck with the feeding support roller detached, may cause paper jams.
|
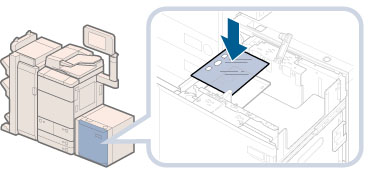
4.
Load the paper stack into the paper deck unit.

Paper Deck Unit-C1
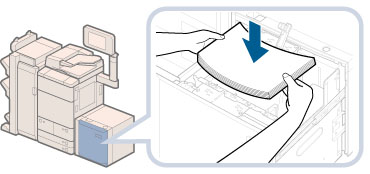
POD Deck Lite-A1
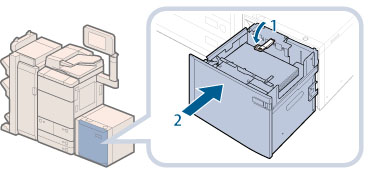
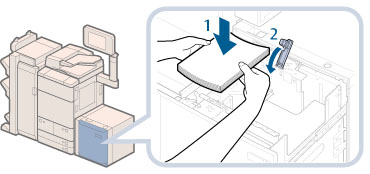
5.
Lower the feeding support roller and close the paper deck unit.
|
CAUTION |
|
When closing the paper deck unit, be careful not to get your fingers caught, as this may result in personal injury.
|
|
IMPORTANT
|
|
Do not load the following types of paper into the Paper Deck Unit-C1. Doing so may cause a paper jam.
Severely curled or wrinkled paper
Thin straw paper
Heavy paper (more than 220 g/m2)
Paper which has been printed on using a thermal transfer printer
The reverse side of paper which has been printed on using a thermal transfer printer
Coated paper
Tracing paper
Transparencies
Tab paper
Labels
Do not load the following types of paper into the POD Deck Lite-A1. Doing so may cause a paper jam.
Severely curled or wrinkled paper
Thin straw paper
Paper which has been printed on using a thermal transfer printer
The reverse side of paper which has been printed on using a thermal transfer printer
Coated paper
Tracing paper
Tab paper
Paper which is curled must be straightened out before loading it into the paper deck unit.
Do not load paper into the Paper Deck Unit-C1/POD Deck Lite-A1 that has been previously copied onto, as this may result in a malfunction or damage to the copier. Always use the multi-purpose tray to feed paper when you want to copy onto the back of a sheet of paper that already has something copied on its front side (2nd side of 2-Sided copy).
Make sure that the size change plate in the POD Deck Lite-A1 is properly aligned with the marks for the desired paper size. If the size change plate is not properly aligned, the POD Deck Lite-A1 may become damaged.
Never place paper or any other items in the empty part of the paper deck unit next to the paper stack. Doing so may cause paper jams.
A paper blower is attached inside of the POD Deck Lite-A1. Do not insert paper clips or other foreign objects into the blower port.
Paper jams may occur if you load paper into the POD Deck Lite-A1 in a low humidity environment. If paper jams occur, follow the instructions on the touch panel display to remove the jammed paper. In addition, make sure that the loaded paper is not curled (See "Paper Deck Unit-C1/POD Deck Lite-A1 (Optional)."). Paper curls must be straightened out prior to loading.
You will not be able to make copies or print if you load paper that exceeds the loading limit mark (
 ), or if the paper drawer is not completely pushed into the paper deck unit. ), or if the paper drawer is not completely pushed into the paper deck unit.Make sure that the height of the paper stack does not exceed the loading limit mark (
).Always check that the paper deck unit is in place.
|
|
NOTE
|
|
Load the paper stack in stages, adding approximately 550 sheets of paper at a time. If the Paper Deck Unit-C1 or POD Deck Lite-A1 can accommodate more paper, the lifter will descend.
For more information on aligning the size change plate of the POD Deck Lite-A1, see "Changing the Paper Size for the POD Deck Lite-A1."
Hot air that is blown by the fan may warm the inner size change plate of the POD Deck Lite-A1.
For instructions on loading transparencies, see "Loading Transparencies."
If there are instructions on the paper package about which side of the paper to load, follow those instructions.
When paper is loaded in the Paper Deck Unit-C1 or POD Deck Lite-A1, the side facing up is the one printed on.
If problems, such as poor print quality or paper jams occur, try turning the paper stack over and reloading it.
For more information on the print direction of preprinted paper (paper which has logos or patterns already printed on it), see "Relationship Between the Original Orientation and Paper Orientation."
Rewrap any remaining paper in its original package, and store it in a dry place, away from direct sunlight.
If paper runs out and printing is stopped, load a new paper stack. Printing restarts after the new paper stack is loaded.
 |
Changing the Paper Size for the POD Deck Lite-A1
This section explains how to change the paper size for the POD Deck Lite-A1.
1.
Register the desired paper size for the POD Deck Lite-A1 in [Paper Settings] in [Preferences] (Settings/Registration).
For instructions on registering the paper size for the POD Deck Lite-A1, see "Registering the Paper Size and Type for a Paper Source."
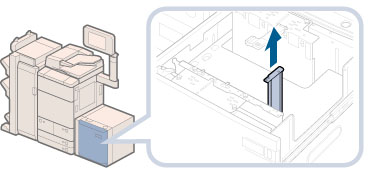
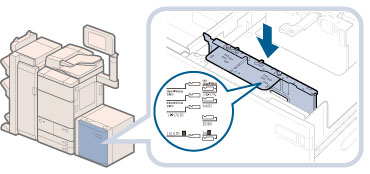
2.
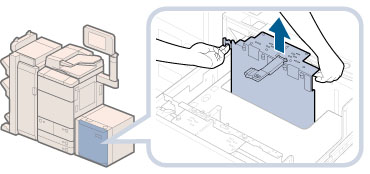
Remove all of the loaded paper, the paper size sheet, and deck base plate in the paper deck.
|
NOTE
|
|
It may take some time for the paper deck to open, even if you press the open button.
|
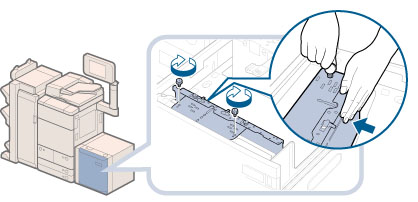
3.
Remove the blue screw on the rear edge retainer using a coin or something similar.

4.
Remove the rear edge retainer.
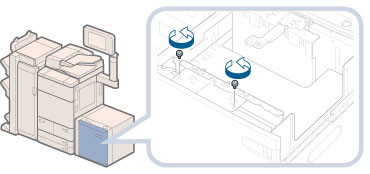
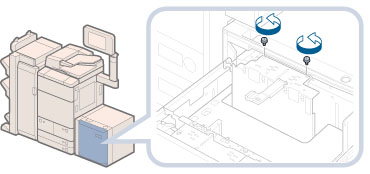
5.
Remove the two blue screws on the outer size change plate using a coin or something similar.
|
IMPORTANT
|
|
Do not loosen or remove any screw other than the two blue screws on the outer size change plate.
|
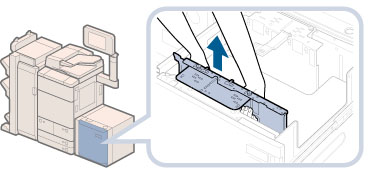
6.
Remove the outer size change plate.
7.
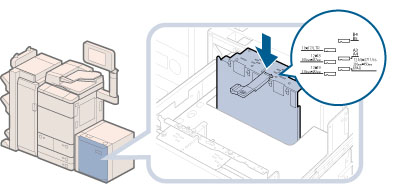
Align the outer size change plate with the marks for the desired paper size that you want to load.
|
IMPORTANT
|
|
Make sure to align the outer size change plate properly with the marks for the desired paper size. There are two locations with marks for the paper size on the top of the outer size change plate. Align the outer size change plate with the desired marks.
Make sure that the size change plate is properly aligned with the marks for the desired paper size. If the size change plate is not properly aligned, the POD Deck Lite-A1 may become damaged.
|
8.
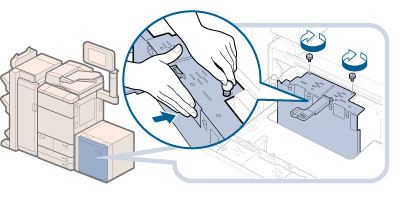
Fix the outer size change plate with the two blue screws using a coin or something similar, while slightly holding its centre front portion and pressing it towards you.
Fix the screws by turning them in the clockwise direction.
Fasten the left blue screw before fastening the right blue screw.
|
IMPORTANT
|
|
If you fasten the blue screws without pressing the outer size change plate towards you, the plate may be fixed at an angle. If you use the paper deck with a tilted outer size change plate, paper may be fed as slanted, poor print quality may result, and paper jams may occur. Therefore, make sure to fasten the blue screw while pressing the outer size change plate towards you.
|
9.
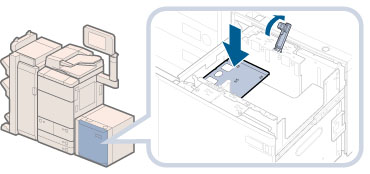
Align the rear edge retainer with the marks for the desired paper size.

|
IMPORTANT
|
|
If the rear edge retainer is not aligned properly, paper may become jammed, the quality of the image may be degraded, or the inside of the machine may become dirty. Make sure to load paper with the rear edge retainer properly aligned with the paper size marks on the top and base of the paper deck.
|
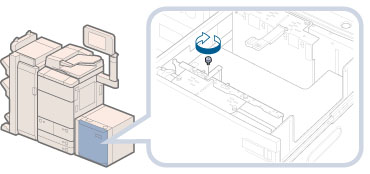
10.
Fix the rear edge retainer with the blue screw using a coin or something similar.
Fix the screws by turning them in the clockwise direction.
|
IMPORTANT
|
|
There are two screw holes for fastening the rear edge retainer. Make sure that it is fastened properly (aligned with the marks for the desired paper size) to prevent it from being installed at an angle.
|
11.
Remove the two blue screws on the inner size change plate using a coin or something similar.
12.
Remove the inner size change plate.
|
NOTE
|
|
Hot air that is blown by the fan may warm the inner size change plate.
|
13.
Align the inner size change plate with the marks for the desired paper size.
|
IMPORTANT
|
|
Make sure to align the inner size change plate properly with the marks for the desired paper size. There are two locations with marks for the paper size on the top of the inner size change plate. Align the inner size change plate with the desired marks.
Make sure that the size change plate is properly aligned with the marks for the desired paper size. If the size change plate is not properly aligned, the POD Deck Lite-A1 may become damaged.
|
14.
Fix the inner size change plate with the two blue screws using a coin or something similar, while slightly holding its centre front portion, and pressing it away from you.
Fasten the right blue screw before fastening the left blue screw.
|
IMPORTANT
|
|
If you fasten the blue screws without pressing the inner size change plate away from you, the plate may be fixed at an angle. If you use the paper deck with a tilted inner size change plate, paper may be fed as slanted, poor print quality may result, and paper jams may occur. Therefore, make sure to fasten the blue screw while pressing the inner size change plate away from you.
|
15.
Insert the correct deck base plate that matches the new paper size into the paper deck.
If you are not using the deck base plate, move the POD Deck Lite-A1 away from the main unit, and hang it on the hook that is on the inner left side of the POD Deck Lite-A1.
|
IMPORTANT
|
|
Always use the deck base plate when loading paper into the paper deck. If you load paper without setting the deck base plate, the loaded paper may hang over the lifter, and paper jam may occur.
Never place the deck base plate in the empty part of the paper deck. Doing so may lead to a malfunction of the machine.
|
16.
Place the paper size sheet that matches the new paper size into the paper deck.
|
IMPORTANT
|
|
Never place the paper size sheet in the empty part of the paper deck. Doing so may lead to a malfunction of the machine.
|
17.
Load the paper stack into the paper deck, and then lower the feeding support roller.
|
CAUTION |
|
When loading paper, take care not to cut your hands on the edges of the paper.
|
|
IMPORTANT
|
|
To load paper larger than B4, first close the paper deck to raise the inside lifter, open the paper deck, and then load the paper. If you try to load paper larger than B4 when the inside lifter is at its lowest position, the paper may not be loaded properly, and paper jams may occur.
Never place paper or any other items in the empty part of the paper deck. Doing so may lead to a malfunction of the machine.
|
|
NOTE
|
|
When loading paper, make sure that the height of the paper stack does not exceed 20 mm. If the height of the paper stack exceeds 20 mm, the edges of the paper stack may become curled or creased, and poor print quality may result.
|
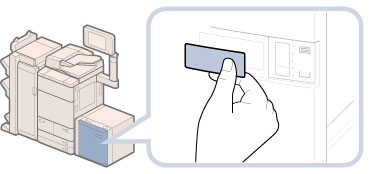
18.
Place a magnet label indicating the new paper size on the POD Deck Lite-A1.
19.
Close the paper deck.
The inside lifter automatically ascends, and prepares the paper deck for feeding.
|
CAUTION |
|
When closing the paper deck, be careful not to get your fingers caught, as this may result in personal injury.
|