Restricting Access to the Machine (IPv4)
If you are using this machine on a network environment, there are possibility that the machine may be hacked. By specifying IP addresses and port numbers that can have access to the machine, you can prevent unauthorized transmission and access.
This section describes how to only allow computers with IP address from 192.31.255.1 to 192.31.255.254 to view and specify each settings on the machine using the Remote UI or application software via IPv4 network.
The screens may differ, depending on the model of the machine and on attached optional products.
|
Required Condition
|
|
You are logged in as the administrator.
|
1.
Press  (Settings/Registration) → [Preferences] → [Network] → [Firewall Settings].
(Settings/Registration) → [Preferences] → [Network] → [Firewall Settings].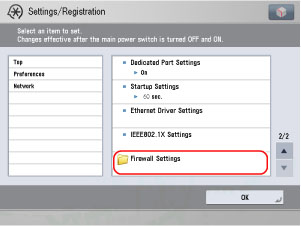
2.
Press [IPv4 Address Filter] → [RX Filter].
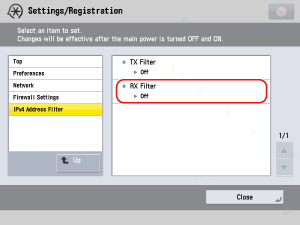
3.
Press [On] for <Use Filter> → press [Reject] for <Default Policy> → press [Reject].
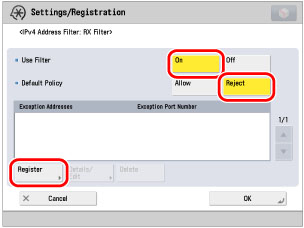
4.
Press [Address Range] → press [First Address] and enter '192.31.255.1' → press [Last Address] and enter '192.31.255.254' using  -
-  (numeric keys) → press [Next].
- (numeric keys) → press [Next].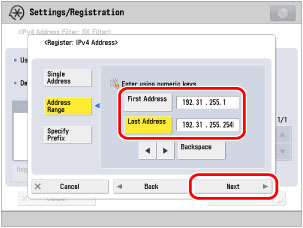
5.
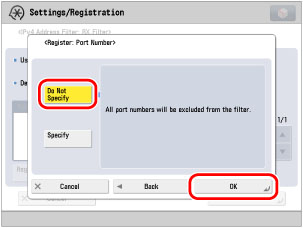
Press [Do Not Specify] → press [OK].
6.
Restart the machine.
The settings are only effective after you restart the machine.
Reference Information
Checking the Access Log
You can check the log of send transmission from this machine to the machine with the authorized IP address and the access log by the machine with the authorized IP address. The log can store up to 100 transmissions. Follow the procedures below to check the log.
Press (Settings/Registration) → [Preferences] → [Network] → [Firewall Settings] → [IP Address Block Log].
(Settings/Registration) → [Preferences] → [Network] → [Firewall Settings] → [IP Address Block Log].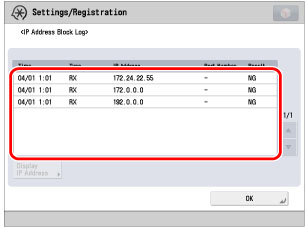
You can save the log in CSV format using the Remote UI.
Click [Settings/Registration] → [Network] for <Preferences> → [IP Address Block Log].
MAC Address Filter
MAC Address is a unique ID number for network machine. The address does not change even if the IP address is changed. In addition to the IP address, you can set the Send Filter as well as the Receive Filter for the MAC Address. Follow the procedures below to set the filter for the MAC Address.
Press (Settings/Registration) → [Preferences] → [Network] → [Firewall Settings] → [MAC Address Filter].
(Settings/Registration) → [Preferences] → [Network] → [Firewall Settings] → [MAC Address Filter].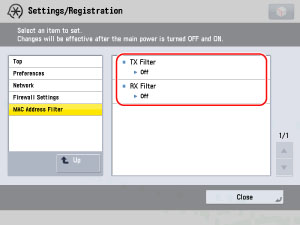
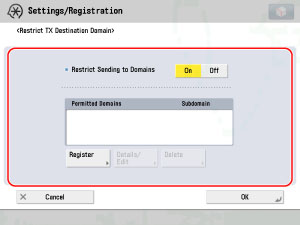
Specifying the TX Destination Domain
You can restrict the domain where the e-mail is sent. You can prevent information leakage by only allowing e-mails to be sent to an e-mail address with the specified domain. Follow the procedures below to specify the TX Destination Domain.
Press (Settings/Registration) → [Function Settings] → [Send] → [E-Mail/I-Fax Settings] → [Restrict TX Destination Domain].
(Settings/Registration) → [Function Settings] → [Send] → [E-Mail/I-Fax Settings] → [Restrict TX Destination Domain].