Storing Forwarding Settings
You can set the machine to forward received fax/I-fax documents to other machines or the file servers. If a received document matches the forwarding conditions, it is forwarded to the specified destination. This section explains forwarding conditions and how to register, change, and erase forwarding destinations.
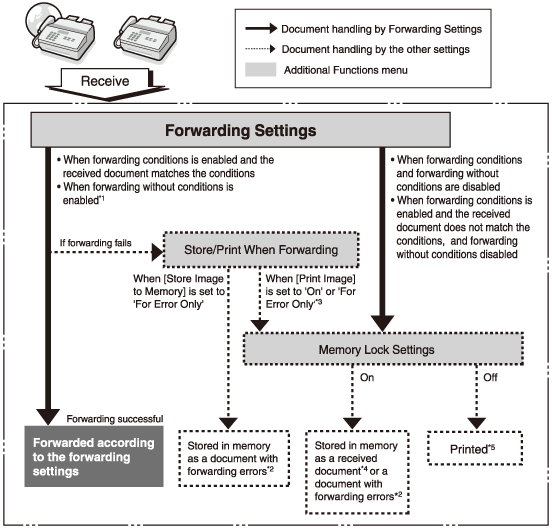
Document Handling under Forwarding Settings
|
*1 If Forward w/o Cond. is enabled, all received documents that do not match the forwarding conditions are forwarded to the destination selected for Forward w/o Cond.
*2 I-fax/fax documents with forwarding errors stored in memory can be confirmed, deleted, printed, and forwarded to the destinations registered in the One-touch Buttons or the Address Book from the I-Fax or Fax Forwarding Error Status Screen on the System Monitor screen. (Checking / Changing the Status of Documents in Memory) However, if a forwarding error occurs when Memory Lock is set to ‘On’, the error job appears on the Forwarding Error Status Screen when Memory Lock is turned ‘Off’.
*3 If Print Image in Store/Print When Forwarding in System Settings is set to ‘For Error Only,’ documents with forwarding errors are printed. If Print Image in Store/Print When Forwarding in System Settings is set to ‘On,’ all of the forwarded documents (including those with forwarding errors) are printed. However, if Memory Lock is set to ‘On’, forwarded documents are printed when Memory Lock is set to ‘Off’.
*4 Documents stored in memory can be confirmed, deleted, and forwarded to the destinations registered in the One-touch Buttons or the Address Book from the I-FAX Memory Lock Document screen (I-Fax) or RX Job Status screen (fax) on the System Monitor screen. (Checking / Changing the Status of Documents in Memory)
*5 If documents are received while paper is jammed, or paper or toner has run out, they are printed after the paper jam is cleared, paper is loaded, or toner is replaced.
|
|
IMPORTANT
|
|
This setting is available only when the Send function (optional for the imageRUNNER 2545/2535/2530/2525/2520) is activated or the optional Super G3 Fax Board-AG1 is attached to the machine.
If the Language Switch setting is set to ‘On’, some characters are restricted and cannot be entered. To enter all characters, set the Language Switch setting to ‘Off’. (Configuring the Machine's Basic Settings)
If a blackout occurs or the machine is turned OFF while the machine is receiving the documents to be forwarded, the received documents are not forwarded to the specified destination. These documents are printed after the power is turnd ON.
|
|
NOTE
|
|
The maximum number of forwarding settings that you can store is 12: ten settings with forwarding conditions, and one fax and one I-fax forwarding jobs without conditions.
You can set whether to print I-fax/fax documents with forwarding errors, and whether to store them in memory. (Handling Forwarding Documents)
When Print Image and Memory Lock are set to ‘Off’ and Store Image to Memory is set to ‘Do Not Store’, the received documents will be lost if a forwarding error occurs.
For instructions on how to enter characters using the on-screen keyboard, see Basic Operations.
|
Storing Forwarding Settings
1
Press  (Additional Functions) → [System Settings] → [Forwarding Settings].
(Additional Functions) → [System Settings] → [Forwarding Settings].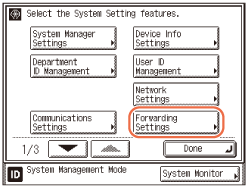
2
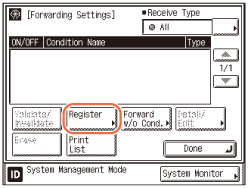
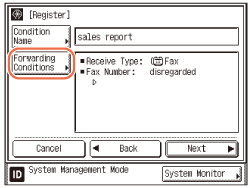
Press [Register].
3
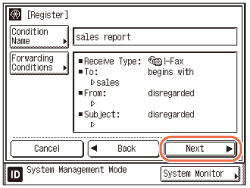
Press [Condition Name].

4
Enter a name for the forwarding condition → press [OK].
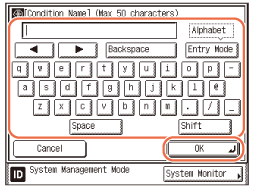
You can enter up to 50 characters for the condition name.
5
Press [Forwarding Conditions].
6
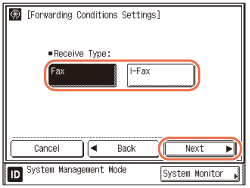
Press [Fax] or [I-Fax] → [Next].
This step is necessary only when the Send function (optional for the imageRUNNER 2545/2535/2530/2525/2520) is activated and the optional Super G3 Fax Board-AG1 is attached to the machine.
7
Set the forwarding conditions.
If the Send function (optional for the imageRUNNER 2545/2535/2530/2525/2520) is not activated and the Super G3 Fax Board-AG1 is attached to the machine, or ‘Fax’ is selected as the receive type:
|
1
|
Press the Fax Number drop-down list → select the forwarding condition.
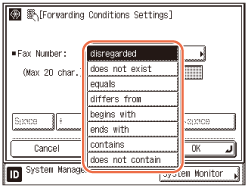 The available forwarding conditions are:
|
|
2
|
Enter the forwarding criterion using
 - -  (numeric keys) → press [OK]. (numeric keys) → press [OK].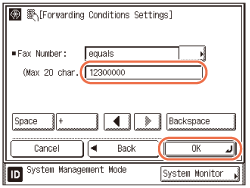 [Space]: Press to insert a space between numbers.
[+]: Press to insert a “+” sign between the country code and fax number.
[
 ] [ ] [ ]: Use to move the position of the cursor. ]: Use to move the position of the cursor.[Backspace]: Press to delete the number immediately to the left of the cursor.
If you want to change the criterion for the forwarding conditions without changing the forwarding condition for the Fax Number drop-down list, press
You can enter up to 20 characters for the Fax Number forwarding criterion. The characters that can be entered are: 0 to 9, [Space], [+].
NOTE:
If ‘disregarded’ or ‘does not exist’ is selected as the forwarding condition, you cannot enter any criteria.
|
If the Send function (optional for the imageRUNNER 2545/2535/2530/2525/2520) is activated and the Super G3 Fax Board-AG1 is not attached to the machine, or ‘I-Fax’ is selected as the receive type:
|
1
|
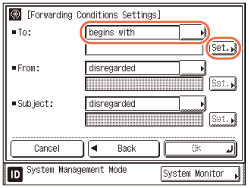
Press the Destination, From, or Subject drop-down list.
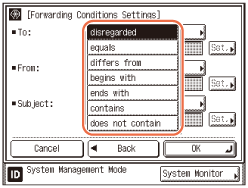 The available forwarding conditions are:
|
|
2
|
Select the forwarding condition → press [Set.].
 |
|
3
|
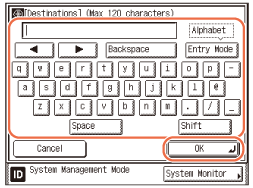
Enter the forwarding criteria → press [OK].
 |
|
4
|
If necessary, repeat this step for the other drop-down list(s).
If you want to change the criteria for the forwarding conditions without changing the forwarding condition for the Destination, From, and Subject drop-down lists, press [Set.] next to the criteria you want to change → enter the new criteria → press [OK]. You can enter up to 120 characters for the Destination, and 128 characters for the From or Subject forwarding criteria.
|
|
5
|
When setting is complete, press [OK].
NOTE:
If ‘disregarded’ is selected as the forwarding condition, you cannot enter any criteria.
|
8
Press [Next].
9
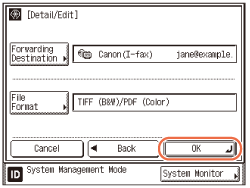
Press [Forwarding Destination].
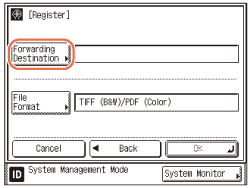
10
Select a destination → press [OK].
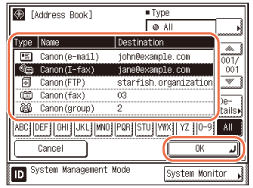
Press the alphanumeric keys (e.g., [ABC]) to display the individual keys for each letter or number. You can select a letter or number to restrict the displayed range of entries. Press [All] to return to the full address list.
If the desired destination is not displayed, press [ ] or [
 ] to scroll to the desired destination.
] or [] to scroll to the desired destination.You can restrict the type of destinations displayed in the results list by pressing the Type drop-down list.
You cannot select multiple destinations. To forward to multiple destinations, select a group address.
NOTE:
To view the detailed information of a selected destination, select the destination → press [Details].
To be able to select a forwarding destination, it is necessary to register destinations in the Address Book beforehand. (Specifying Destinations Easily and Quickly)
11
Press [File Format].
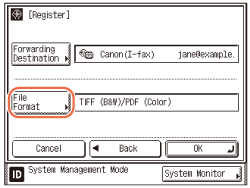
If any of the following is true, steps 11 and 12 are not necessary:
A fax number is specified as the forwarding destination.
An I-fax address is specified as the forwarding destination.
For the imageRUNNER 2545/2535/2530/2525/2520, the Send function is not activated with the optional Color Send Kit-Y1.
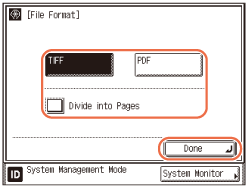
12
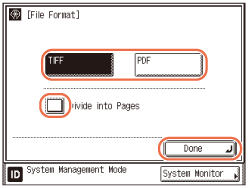
Select the file format of the document you want to forward → press [Done].
If [Fax] is selected as the receive type on step 6:
If you want to separate multiple images and send them as separate files, each of which consists of only one page, press [Divide into Pages].
If you want to send multiple images as a single file without dividing them, do not press [Divide into Pages].
File Formats:
[TIFF]: Forwards the file in the TIFF (B&W) format.
[PDF]: Forwards the file in the PDF format regardless of the color mode.
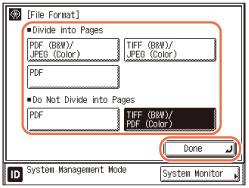
If [I-Fax] is selected as the receive type on step 6:

<Divide into Pages>:
When the received document contains two or more pages, they are divided into separate files, each of which consists of only one page.
When using this option, you can select from the following three file formats:
[PDF (B&W)/JPEG (Color)]: Forwards the file in the PDF (B&W) or JPEG (Color) format.
[TIFF (B&W)/JPEG (Color)]: Forwards the file in the TIFF (B&W) or JPEG (Color) format.
[PDF]: Forwards the file in the PDF format regardless of the color mode.
<Do Not Divide into Pages>
The received document is forwarded without being divided into separate pages.
When using this option, you can select from the following two file formats:
[PDF]: Forwards the file in the PDF format regardless of the color mode.
[TIFF (B&W)/PDF (Color)]: Forwards the file in the TIFF (B&W) or PDF (Color) format.
NOTE:
Documents are forwarded in the same color mode (B&W or Color) as when they were received.
To view a TIFF or JPEG file, a software application that supports the TIFF or JPEG format (such as Imaging for Windows) is required.
To view a PDF file, Adobe Reader/Adobe Acrobat Reader is required.
13
Press [OK].
14
Press  (Reset) to return to the top screen.
(Reset) to return to the top screen.Setting Forwarding without Conditions
You can store the forwarding destinations of a received document if the forwarding settings of the received document are not registered, or if the received document does not match all of the forwarding conditions that you have specified.
|
NOTE
|
|
Forwarding destinations can be stored one at a time, according to the Receive Type of the received document.
|
1
Press (Additional Functions) → [System Settings] → [Forwarding Settings].
(Additional Functions) → [System Settings] → [Forwarding Settings].For help, see step 1 in Storing Forwarding Settings.
2
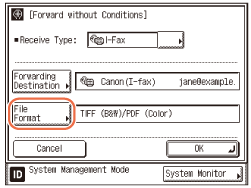
Press [Forward w/o Cond].
3
Press the Receive Type drop-down list → select [Fax] or [I-Fax].
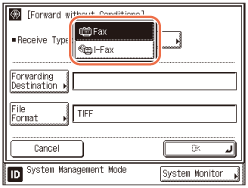
This step is necessary only when the Send function (optional for the imageRUNNER 2545/2535/2530/2525/2520) is activated and the optional Super G3 Fax Board-AG1 is attached to the machine.
4
Press [Forwarding Destination].
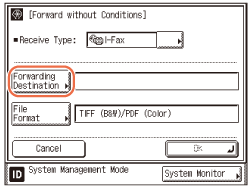
5
Select the forwarding destination → press [OK].

Press the alphanumeric keys (e.g., [ABC]) to display the individual keys for each letter or number. You can select a letter or number to restrict the displayed range of entries. Press [All] to return to the full address list.
If the desired destination is not displayed, press [] or [] to scroll to the desired destination.
] or [] to scroll to the desired destination.You can restrict the type of destinations displayed in the results list by pressing the Type drop-down list.
You cannot select multiple destinations.
NOTE:
To view the detailed information of a selected destination, select the destination → press [Details].
To be able to select a forwarding destination, it is necessary to register destinations in the Address Book beforehand. (Specifying Destinations Easily and Quickly)
6
Press [File Format].
If any of the following is true, steps 6 and 7 are not necessary:
A fax number is specified as the forwarding destination.
An I-fax address is specified as the forwarding destination.
For the imageRUNNER 2545/2535/2530/2525/2520, the Send function is not activated with the optional Color Send Kit-Y1.
7
Select the file format of the document you want to forward → press [Done].
If [Fax] is selected as the receive type on step 3:
If you want to separate multiple images and send them as separate files, each of which consists of only one page, press [Divide into Pages].
If you want to send multiple images as a single file without dividing them, do not press [Divide into Pages].
File Formats:
[TIFF]: Forwards images in the TIFF format. Forwards the file in the TIFF (B&W) format.
[PDF]: Forwards the file in the PDF format. Forwards the file in the PDF format regardless of the color mode.
If [I-Fax] is selected as the receive type on step 3:
<Divide into Pages>:
When the received document contains two or more pages, they are divided into separate files, each of which consists of only one page.
When using this option, you can select from the following three file formats:
[PDF (B&W)/JPEG (Color)]: Forwards the file in the PDF (B&W) or JPEG (Color) format.
[TIFF (B&W)/JPEG (Color)]: Forwards the file in the TIFF (B&W) or JPEG (Color) format.
[PDF]: Forwards the file in the PDF format regardless of the color mode.
<Do Not Divide into Pages>
The received document is forwarded without being divided into separate pages.
When using this option, you can select from the following two file formats:
[PDF]: Forwards the file in the PDF format regardless of the color mode.
[TIFF (B&W)/PDF (Color)]: Forwards the file in the TIFF (B&W) or PDF (Color) format.
NOTE:
Documents are forwarded in the same color mode (B&W or Color) as when they were received.
To view a TIFF file, a software application that supports the TIFF format (such as Imaging for Windows) is required.
To view a PDF file, Adobe Reader/Adobe Acrobat Reader is required.
8
Press [OK].
9
Press (Reset) to return to the top screen.
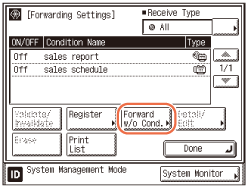
(Reset) to return to the top screen.Checking/Changing Forwarding Settings
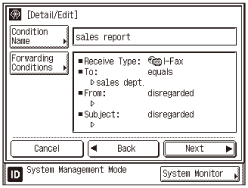
You can check or change forwarding settings that have been stored.
1
Press (Additional Functions) → [System Settings] → [Forwarding Settings].
(Additional Functions) → [System Settings] → [Forwarding Settings].For help, see step 1 in Storing Forwarding Settings.
2
Select the forwarding setting whose details you want to check → press [Detail/Edit].
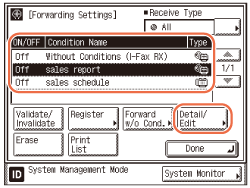
If the desired forwarding setting is not displayed, press [] or [] to scroll to the desired forwarding setting.
] or [] to scroll to the desired forwarding setting.3
Check or change the forwarding settings → press [OK].
NOTE:
For instructions on changing forwarding settings, see Storing Forwarding Settings.
4
Press (Reset) to return to the top screen.
(Reset) to return to the top screen.Turning Forwarding ON/OFF
You can set whether received documents are forwarded.
1
Press (Additional Functions) → [System Settings] → [Forwarding Settings].
(Additional Functions) → [System Settings] → [Forwarding Settings].For help, see step 1 in Storing Forwarding Settings.
2
Select the desired forwarding setting → press [Validate/Invalidate].
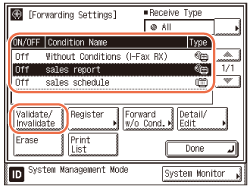
<On>: The received document is forwarded to the specified destination if it matches the forwarding conditions.
<Off>: The received document is not forwarded to the specified destination even if it matches the forwarding conditions.
If the desired forwarding setting is not displayed, press [] or [] to scroll to the desired forwarding setting.
] or [] to scroll to the desired forwarding setting.To cancel forwarding, press [Validate/Invalidate] again.
The selected forwarding setting is enabled.
NOTE:
You can set whether to print I-fax/fax documents with forwarding errors, and whether to store them in memory. (Handling Forwarding Documents)
3
Press (Reset) to return to the top screen.
(Reset) to return to the top screen.Erasing Forwarding Settings
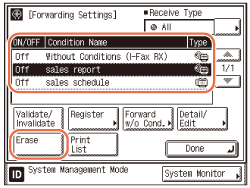
You can erase forwarding settings that have been stored.
1
Press (Additional Functions) → [System Settings] → [Forwarding Settings].
(Additional Functions) → [System Settings] → [Forwarding Settings].For help, see step 1 in Storing Forwarding Settings.
2
Select the forwarding setting that you want to erase → press [Erase].
If the desired forwarding setting is not displayed, press [] or [] to scroll to the desired forwarding setting.
] or [] to scroll to the desired forwarding setting.3
Press [Yes].
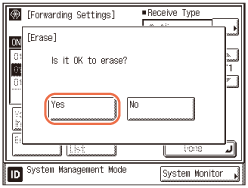
To cancel erasing the forwarding setting, press [No].
The selected forwarding setting is erased.
4
Press (Reset) to return to the top screen.
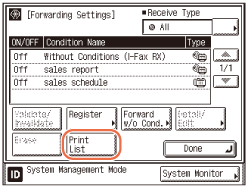
(Reset) to return to the top screen.Printing Forwarding Settings
You can print a list of the stored forwarding settings.
1
Press (Additional Functions) → [System Settings] → [Forwarding Settings].
(Additional Functions) → [System Settings] → [Forwarding Settings].For help, see step 1 in Storing Forwarding Settings.
2
Press [Print List].
NOTE:
The forwarding settings can be printed only if A3, B4, A4, or A4R (plain or recycled paper) is loaded in the paper sources whose settings in Other in Drawer Eligibility For APS/ADS in Common Settings (from the Additional Functions screen) are set to ‘On’. (Configuring the Machine's Basic Settings)
3
Press [Yes].
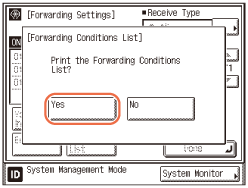
To cancel printing, press [No].
The forwarding settings are printed.
4
Press (Reset) to return to the top screen.
(Reset) to return to the top screen.