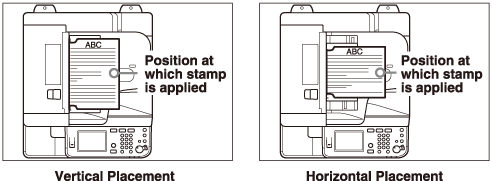
Stamping Originals Which Have Already Been Scanned
The feeder directly applies a stamp (about 3 mm in diameter) on the front side of originals after scanning them, so that you can distinguish scanned originals from those that have not been scanned.
|
IMPORTANT
|
|
The Stamp mode is available only when the following options are attached to the machine:
Stamp Unit-B1
Feeder* (DADF-AA1 for the imageRUNNER 2545/2535 or DADF-AB1 for the imageRUNNER 2530/2525/2520)
* Standard-equipped for the imageRUNNER 2545i/2535i/2525i/2520i.
The Stamp mode cannot be used with the following modes:
Document Size (except for [Auto]) (Specifying the Document Size)
Different Size Originals (Scanning Different Size Originals Together (Different Size Originals))
Direct Sending (Direct Sending)
Manual Sending (Manual Sending)
|
1
Press  (SEND) → place your originals into the feeder → specify the destination.
(SEND) → place your originals into the feeder → specify the destination.NOTE:
For instructions on how to place your originals, see Basic Operations.
For instructions on how to specify the destination, see Basic Sending Methods or Specifying Destinations Easily and Quickly.
2
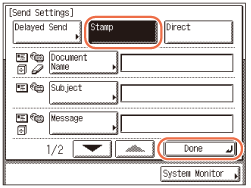
Press [Send Settings].

3
Press [Stamp] → [Done].
NOTE:
To cancel the Stamp mode, press [Stamp] again.
4
Press  (Start) to start scanning your originals.
(Start) to start scanning your originals.To cancel scanning, press [Cancel] or  (Stop).
(Stop).The scanned data is sent to the specified destination when scanning is complete.
A stamp mark ( ) appears on the original output.
) appears on the original output.NOTE:
If the stamp mark is not clear, see Routine Maintenance.
The specified settings return to their defaults after documents are sent. If you want to keep the settings as the default, see Registering Frequently Used Scan Settings as Default (Standard Send Settings).