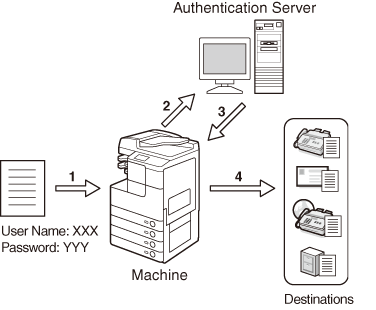
1. A user who attempts to send documents is prompted to enter a valid user name and password.
2. Entered information is checked in the authentication server against the directory database to authenticate the user.
3. The machine receives the authentication results from the authentication server.
4. Once authenticated, the authorized user can send documents to the specified destination.
Advanced Sending Methods
This section describes some additional features for sending documents.
Authenticating Users Before Sending Documents (Authorized Send)
If your network uses directory services such as Active Directory, we recommend that you use also Authorized Send. Authorized Send is an authentication feature that enables you to prevent unauthorized users from sending documents from the machine. With this feature activated, any user who wants to send documents needs to enter a valid user name and password.
Flow of Sending Documents with Authorized Send
What you can do with Authorized Send
In addition to authenticating users, Authorized Send enables you to do the following:
Carry over the login information (both user name and password, or user name only) from Authorized Send to other authentication systems such as SMTP authentication
Restrict the destinations of sending documents to the e-mail address and folder of a logged on user
Enable/disable sending functionalities
To use Authorized Send, specify authentication server settings and other settings in the machine beforehand. (Customizing Settings)
This section describes how to log in to Authorized Send and introduces an easier way to send documents to the e-mail address and folder of a logged on user.
|
IMPORTANT
|
|
Depending on the network environment, set up of the authentication server may be required beforehand.
|
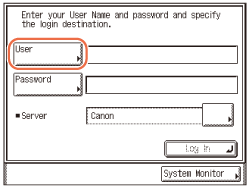
Logging in to Authorized Send
The following describes how to log in to Authorized Send.
1
Press  (SEND) → place your originals.
(SEND) → place your originals.The Authorized Send log-in screen appears.
NOTE:
For instructions on how to place your originals, see Basic Operations.
If any of the messages below appears, follow the instructions in Basic Operations:
<Enter the Department ID and Password using the numeric keys.>
<You must insert a control card.>
<Enter the User ID and Password.>
2
Press [User].
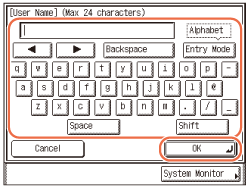
3
Enter your user name (up to 24 characters) using the on-screen keyboard → press [OK].
NOTE:
For instructions on how to enter characters, see Basic Operations.
4
Press [Password].
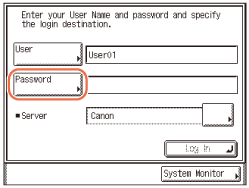
5
Enter your password (up to 24 characters) using the on-screen keyboard → press [OK].

6
Select the server name you want to log in to from the Server drop-down list → press [Log In].
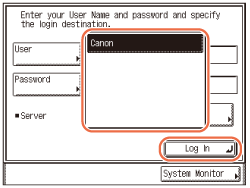
If you are successfully authenticated, the top screen (Send) appears.
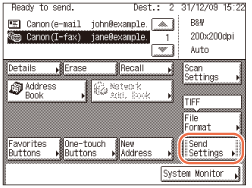
7
Specify the destination, scan settings, send settings, and press  (Start) to send documents.
(Start) to send documents.NOTE:
For the basic procedures for sending documents, see Basic Sending Methods.
8
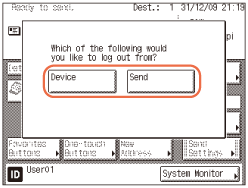
Press  (Log In/Out).
(Log In/Out).You are logged out of Authorized Send and the display returns to the Authorized Send log-in screen.
IMPORTANT:
If [Display confirm screen when logged out] is selected on the Send Function Authentication Settings page, the following screen may appear when you are logged out. (Customizing Settings)
Press [Send] to log out of Authorized Send only or [Device] to log out of other security features such as Department ID Management simultaneously.
Press [Send] to log out of Authorized Send only or [Device] to log out of other security features such as Department ID Management simultaneously.
When the machine enters the Sleep mode or after the Auto Clear mode is activated, you are automatically logged out of Authorized Send.
Sending Documents to Your E-Mail Address Using Authorized Send
Authorized Send offers an easy way to specify your e-mail address as the destination when you send documents via e-mail. The machine automatically obtains your e-mail address from an authentication server during communication with the server when you log in to Authorized Send. With the press of [Send Mail To Self], you can specify your e-mail address as destination.
The following describes how to use Authorized Send to specify your e-mail address as destination.
The following describes how to use Authorized Send to specify your e-mail address as destination.
|
IMPORTANT
|
|
To specify your e-mail address as destination, make sure of the following:
[Allow] or [Only allow sending to own address] in [E-mail Send] is selected. (Customizing Settings)
Your e-mail address attribute is registered on an authentication server. (Consult your network administrator.)
|
1
Follow steps 1 to 6 in Logging in to Authorized Send.
The top screen (Send) appears.
2
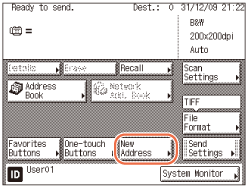
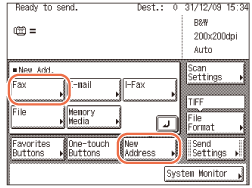
Press [New Address].
3
Press [Send Mail To Self].
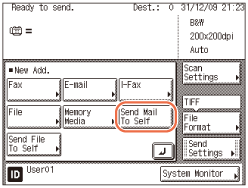
Your e-mail address appears on the top screen.
4
Specify the scan settings, send settings, and press (Start) to send documents.
(Start) to send documents.NOTE:
For the basic procedures for sending documents, see Basic Sending Methods.
If the settings under <Authentication Method> in <SMTP Authentication Settings> are configured to display an authentication screen, the Enter Network Password screen appears when you press  (Start). (Customizing Settings) Specify the user name and password → press [OK].
(Start). (Customizing Settings) Specify the user name and password → press [OK].Sending Documents to Your Folder Using Authorized Send
Authorized Send offers an easy way to specify your folder as the destination when you send documents to a file server. If Active Directory is used as an authentication server, the machine automatically obtains your home directory name (folder name) from an authentication server during communication with the server when you log in to Authorized Send. With the press of [Send File To Self], you can specify this folder as destination.
The following describes how to use Authorized Send to specify your folder as destination.
The following describes how to use Authorized Send to specify your folder as destination.
|
IMPORTANT
|
|
To specify your folder as destination, make sure of the following:
[Allow] or [Only allow sending to own address or specified folder] in [File Send] is selected. (Customizing Settings)
Your home directory attribute is registered on an authentication server. (Consult your network administrator.)
If Active Directory is not used as an authentication server, or you want to manually specify your folder as destination, the folder specified in [Folder Path] under [Specify destination folder] is used as the destination when [Send File To Self] is pressed. (Customizing Settings)
|
1
Follow steps 1 to 6 in Logging in to Authorized Send.
The top screen (Send) appears.
2
Press [New Address].

3
Press [Send File To Self].

Your folder path appears on the top screen.
NOTE:
If the settings under <When Sending File to Own Address> are configured to display an authentication screen, the File screen appears when you press [Send File To Self]. (Customizing Settings) Specify the user name and password → press [OK].
4
Specify the scan settings, send settings, and press (Start) to send documents.
(Start) to send documents.NOTE:
For the basic procedures for sending documents, see Basic Sending Methods.
Switching Temporarily to Tone Dialing
Many fax information services for banks, airline reservations, hotel reservations, etc., require tone dialing for their services. If your machine is connected to a rotary pulse line, follow the procedure below to set the machine temporarily for tone dialing.
1
Press (SEND).
(SEND).2
Press [New Address] → [Fax].

NOTE:
If Fax Send is set to ‘Do not allow’, [Fax] is not displayed. (Customizing Settings)
3
Press [Hook].
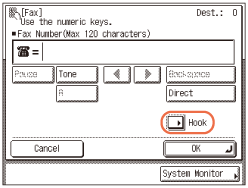
IMPORTANT:
If the machine is in the Department ID Management with the optional Copy Card Reader-F1, do not remove the control card. Removing the card results in the disconnection of the line.
4
Enter the number of the information service using  -
-  (numeric keys).
- (numeric keys).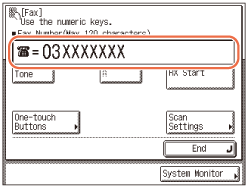
If the number is registered in the one-touch buttons, you can also press [One-touch Buttons] to specify the number. (Using the One-Touch Buttons)
In this step, the key listed below is also available as needed.
|
|
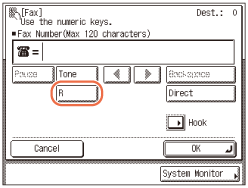
[R]:
|
Press to use the R-key. (Calling from an Extension)
|
NOTE:
The Address Book and Job Recall feature cannot be used to specify the number.
5
When your call is answered and you hear the recorded message of the information service, press [Tone].
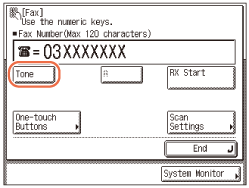
After you press [Tone], the letter <T> appears on the touch panel display.
6
Enter the numbers requested by the information service using - (numeric keys).
- (numeric keys).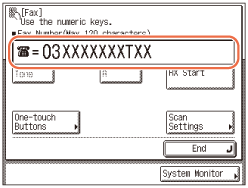
NOTE:
If you require more information about the service, contact the company providing the service.
7
Press [RX Start] if you require a faxed copy of the information.
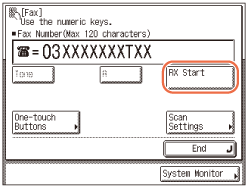
If you do not require a faxed copy of the information, press [End].
Specifying the Time to Start Sending (Delayed Send)
The Delayed Send mode enables you to store a send job in memory, and have it sent at a later time.
|
NOTE
|
|
You can reserve up to 64 jobs for the Delayed Send mode. However, the actual number of jobs that can be reserved may be less than 64 under the following conditions:
If multiple documents are being sent at the same time
If large documents are being sent
The maximum number of delayed send jobs might also be reduced if there are jobs other than those for the Delayed Send mode or if there are other factors affecting the specified destinations.
The Delayed Send mode cannot be used when:
Sending scanned documents to a USB memory media device
Sending fax documents in the Direct Sending mode or Manual Sending mode
Once the delayed documents are sent, the documents are automatically deleted from memory.
You can check the status or cancel the transmission of jobs for which a preset send time has been specified. (Checking / Deleting Documents Being Sent or Waiting To Be Sent)
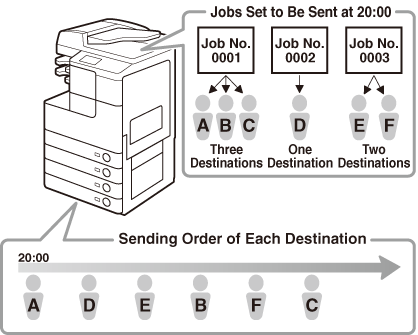
If multiple send jobs reach their delayed send time simultaneously, documents are sent in the following order:
 |
1
Press (SEND) → place your originals → specify the destination.
(SEND) → place your originals → specify the destination.NOTE:
For instructions on how to place your originals, see Basic Operations.
For instructions on how to specify the destination, see Basic Sending Methods or Specifying Destinations Easily and Quickly.
2
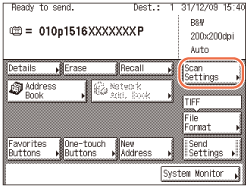
Press [Scan Settings] to specify the scan settings you require.
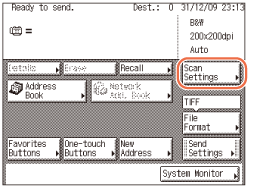
For more information, see Specifying the Scan Settings.
3
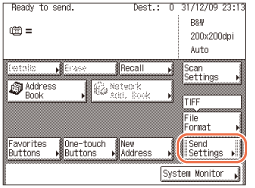
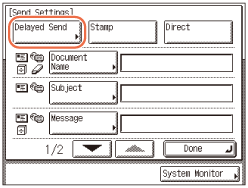
Press [Send Settings].
4
Press [Delayed Send].
5
Enter the send time using - (numeric keys) → press [OK].
- (numeric keys) → press [OK].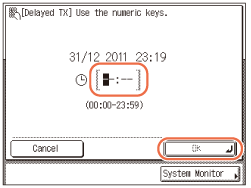
Enter all four digits of the time (including zeros), using 24-hour notation.
Examples:
9:05 a.m. → 0905
4:18 p.m. → 1618
If you set a time earlier than the current time, the document will be sent at that time on the next day.
NOTE:
If you make a mistake when entering the send time, press  (Clear) to clear your entry → enter another four digit number.
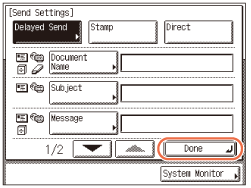
6
Press [Done].
NOTE:
To cancel the Delayed Send mode, press [Delayed Send] → [Cancel].
7
Press (Start) to start scanning your originals.
(Start) to start scanning your originals.To cancel scanning, press [Cancel] or  (Stop).
(Stop).If the original is placed on the platen glass, follow the instructions that appear on the touch panel display → press (Start) once for each original. When scanning is complete, press [Done].
(Start) once for each original. When scanning is complete, press [Done].The document is stored in memory, and sent to the specified destination at the specified time.
NOTE:
You can cancel a delayed send job from the System Monitor screen. (Checking / Deleting Documents Being Sent or Waiting To Be Sent)
Sending Documents to More Than One Destination (Sequential Broadcast)
Sequential Broadcast enables you to scan documents once and send them to several destinations. With this sending method, you can send the same document to a maximum of 532 destinations.
|
NOTE
|
|
If you frequently send documents to multiple destinations, it is recommended that you store those destinations as a group address. (Group Addresses)
If you specify destinations using a group address, each destination is counted as a separate address.
When Restrict Sequential Broadcast in Restrict the Send Function is set to ‘Prohibit Broadcast’, you cannot send documents to multiple destinations if these destinations contain a fax address. (Setting the Send Function)
You cannot cancel sending the document to only one destination out of the multiple destinations.
|
1
Press (SEND) → place your originals.
(SEND) → place your originals.NOTE:
For instructions on how to place your originals, see Basic Operations.
2
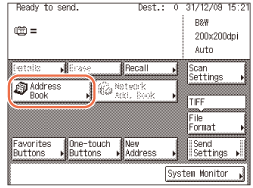
Specify the destinations.
Use the Address Book to select the desired destinations, and/or use - (numeric keys) or the on-screen keyboard to enter the recipient’s address digit by digit.
- (numeric keys) or the on-screen keyboard to enter the recipient’s address digit by digit.If you use the Address Book:
|
1
|
Press [Address Book].
 |
|
2
|
Select the destinations from the Address Book list → press [OK].
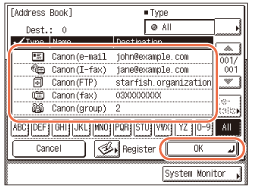 You can select up to 500 destinations.
NOTE:
To cancel a selected destination, select the destination again to clear the check mark.
For instructions on how to use the Address Book, see Using the Address Book.
The destinations you can specify may vary depending on the settings under <Send Restriction Settings>. (Customizing Settings) For example, if E-mail Send is set to ‘Do not allow’ or ‘Only allow sending to own address’, e-mail addresses and I-fax addresses are not displayed in the Address Book list.
If the settings under <When Sending File to Address Registered in Address Book> are configured to display an authentication screen, do not specify multiple file server addresses at the same time. (Customizing Settings) If you specify multiple file server addresses, an error message appears when you press
(Start) in step 5. |
If you use - (numeric keys) or the on-screen keyboard:
|
1
|
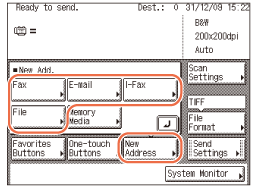
Press [New Address] → select [E-mail], [I-Fax], [File], or [Fax].
 NOTE:
Depending on the settings under <Send Restriction Settings>, [E-mail], [I-Fax], [File], or [Fax] may not be displayed. (Customizing Settings)
|
|
2
|
Specify the destination using
- (numeric keys) or the on-screen keyboard → press [OK].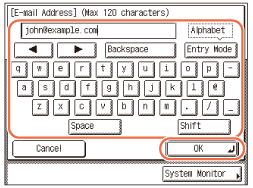 NOTE:
For instructions on how to specify the destination, see Basic Sending Methods.
|
|
3
|
Repeat these steps until all the destinations are specified.
You can specify up to 32 destinations.
|
3
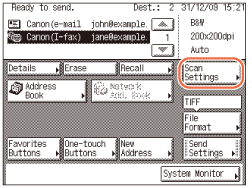
Press [Scan Settings] to specify the scan settings you require.
For more information, see Specifying the Scan Settings.
4
Press [Send Settings] to specify the send settings you require → press [Done].
For more information, see Basic Sending Methods.
5
Press (Start) to start scanning your originals.
(Start) to start scanning your originals.To cancel scanning, press [Cancel] or (Stop).
(Stop).If the original is placed on the platen glass, follow the instructions that appear on the touch panel display → press (Start) once for each original. When scanning is complete, press [Done].
(Start) once for each original. When scanning is complete, press [Done].The scanned data is sent to the specified destination when scanning is complete.
NOTE:
If the settings under <Authentication Method> in <SMTP Authentication Settings> are configured to display an authentication screen, the Enter Network Password screen appears when you press (Start) to send e-mails or I-faxes. (Customizing Settings) Specify the user name and password → press [OK].
(Start) to send e-mails or I-faxes. (Customizing Settings) Specify the user name and password → press [OK].If the settings under <When Sending File to Address Registered in Address Book> are configured to display an authentication screen, the Enter Network Password screen appears when you press (Start) to send documents to a file server. (Customizing Settings) Specify the user name and password → press [OK].
(Start) to send documents to a file server. (Customizing Settings) Specify the user name and password → press [OK].Calling from an Extension
When calling an outside line from an extension, the outside line access number (such as 0) is normally dialed before the destination fax number. Likewise, when the machine is connected to an extension, the outside line access number needs to be entered before fax numbers. You can also enter a pause time (i.e., the amount of time the machine waits after dialing the outside line access number when calling from an extension) together with these numbers.
1
Press (SEND) → place your originals.
(SEND) → place your originals.NOTE:
For instructions on how to place your originals, see Basic Operations.
2
Press [New Address] → [Fax].
NOTE:
If Fax Send is set to ‘Do not allow’, [Fax] is not displayed. (Customizing Settings)
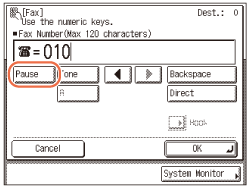
3
Press [R].
If you have not registered the outside line access number in the R-key, [R] is not available. Use - (numeric keys) to enter the outside line access number.
- (numeric keys) to enter the outside line access number.NOTE:
For instructions on how to register the outside access number in the R-key, see Setting the Send Function.
4
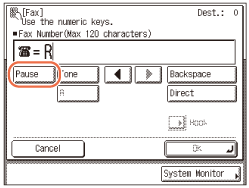
Press [Pause].
NOTE:
The pause time differs in length, depending on whether it is entered in the middle or at the end of a fax number.
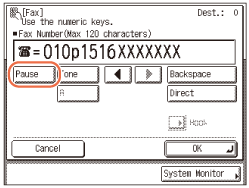
The pause time entered in the middle of a fax number (lower-case p) is set to two seconds long by default. This can be changed to any length between 1 and 15 seconds. (Adjusting the Pause Time)
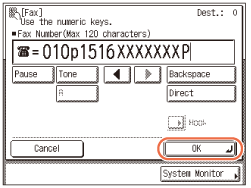
The pause time entered at the end of a fax number (upper-case P) is set to 10 seconds long. (This length cannot be changed.)
Two or more pauses can be entered consecutively.
Enter the pause time equivalent in length to the time required for the outside line dial tone to be heard after the outside line access number is called.
5
Enter the fax number (up to 120 characters) using - (numeric keys).
- (numeric keys).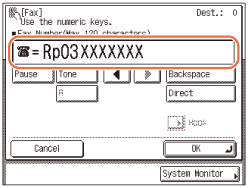
6
Press [OK].
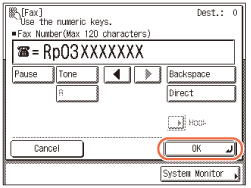
The specified destination appears on the top screen.
If you want to check or change the specified destination:
|
1
|
Press [Details] → check or change the destination’s information → press [OK].
For help, see step 4 in Sending an E-Mail Message.
|
If you want to delete the specified destination:
|
1
|
Press [Erase].
For help, see step 4 in Sending an E-Mail Message.
|
NOTE:
If Confirm Entered Fax Numbers in Restrict the Send Function is set to ‘On’, you should enter the fax number again for confirmation. Enter the fax number you entered in step 5 → press [OK]. (Setting the Send Function)
7
Press [Scan Settings] to specify the scan settings you require.
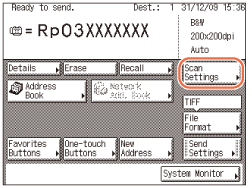
For more information, see Specifying the Scan Settings.
8
Press (Start) to start scanning your originals.
(Start) to start scanning your originals.To cancel scanning, press [Cancel] or (Stop).
(Stop).If the original is placed on the platen glass, follow the instructions that appear on the touch panel display → press (Start) once for each original. When scanning is complete, press [Done].
(Start) once for each original. When scanning is complete, press [Done].The scanned data is sent to the specified destination when scanning is complete.
Dialing an Overseas Number
When you dial an overseas number, you may need to insert a pause time (i.e., the amount of time the machine waits after dialing the international fax number) within the number. Follow this procedure to enter pauses together with an international fax number.
1
Press (SEND) → place your originals.
(SEND) → place your originals.NOTE:
For instructions on how to place your originals, see Basic Operations.
2
Press [New Address] → [Fax].

NOTE:
If Fax Send is set to ‘Do not allow’, [Fax] is not displayed. (Customizing Settings)
3
Enter the international access code using - (numeric keys).
- (numeric keys).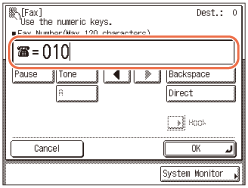
4
If necessary, press [Pause] to enter a pause time.
NOTE:
The pause time differs in length, depending on whether it is entered in the middle or at the end of a fax number.
The pause time entered in the middle of a fax number (lower-case p) is set to two seconds long by default. This can be changed to any length between 1 and 15 seconds. (Adjusting the Pause Time)
The pause time entered at the end of a fax number (upper-case P) is set to 10 seconds long. (This length cannot be changed.)
Two or more pauses can be entered consecutively.
Enter a pause time long enough to allow the dial tone to be heard after the international access code is dialed.
5
Enter the country code, the area code, and the fax number using - (numeric keys).
- (numeric keys).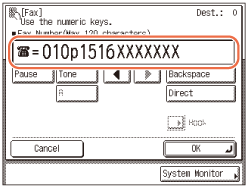
6
If necessary, press [Pause] to enter a pause time at the end of the fax number.
7
Press [OK].
The specified destination appears on the top screen.
If you want to check or change the specified destination:
|
1
|
Press [Details] → check or change the destination’s information → press [OK].
For help, see step 4 in Sending an E-Mail Message.
|
If you want to delete the specified destination:
|
1
|
Press [Erase].
For help, see step 4 in Sending an E-Mail Message.
|
NOTE:
If Confirm Entered Fax Numbers in Restrict the Send Function is set to ‘On’, you should enter the fax number again for confirmation. Enter the fax number you entered in step 5 → press [OK]. (Setting the Send Function)
8
Press [Scan Settings] to specify the scan settings you require.
For more information, see Specifying the Scan Settings.
9
Press (Start) to start scanning your originals.
(Start) to start scanning your originals.To cancel scanning, press [Cancel] or (Stop).
(Stop).If the original is placed on the platen glass, follow the instructions that appear on the touch panel display → press (Start) once for each original. When scanning is complete, press [Done].
(Start) once for each original. When scanning is complete, press [Done].The scanned data is sent to the specified destination when scanning is complete.