Overview of Send and Fax Functions
This machine enables you to scan documents and send them via e-mail, I-fax, and fax, or to a file server or USB memory media device. You can also send documents to multiple destinations simultaneously using various sending methods, such as e-mail and I-fax.
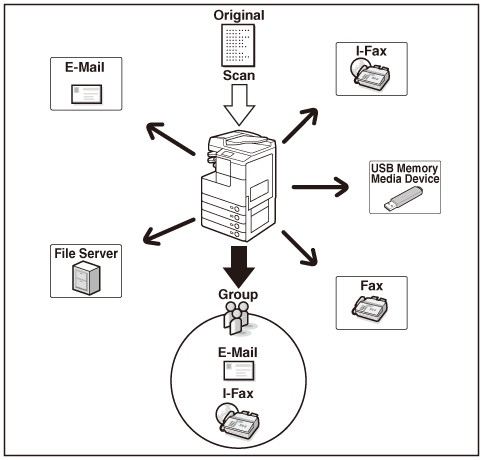
Sends scanned documents to an e-mail application. Scanned documents are converted to file formats such as TIFF and are transmitted as an e-mail attachment to the recipient’s e-mail application.
I-fax
Sends fax documents over the network. Scanned documents are converted to TIFF format and are transmitted as an e-mail attachment to the recipient’s I-fax compatible machine. Regardless of the distance and area, I-fax helps you to reduce transmission costs by making transactions via the Internet.
|
NOTE
|
|
You can send/receive e-mails and I-faxes securely using TLS-encrypted communications. (Setting up the Machine for Your Network Environment)
|
File server
Sends scanned documents to a file server. Scanned documents are converted to file formats such as TIFF and are transmitted to the specified file server.
USB memory media device
Stores scanned documents in a USB memory media device. Scanned documents are converted to file formats such as TIFF and are transmitted directly to the USB memory media device connected to the machine.
Fax
Sends scanned documents as faxes.
|
IMPORTANT
|
|
To send documents via e-mail and I-fax, or to a file server or USB memory media device with the imageRUNNER 2545/2535/2530/2525/2520, the Send function must be activated with the optional Color Send Kit-Y1.
Sending documents via fax is available only when the optional Super G3 Fax Board-AG1 is attached to the machine.
|
Keys and Functions
Whenever using Send and Fax functions, you need to press  (SEND) first to switch the screen shown below, called the top screen (Send). The top screen (Send) that is displayed varies depending on the options installed and the settings specified, as shown below.
 (SEND) first to switch the screen shown below, called the top screen (Send). The top screen (Send) that is displayed varies depending on the options installed and the settings specified, as shown below.
If the Send function is activated and the Super G3 Fax Board-AG1 is attached to the machine
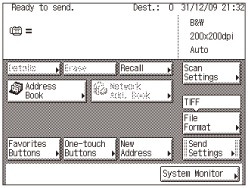 |
|
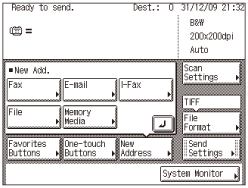 |
If only the Send function is activated
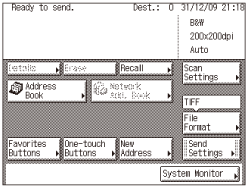 |
|
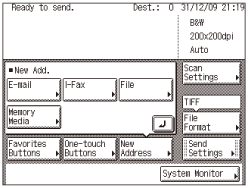 |
If only the Super G3 Fax Board-AG1 is attached to the machine
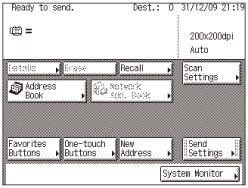 |
|
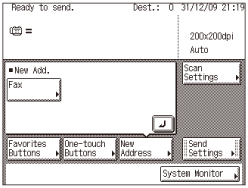 |
If Authorized Send is activated
[Send Mail To Self] and [Send File To Self] appear when you press [New Address]. You can press [Send Mail To Self] and [Send File To Self] to specify your e-mail address and your computer folder as the destination. (Sending Documents to Your E-Mail Address Using Authorized Send, Sending Documents to Your Folder Using Authorized Send) The screen below shows the top screen (Send) with the Send function activated and the Super G3 Fax Board-AG1 attached to the machine.
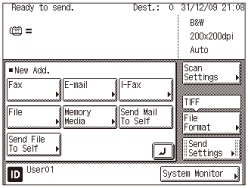
The names and functions of the keys on the top screen (Send) are described below.
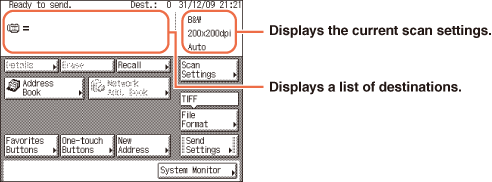
 → Specifying the Scan Settings → Specifying the Scan SettingsPress to configure the scan settings for the document you are sending. You can set the document type (color or black & white, document size, two-sided original, and different size originals), resolution, density, and image quality. |
|
|
|
|
 → Specifying the File Format → Specifying the File FormatPress to select the file format of the document you are going to send (<B&W>: TIFF, PDF, and PDF (OCR)*; <Color>: JPEG, PDF, PDF (Compact), PDF (OCR)*, and PDF (Compact+OCR)*). This gives you the freedom to send documents in a manner that is suited to the purpose of the document, as well as the recipient’s document handling environment. * Available only when the optional OCR function is activated.
|
|
|
|
|
 → Basic Sending Methods → Basic Sending MethodsPress to set the send settings. You can specify various settings, such as setting the time to send a document and entering a subject for an e-mail or an I-fax. |
|
|
|
|
|
Press to check or change the destination information selected from the destination list.
|
|
|
|
|
|
|
|
|
Press to recall previously set send jobs, including the destinations, scan settings, and send settings.
|
|
|
|
|
 → Using the Address Book → Using the Address BookPress to select a destination from the Address Book, or to search for a destination registered in the Address Book. |
|
|
|
|
|
Press to search for addresses stored on LDAP (Lightweight Directory Access Protocol) servers on the network and use them as recipients for send jobs.
|
|
|
|
|
 → Using the Favorites Buttons → Using the Favorites ButtonsPress to recall the destinations and settings stored in a favorites button. |
|
|
|
|
|
Press to recall the destinations stored in a one-touch button.
|
|
|
|
|
 → Basic Sending Methods → Basic Sending MethodsPress to specify a destination not stored in the Address Book. If Authorized Send is activated, you can easily specify your e-mail address and your computer folder as destination. (Sending Documents to Your E-Mail Address Using Authorized Send, Sending Documents to Your Folder Using Authorized Send) |
|
|
|
|
 → Checking / Changing the Status of Documents in Memory → Checking / Changing the Status of Documents in MemoryPress to check the status or details of a send or receive job, or to cancel a job. |
|
|
|
 →
→  →
→  →
→  →
→  →
→