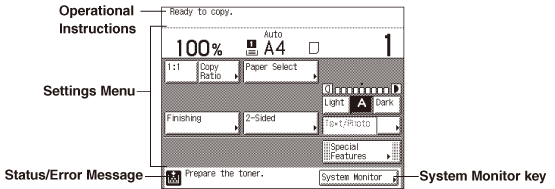
Using the Touch Panel Display
The touch panel display on the control panel enables you to access and make settings by touching the screen directly. For example, if you wish to view and select from the Finishing options, press [Finishing] directly on the display. The machine will display the available Finishing options.
|
IMPORTANT
|
|
Press the touch panel display keys gently with your fingers. Do not use a pencil, ballpoint pen, or other sharp object that can scratch the surface of the touch panel display. Doing so may damage the touch panel display.
|
The screen shot below is an example of the top screen of the Copy function.
|
NOTE
|
|
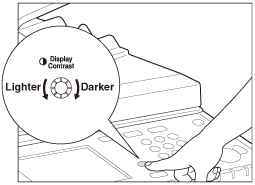
If the touch panel display is difficult to view, use the Display Contrast dial on the control panel. Turn the dial clockwise or counterclockwise to obtain the desired contrast.
|
Selecting the Desired Function
By default, the machine is set to display the top screen of the Copy function when you turn ON the machine. (Initial Function at Power ON) If you wish to use other functions, such as Send and Remote Scan, you need to switch the display to the screen of the desired function.
The table below lists the keys that you need to press to select the desired function.
|
Functions
|
Key
|
Location
|
|
Copy
|
 (COPY) (COPY) |
Control Panel
|
|
Send or Fax
|
 (SEND) (SEND) |
|
|
Remote Scan, USB Memory Media Print, or Secure Printing
|
 (SCAN/OPTIONS) (SCAN/OPTIONS) |
|
|
System Monitor
|
[System Monitor]
|
Touch Panel Display
|
|
IMPORTANT
|
|
To use the Send function with the imageRUNNER 2545/2535/2530/2525/2520, the function must be activated with the optional Color Send Kit-Y1.
The Fax function is available only when the optional Super G3 Fax Board-AG1 is attached to the machine.
|
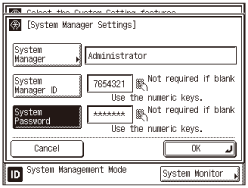
Using the Menus
The machine employs a menu system that you can use to configure the machine settings or register important information.
 |
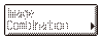
Keys with a right triangle (
 ) in the lower right corner indicate that pressing these keys displays additional screens or drop-down lists to set their functions. ) in the lower right corner indicate that pressing these keys displays additional screens or drop-down lists to set their functions. |
 Not highlighted (Not selected)
 Highlighted (Selected)
|
Highlighted keys indicate that the corresponding settings or modes are selected. To select the other settings or modes, press the keys that are not highlighted. Some highlighted keys can be pressed to cancel the selected settings or modes.
|
 Grayed out (Not available for selection)
|
When certain modes are set, the characters on some keys may become grayed out and unavailable for selection. This means that the settings or modes corresponding with these keys cannot be selected in combination with the presently set settings or modes.
|
 Settings are stored.
 No settings are stored.
|
Keys with a black square (
 ) in the lower right corner indicate that settings for a certain purpose are already stored in these keys. When the square is blank, no settings are stored in the key. ) in the lower right corner indicate that settings for a certain purpose are already stored in these keys. When the square is blank, no settings are stored in the key. |
|
NOTE
|
|
The display automatically returns to the top screen if the machine has not been operated for the preset period of time. (Auto Clear Time)
|
Entering Characters
For screens that require alphanumeric entries, enter characters using the on-screen keyboard and  -
-  (numeric keys) on the control panel.
- (numeric keys) on the control panel.|
NOTE
|
|
You can also use a standard USB keyboard to enter characters. (Entering Characters Using a USB Keyboard)
|
Entering Numbers
Whenever the numeric keys icon ( ) is displayed on the screen, you can use - (numeric keys) on the control panel to enter a number.
) is displayed on the screen, you can use - (numeric keys) on the control panel to enter a number.
Entering Alphanumeric Characters
Whenever the on-screen keyboard is displayed, you are expected to enter alphanumeric characters.
|
IMPORTANT
|
|
If the Language Switch setting is set to ‘On’, some characters are restricted and cannot be entered. To enter all characters, set the Language Switch setting to ‘Off’. (Changing the Language on the Display)
|
|
NOTE
|
|
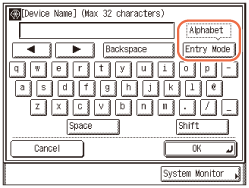
The procedure below uses the Device Name screen as an example to show how to enter characters. (Other System Settings)
|
1
Press [Entry Mode] to select the desired entry mode.
The entry mode changes every time you press [Entry Mode].
|
1
|
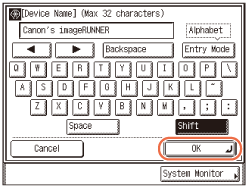
To enter alphabetic characters, select [Alphabet].
 |
|
2
|
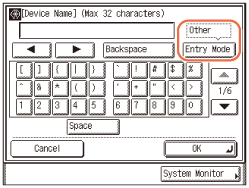
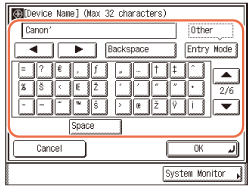
To enter symbols, select [Other].
 |
2
Enter the desired characters.
When the entry mode is [Alphabet]:
|
1
|
Press the keys for the desired characters.
 To enter uppercase letters, press [Shift] → enter the desired letters.
|
When the entry mode is [Other]:
|
1
|
Press [
 ] or [ ] or [ ] until the desired symbol appears. ] until the desired symbol appears.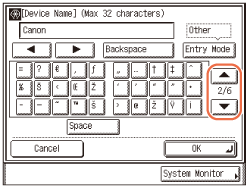 |
|
2
|
Press the key for the desired symbol.
 |
NOTE:
If you make a mistake when entering a character, press [ ] or [] to position the cursor on the right side of the incorrect character → press [Backspace] to delete the character → enter the correct character.
] or [] to position the cursor on the right side of the incorrect character → press [Backspace] to delete the character → enter the correct character.To delete all of the entered characters, press  (Clear) on the control panel.
The available entry modes and the maximum number of characters that you can enter may vary depending on the type of entries you are making.
3
When you have entered all characters, press [OK].
Entering Characters Using a USB Keyboard
Instead of using the on-screen keyboard, you can also use a standard USB keyboard to enter characters.
|
IMPORTANT
|
|
Make sure that the shape of the USB keyboard connector meets USB specifications. Inserting a connector that does not meet USB specifications may damage the USB port.
Do not insert the connector of the USB keyboard into the USB port at an angle.
Some USB keyboards may not operate correctly.
|
|
NOTE
|
|
The USB keyboard can be disconnected from the machine at any time. No special operation is required to remove it.
|
Using a USB Keyboard
Entering characters using the USB keyboard is easy. However, keep in mind the following differences from the on-screen keyboard:
Only ASCII characters can be entered from the USB keyboard.
You do not need to change the entry mode. When the entry mode drop-down list is displayed on the screen, you cannot enter characters from the USB keyboard.
Single key operations cannot be combined using both the USB keyboard and the on-screen keyboard. For example, pressing [Shift] on the touch panel display while entering characters <usb> from the USB keyboard results in the lowercase entry <usb>, not the uppercase <USB>.
Even when using a USB keyboard, you must press [OK] on the touch panel display when you have entered all the desired characters. The Enter key of the USB keyboard is used only to enter line breaks.
Keys that are not included in the on-screen keyboard, such as Delete, End, Tab, Esc, and function keys, cannot be used on the USB keyboard.
|
NOTE
|
|
The key entry sound made when entering characters using the USB keyboard can be controlled just as with the on-screen keyboard. (Volume Control)
|