Adjusting the Copy Image
Gradation refers to the dark to light continuum of shades of color. The more shades in the gradations of color that are printed, the more natural printouts seem. When the gradation or density of the copies is significantly different from that of the original document, perform the gradation adjustment so that the copy results more closely match the original document. Note that you cannot perform this adjustment while the machine is performing some functions, including scanning and printing.
1
Press  .
.
 .
.2
Use  /
/ to select <Adjustment/Maintenance>, and press
  .
.
 /
/ to select <Adjustment/Maintenance>, and press
  .
.3
Select <Adjust Copy Image>, and press  .
.
 .
.4
Check that the size and type of paper displayed on the screen is loaded in the machine, and press  .
.
 .
.
5
Confirm the procedure, and press  .
.
 .
.Adjustment starts. In approximately 15 seconds, an adjustment image is printed.

6
Open the feeder or the platen glass cover after the printing progress screen disappears.
7
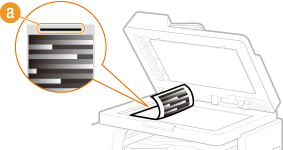
Place the adjustment image on the platen glass with the print side face down.
Place the adjustment image so that the black stripe ( ) is toward the left side of the machine.
 ) is toward the left side of the machine.
8
Gently close the feeder or the platen glass cover.
9
Press  .
.
 .
.The machine starts scanning the adjustment image. In approximately 15 seconds, the adjustment is finished.

10
Press  to close the menu screen.
 to close the menu screen.
11
Open the feeder or the platen glass cover, and remove the adjustment image.
12
Gently close the feeder or the platen glass cover.
|
NOTE
|
If the <Correction failed.> message is displayedDid you load plain A4 or Letter size paper into a paper source?
Did you place the adjustment image with the print side face down, with the black stripe toward the left side of the machine?
Has a paper jam occurred?
|