Converting to PDF Documents with Advanced Settings in Quick Printing Tool
With the Quick Printing Tool, you can specify data compression and password settings to convert documents to PDF documents.
|
NOTE
|
|
Documents converted to PDF files are saved on the desktop screen of Windows. You can change the destination folder. For more information, see the following.
The document name of the PDF document that is created is the same as the original document name, with the extension changed to "*.pdf". If another document with the same name already exists in the destination of the converted PDF document, the document name has "(2)" added to the end of it.
|
1.
Drag a document/folder to the Quick Printing Tool.
A popup menu is displayed.
|
NOTE
|
|
While dragging the mouse, the Quick Printing Tool is displayed at the front if the [T] key on the keyboard is pressed, or near the mouse cursor if the [N] key on the keyboard is pressed. You can also change the assigned keys. For more information, see the following.
|
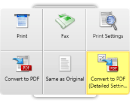
2.
Drop the dragged document/folder to [Convert to PDF (Detailed Settings)].
The menu that the mouse cursor is currently over is highlighted in yellow.
When you drag multiple documents or a folder, the [Multiple Document Order Settings] dialog box is displayed. In this case, proceed to step 3. If you selected a single document, the [Detailed Settings for PDF Document] dialog box is displayed. Proceed to step 5.
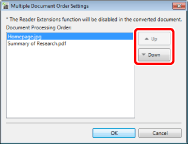
3.
Select a document in [Document Processing Order] and click  or
or  to specify the order of converting the documents.
|
NOTE
|
|
When you drag multiple documents, the document name of the PDF document that is created is the same as the first document name, with the extension changed to "*.pdf". If another document with the same name already exists in the destination of the converted PDF document, the document name has "(2)" added to the end of it.
|
4.
Click [OK].
5.
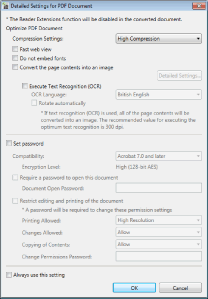
Specify the advanced settings in the [Detailed Settings for PDF Document] dialog box.
|
[Compression Settings]
|
Set the compression level of the PDF document.
|
|
[Fast web view]
|
Select this check box to optimize the PDF document for display on the Web.
Converting a PDF document with this check box selected enables the document to be downloaded page by page (with byte-serving) when the PDF has been uploaded to the Web.
|
|
[Do not embed fonts]
|
Select this check box to convert without using embedded fonts when creating the PDF document.
Converting a PDF document without using embedded fonts enables the size of the PDF document to be reduced.
|
|
[Convert the page contents into an image]
|
Select this check box to convert all pages in a document that will be converted to a PDF document into TIFF format images.
|
|
[Detailed Settings]
|
Enables you to configure how to convert images.
[Color Mode]: Specifies the color.
[Resolution]: Specifies the resolution.
|
|
[Execute Text Recognition (OCR)]
|
Select this check box to enable text searches for documents converted to TIFF images (OCR function).
If this check box is selected, a check mark is automatically displayed for the [Convert the page contents into an image] check box.
When you convert a large size document, it may take time.
|
|
[OCR Language]
|
Select the language to use for the OCR function from the pull-down list.
|
|
[Rotate automatically]
|
If this check box is selected, the vertical orientation of the document is corrected. Select this check box when the document includes both vertically and horizontally-oriented pages.
|
|
[Set password]
|
If you want to restrict PDF access, printing, and editing for security reasons, select this check box.
|
|
[Compatibility]
|
Select security compatibility settings for the PDF document.
|
|
[Require a password to open this document]
|
Select this check box to set a password for opening the document.
|
|
[Document Open Password]
|
Enter the password for the PDF document.
|
|
[Restrict editing and printing of the document]
|
Select this check box to restrict printing, editing, and copying of the PDF document.
|
|
[Printing Allowed]
|
Specify the conditions for printing. Select either [High Resolution] or [None].
|
|
[Changes Allowed]
|
Specify whether to allow editing of the document. Select either [Allow] or [None].
|
|
[Copying of Contents]
|
Specify whether to allow copying of the contents of PDF document. Select either [Allow] or [None].
|
|
[Change Permissions Password]
|
Enter the password to release print and editing restrictions in the document.
|
|
[Always use this setting]
|
Select this check box to use the same settings without displaying the [Detailed Settings for PDF Document] dialog box from next time.
|
|
NOTE
|
|
If you select the [Execute Text Recognition (OCR)] check box, be wary of the following.
The maximum paper size for the original document is A3.
Because original skew is automatically corrected, the paper size of the created PDF document may become larger than the paper size of the original document. In this case, if you print/fax using the same paper size as the original document, the created document may appear smaller.
Additional hard disk space is required along with free space for the created PDF document. If there is a large number of pages, up to 1 GB of free space will be used.
In the following cases, the dialog box is displayed even if the [Always use this setting] check box is selected.
When the [Require a password to open this document] check box is selected
When the [Restrict editing and printing of the document] check box is selected
If you select the [Always use this setting] check box, the [Detailed Settings for PDF Document] dialog box is not displayed from next time. To display a dialog box when dropping a file, select the [Display dialog box when [Convert to PDF (Detailed Settings)]] check box.
Right-click the Quick Printing Tool > [iR-ADV Desktop Quick Printing Tool Settings] > [Other] tab > [Display dialog box when [Convert to PDF (Detailed Settings)]]
|
6.
Click [OK].
The document is converted to a PDF document with detailed settings specified.
|
NOTE
|
|
While the document is being converted to a PDF file, the converting icon is displayed. When conversion is completed, you are notified via a message.
If you select [Open the destination folder after converting] in the Quick Printing Tool settings, the destination folder is displayed when the PDF document conversion is complete. For information on this setting, see the following.
The [Printing] dialog box or the [Print] dialog box of the application used to create the document may be displayed. In this case, select Desktop Document Writer as the output printer and print.
You can drop another file to convert to a PDF document to the Quick Printing Tool while a PDF document is being converted. In this case, the files are processed in the order that they are dropped.
|