Sending Faxes from Quick Printing Tool
You can drag and drop a document/folder to the Quick Printing Tool to send a fax. You can send multiple documents at the same time.
1.
Drag a document/folder to the Quick Printing Tool.
A popup menu is displayed.
|
NOTE
|
|
While dragging the mouse, the Quick Printing Tool is displayed at the front if the [T] key on the keyboard is pressed, or near the mouse cursor if the [N] key on the keyboard is pressed. You can also change the assigned keys. For more information, see the following.
|
2.
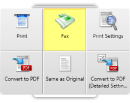
Drop the dragged document/folder to [Fax].
The menu that the mouse cursor is currently over is highlighted in yellow.
When you drag multiple documents or a folder, the [Multiple Document Order Settings] dialog box is displayed. In this case, proceed to step 3. However, if the [Send one file at a time by fax without combining multiple files] check box is selected on the [Other] tab of the [imageRUNNER ADVANCE Desktop Quick Printing Tool Settings] dialog box, proceed to step 5. Also proceed to step 5 if you selected a single document.
|
NOTE
|
|
When you drop a folder or an Outlook message file (*.msg), the [Multiple Document Order Settings] dialog box is displayed, even if [Send one file at a time by fax without combining multiple files] is selected. In this case, proceed to step 3.
Right-click the Quick Printing Tool > [iR-ADV Desktop Quick Printing Tool Settings] > [Other] tab > [Send one file at a time by fax without combining multiple files]
If you right-click to select the document or folder, and drag and drop it to [Fax], the following menu is displayed.
[Multiple Document Order Settings]: Displays the [Multiple Document Order Settings] dialog box.
[Cancel]: Cancels sending the fax.
|
3.
Select a document in [Document Processing Order] and click  or
or  to specify the order of faxing the documents.
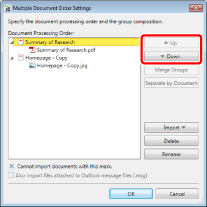
For more information on the [Multiple Document Order Settings] dialog box, see the following.
4.
Click [OK].
The [Fax Sending Settings] dialog box is displayed.
5.
Configure the fax destination.

|
NOTE
|
|
For details on how to set the destination address, see the following.
|
6.
Configure the cover sheet settings if necessary.

|
NOTE
|
|
For more information on how to configure cover sheet settings, see the following.
|
7.
To specify a job name for the fax document to be sent, enter the name in [Document Name].
8.
To fax a document using an external number, select the [Specify Outside Dialing Prefix] check box and enter the fax number in [Outside Dialing Prefix].
9.
When specifying the line to be used, select it from the [Select Line (G3/G4)] pull-down list.
Select [Auto (G3/G4)] when specifying line is not required. Send faxes using the prior sending line specified by the device.
|
NOTE
|
|
If you send a fax with the IP fax function, this setting will be disabled.
|
10.
Select the [Insert annotations and send] check box to include annotations when sending the fax.
|
NOTE
|
|
Annotations added with something other than Desktop Editor may be faxed regardless of whether you select the [Insert annotations and send] check box, depending on the type of annotation.
|
11.
Click [OK].
The faxing starts.
|
NOTE
|
|
If you dropped multiple documents to [Fax] with the [Send one file at a time by fax without combining multiple files] check box selected, the [Fax Sending Settings] dialog box is displayed for the next document. In this case, repeat steps 5 to 11.
Right-click the Quick Printing Tool > [iR-ADV Desktop Quick Printing Tool Settings] > [Other] tab > [Send one file at a time by fax without combining multiple files]
For more information on the status of fax jobs, see the following.
The [Printing] dialog box or the [Print] dialog box of the application used to create the document may be displayed. In this case, select [Desktop Document Writer] as the output printer and print.
|