Erasing Information You Should Not Disclose
You can use Desktop Editor to partially delete original data. This function is called "redaction". Redaction is performed using the Redaction Mode of Desktop Editor.
|
IMPORTANT
|
|
Parts with redactions applied cannot be undone. The data for parts with redactions applied are completely deleted.
When redactions are applied to an image which has multiple instances in the same document, redactions may be applied to other places in the document where the same image occurs.
When redactions are applied to a PDF document in which a digital signature and watermark have been added using Adobe Acrobat, and it is imported using Desktop Editor, if the redactions are applied to one of the watermarks which have been set before importing, redactions are applied to the same watermark on other pages in the document.
Text around the redaction range may be deleted when the redactions are applied, depending on the shape and layout (rotation, etc.) of the text.
|
|
NOTE
|
|
The following documents cannot be redacted.
PDF documents with a digital stamp
PDF documents with updates not allowed in their security settings
Redactions may not be able to be applied to IWB documents that have imported PDF documents with Reader Extensions.
|
Redaction
This section describes an overview of redaction.
Redaction is a function that can delete objects such as text, graphics, etc. from a document.
The deleted areas cannot be viewed even from another application.
This function is used to prevent a specific area of a document from being publicly viewed.
 |
 |
|
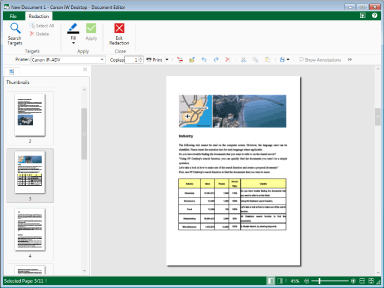
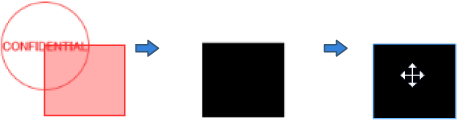
Before Redaction
|
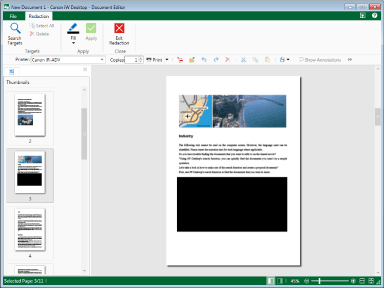
After Redaction
|
The redaction pattern differs according to the type of objects under the redaction markings.
Images: For figures, symbols, logos, etc.
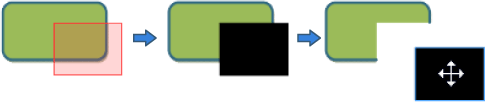
After redaction has been applied, the areas covered with redaction markings are deleted. By moving the redacted markings that have been converted into objects, you can see behind them.
Images: For photos, illustrations made with the paint tool, etc.
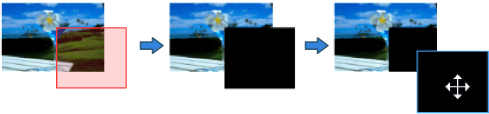
If you created a redaction mark over all objects:
After redaction has been applied, all image objects are deleted. By moving the redacted markings that have been converted into objects, you can see behind them.
If you created a redaction mark over only some objects:
After redaction has been applied, only the areas with redaction markings created are deleted. By moving the redaction markings that have been converted into objects, the areas that have been deleted are filled with the specified color.
Text objects

After redaction has been applied, the areas covered with the redaction markings you created are deleted character by character.
Characters that are partially within the area of the redaction markings you created are also deleted.
When a redaction is performed part way through a string, the text object is cut where the redaction is performed.
Annotations
After applying redactions, annotations that are partially within the area of the redaction markings you created are also deleted.
Annotations cannot be partially deleted.
|
NOTE
|
|
If redaction markings are small compared to the text, the text may not be deleted.
Use annotations if you want to temporarily hide or change a document without deleting it. For information on adding annotations to documents in Desktop Editor, see the following.
Redaction markings can be selected as objects in the Edit Original Pages Mode.
Redaction markings are not converted to objects in the Annotation Mode.
|
Starting the Redaction Mode
This section describes how to start the Redaction Mode.
|
NOTE
|
|
For information on the screen transition of Desktop Editor, see the following.
|
1.
Click  (Redaction) on the ribbon.
(Redaction) on the ribbon.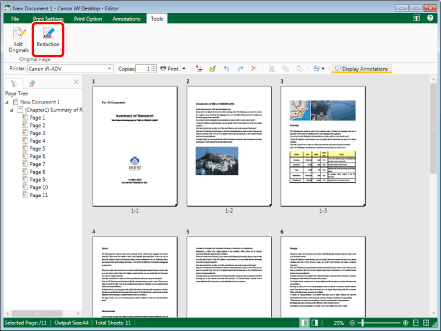
The Redaction Mode starts, and the [Redaction] tab is displayed on the ribbon.
The shape of the mouse pointer changes to  .
.
|
NOTE
|
|
This operation can also be performed with the tool buttons on the toolbar. If tool buttons are not displayed on the toolbar of Desktop Editor, see the following to display them.
While the Redaction Mode is running, tabs other than the [Redaction] tab are not displayed on the ribbon.
|
Redaction Flow
This section describes the flow of redaction.
Redactions are applied after creating redaction markings.
|
NOTE
|
|
You can create multiple redaction markings.
You cannot change the overlapping order of redaction markings you created.
You cannot change the size of redaction markings you created.
To delete a redaction marking you created, select the redaction marking to delete and perform one of the following operations.
Click
 (Delete) on the ribbon (Delete) on the ribbonRight-click and select [Delete]
This operation can also be performed with the tool buttons on the toolbar. If tool buttons are not displayed on the toolbar of Desktop Editor, see the following to display them.
|
Creating Redaction Markings
This section describes how to create redaction markings.
Redaction markings can be created using any of the following two methods:
Creating Redaction Markings by Marking
1.
Drag the mouse pointer selection rectangle to include the area you want to perform redaction on.
The area that you have marked is highlighted in light red.
|
NOTE
|
|
You cannot start marking an area from outside of the page area. However, you can finish marking an area even from outside of the page area. When you finish marking an area outside of the page area, the area marked outside of the page is also highlighted in light red.
You cannot create new markings on top of redaction markings. However, you can end a marking area over another marked area to overlap the markings.
|
2.
Drag the redaction marking to adjust its position, as required.
|
NOTE
|
|
You can move a redaction marking so that it overlaps with another redaction marking.
To select all the redaction markings on the page, click
 (Select All) on the ribbon, or right-click and select [Select All]. (Select All) on the ribbon, or right-click and select [Select All].You can also click
 (Select All) displayed on the toolbar to perform the same operation. If tool buttons are not displayed on the toolbar of Desktop Editor, see the following to display them. (Select All) displayed on the toolbar to perform the same operation. If tool buttons are not displayed on the toolbar of Desktop Editor, see the following to display them.For more information on applying redactions, see the following.
|
Creating Redaction Markings by Selecting Text That Has Been Searched for
This section describes how to create redaction markings for strings you have searched over.
|
NOTE
|
|
Annotation text cannot be searched.
The maximum search string length is 256 characters. Surrogate pair characters are counted as two or more characters.
|
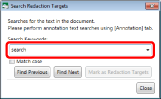
1.
Click  (Search Targets) on the ribbon.
(Search Targets) on the ribbon.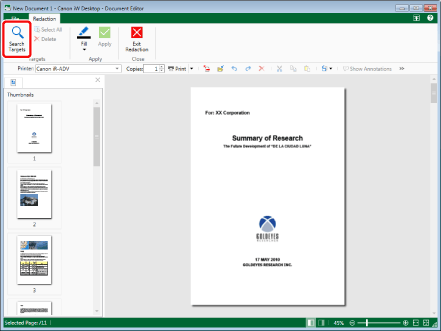
The [Search Redaction Targets] dialog box is displayed.
|
NOTE
|
|
This operation can also be performed with the tool buttons on the toolbar. If tool buttons are not displayed on the toolbar of Desktop Editor, see the following to display them.
|
2.
Enter the string to redact in [Search Keywords].
Or, click  and select the string to redact from the pull-down list.
|
NOTE
|
|
The pull-down list displays a maximum of 10 strings searched for in the past.
|
3.
Select the [Match case] check box to perform case-sensitive searches.
4.
Click [Find Next] or [Find Previous].
Or, press the [Enter] key or [Shift] + [Enter] keys on the keyboard.
Pages that include strings that match the string you searched for are displayed.
Strings that match the string you searched for are highlighted.
|
NOTE
|
|
When it takes time to search, a dialog box indicating that a search is being performed is displayed.
|
5.
Click [Mark as Redaction Targets].
The redaction marking is created on the highlighted text.
|
NOTE
|
|
You cannot move the position of redaction markings created by searching for text.
|
6.
Click [Close] to cancel searching.
Or click  .
.
|
NOTE
|
|
For more information on applying redactions, see the following.
|
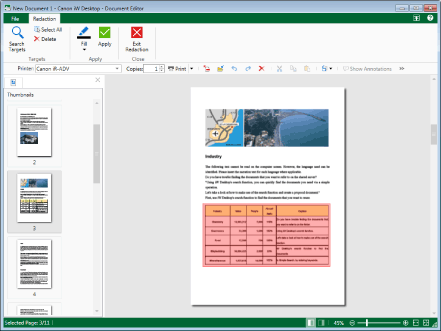
Applying Redactions
This section describes how to apply redactions.
|
NOTE
|
|
You cannot cancel the process for applying redactions.
|
1.
Click  (Fill) on the ribbon, and select the color for filling the created redaction marking.
(Fill) on the ribbon, and select the color for filling the created redaction marking.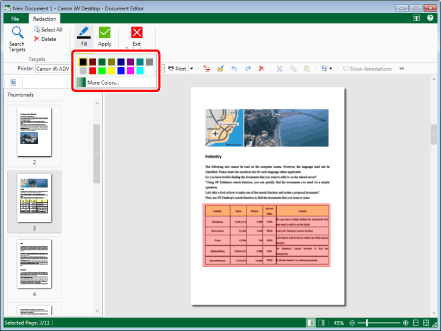
|
NOTE
|
|
When you want to use a color that is not available in the color list, select [More Colors] to set a color on the [Color] dialog box.
|
2.
Click  (Apply) on the ribbon.
(Apply) on the ribbon.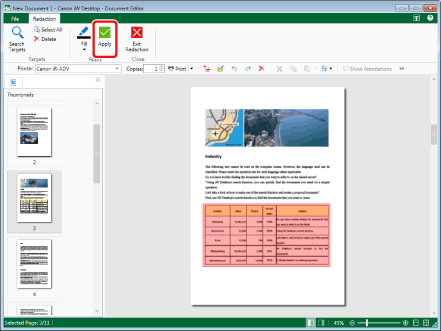
A confirmation message is displayed.
3.
Click [Yes].
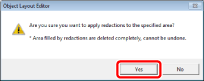
The redactions are applied.
|
NOTE
|
|
The redaction pattern differs according to the type of objects under the redaction markings. For more information, see the following.
|
Exiting the Redaction Mode
This section describes how to exit the Redaction Mode.
1.
Click  (Exit Redaction) on the ribbon.
(Exit Redaction) on the ribbon.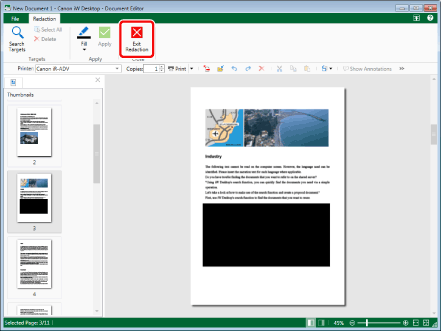
The [Redaction] tab is closed, and the Redaction Mode is exited.
|
NOTE
|
|
Clicking [Exit Redaction] before applying the redactions displays a confirmation message.
Click [Yes] to apply the redactions and close the Redaction Mode.
Click [Cancel] to close the Redaction Mode without applying the redactions.
|