Configuring the Header/Footer
You can configure the header/footer for documents.
The following settings can be specified for the header/footer. Advanced settings can also be specified.
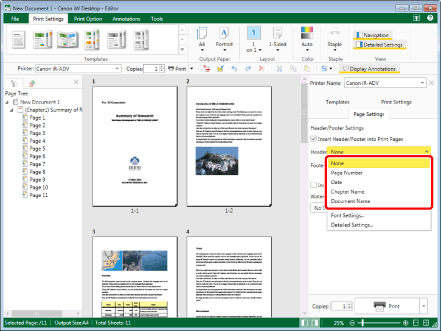
Page Number
Date
Chapter Name
Document Name
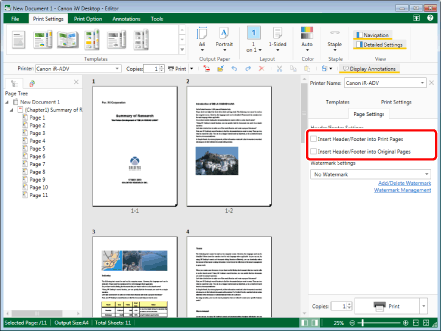
Select [Insert Header/Footer into Print Pages] or [Insert Header/Footer into Original Pages] to configure the header/footer.
Print Pages: Set the header/footer for each page to print.
Original Pages: Set the header/footer for each original page.
|
NOTE
|
|
For information on how to configure the header/footer on a chapter basis, see the following.
|
Configuring the Header/Footer
1.
Select the [Insert Header/Footer into Print Pages] check box in [Header/Footer Settings] on the [Page Settings] tab on the Details Window.
Or, select the [Insert Header/Footer] check box in the [Print Pages] group on the ribbon.
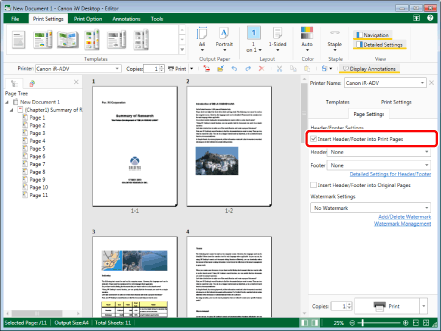
The pull-down list of settings to configure in the header/footer is displayed.
|
NOTE
|
|
If the Details Window is not displayed, see the following.
Select the [Insert Header/Footer into Original Pages] check box to set the header/footer for the original page. To use a ribbon command to do this, select the [Insert Header/Footer] check box in the [Original Pages] group on the ribbon.
If commands are not displayed on the ribbon of Desktop Editor, see the following to display them.
This operation can also be performed with the tool buttons on the toolbar. If tool buttons are not displayed on the toolbar of Desktop Editor, see the following to display them.
|
2.
Select the header/footer settings from the pull-down list in [Header/Footer Settings] on the [Page Settings] tab on the Details Window.
Or, select the items to set for the header/footer from the pull-down list of each [Header]/[Footer] in the [Print Pages]/[Original Pages] groups on the ribbon.
|
NOTE
|
|
If commands are not displayed on the ribbon of Desktop Editor, see the following to display them.
This operation can also be performed with the tool buttons on the toolbar. If tool buttons are not displayed on the toolbar of Desktop Editor, see the following to display them.
|
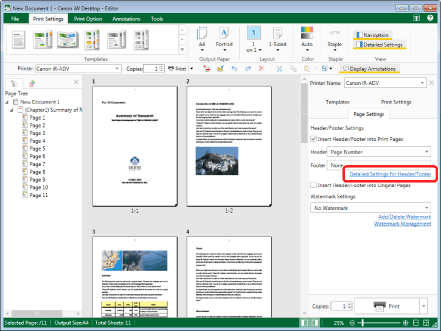
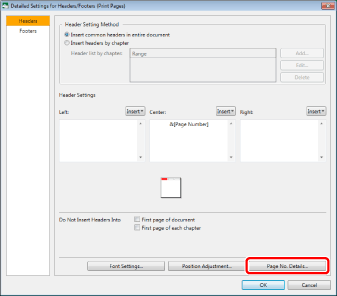
3.
To change the advanced settings of the header/footer, click [Detailed Settings for Header/Footer] in [Header/Footer Settings] on the [Page Settings] tab on the Details Window.
Or, follow one of the steps described below.
Select [Detailed Settings] from each [Header]/[Footer] pull-down list
Click  (Header/Footer on Print) on the ribbon
(Header/Footer on Print) on the ribbonClick  (Header/Footer on Original) on the ribbon
(Header/Footer on Original) on the ribbonSelect [Detailed Settings] from the pull-down list of each [Header]/[Footer] in the [Print Pages]/[Original Pages] groups on the ribbon

The [Detailed Settings for Headers/Footers (Print Pages)] dialog box is displayed.
|
NOTE
|
|
If commands are not displayed on the ribbon of Desktop Editor, see the following to display them.
This operation can also be performed with the tool buttons on the toolbar. If tool buttons are not displayed on the toolbar of Desktop Editor, see the following to display them.
|
4.
Specify the detailed settings for the header/footer as necessary.

|
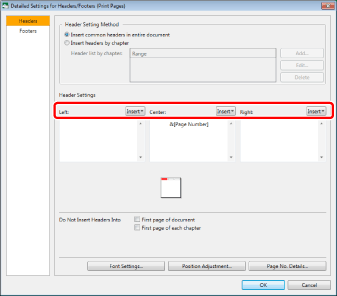
[Header Setting Method]
|
Options for setting the header.
|
|
[Insert common headers in entire document]
|
Select this when you want to insert headers throughout an entire document.
|
|
[Insert headers by chapter]
|
Select this when you want to insert headers individually for each chapter.
|
|
[Add]
|
You can select this when [Insert headers by chapter] has been selected. It will insert the same header for all chapters between the first and last chapter you selected.
|
|
[Edit]
|
Click this to change the range in which to insert the header.
|
|
[Delete]
|
Click this to delete the set range in which to insert the header.
|
|
[Header Settings]
|
The items you selected in [Header Setting Method] are displayed.
|
|
[Left]
|
Inserts the header on the left side.
|
|
[Center]
|
Inserts the header in the middle.
|
|
[Right]
|
Inserts the header on the right side.
|
|
[Do Not Insert Headers Into]
|
Use this when there is an item in which you do not want to insert a header.
|
|
[First page of document]
|
Select this check box when you do not want to insert a header in the first page.
|
|
[Last page of document]*
|
Select this check box when you do not want to insert a header in the last page.
|
|
[First page of each chapter]
|
Select this check box when you do not want to insert a header in the first page of the chapter.
|
|
[Place headers in opposite positions for front and back sides]*
|
Select this check box when you want to place the headers in the opposite positions for the front and back sides.
|
|
[Place headers in opposite positions for odd- and even-numbered pages]*
|
Select this check box when you want to place the headers in opposite positions for odd and even numbered pages.
|
*:Not displayed for [Insert Header/Footer into Original Pages].
|
NOTE
|
|
This procedure is the same for [Insert Header/Footer into Print Pages] and [Insert Header/Footer into Original Pages].
The items displayed in [Do Not Insert Headers Into] differ according to the printing method.
1-Sided Printing:
[First page of document]
[First page of each chapter]
2-Sided Printing:
[First page of document]
[Last page of document]
[First page of each chapter]
[Place headers in opposite positions for front and back sides]
Booklet Printing:
[First page of document]
[Last page of document]
[First page of each chapter]
[Place headers in opposite positions for odd- and even-numbered pages] (This setting is available for book type booklet printing.)
When specifying detailed footer settings, detailed footer settings are displayed. The settings are the same as those for the header.
|
5.
Click [OK].
Changing the Header/Footer Settings
You can change the header/footer settings.
|
NOTE
|
|
The procedure for the header/footer is the same for both printed pages and original pages.
|
Changing the Header/Footer Insertion Position
You can change the header/footer insertion position.
1.
Click [Detailed Settings for Header/Footer] in [Header/Footer Settings] on the [Page Settings] tab on the Details Window.
Or, follow one of the steps described below.
Select [Detailed Settings] from each [Header]/[Footer] pull-down list
Click (Header/Footer on Print) on the ribbon
(Header/Footer on Print) on the ribbonClick (Header/Footer on Original) on the ribbon
(Header/Footer on Original) on the ribbonSelect [Detailed Settings] from the pull-down list of each [Header]/[Footer] in the [Print Pages]/[Original Pages] groups on the ribbon
The [Detailed Settings for Headers/Footers (Print Pages)] dialog box is displayed.
|
NOTE
|
|
If the Details Window is not displayed, see the following.
If commands are not displayed on the ribbon of Desktop Editor, see the following to display them.
This operation can also be performed with the tool buttons on the toolbar. If tool buttons are not displayed on the toolbar of Desktop Editor, see the following to display them.
|
2.
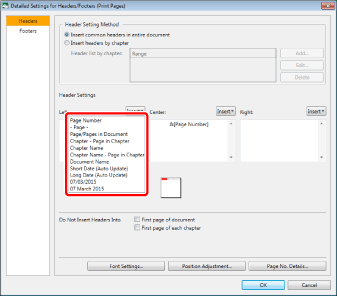
In [Header Settings], click [Insert] in the position you want to insert the header.
3.
Select the type of header to insert from the displayed list.
|
NOTE
|
|
You can also directly enter the header/footer.
Multiple headers/footers can be entered in a single location.
|
4.
Click [OK].
Changing the Header/Footer Font
You can change the header/footer font.
1.
Click [Detailed Settings for Header/Footer] in [Header/Footer Settings] on the [Page Settings] tab on the Details Window.
Or, follow one of the steps described below.
Select [Detailed Settings] from each [Header]/[Footer] pull-down list
Click (Header/Footer on Print) on the ribbon
(Header/Footer on Print) on the ribbonClick (Header/Footer on Original) on the ribbon
(Header/Footer on Original) on the ribbonSelect [Detailed Settings] from the pull-down list of each [Header]/[Footer] in the [Print Pages]/[Original Pages] groups on the ribbon
The [Detailed Settings for Headers/Footers (Print Pages)] dialog box is displayed.
|
NOTE
|
|
If the Details Window is not displayed, see the following.
If commands are not displayed on the ribbon of Desktop Editor, see the following to display them.
This operation can also be performed with the tool buttons on the toolbar. If tool buttons are not displayed on the toolbar of Desktop Editor, see the following to display them.
|
2.
Click [Font Settings].

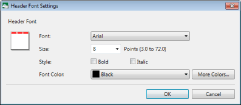
The [Header Font Settings] dialog box is displayed.
3.
Set the format of the header.
|
[Header Font]
|
Enables you to specify the font settings to use for the header.
For the footer, [Footer Font] is displayed.
|
|
[Font]
|
Select a font to use. The list displays the fonts installed in your computer.
|
|
[Size]
|
Select a font size to use. You can also enter the font size directly. Font sizes that can be configured are between 3.0 and 72.0 points. If it is entered directly, the figures below the second decimal place are omitted.
|
|
[Style]
|
To make the text bold, select [Bold].
To make the text italic, select [Italic].
|
|
[Font Color]
|
Select a font color to use. When you want to use a color that is not available in the list, click [More Colors].
|
|
[More Colors]
|
If you click this, the [Color] dialog box is displayed. On the [Color] dialog box, you can set a color that is not listed in [Font Color].
|
|
NOTE
|
|
The font settings in both [Insert Header/Footer into Print Pages] and [Insert Header/Footer into Original Pages] are the same.
When specifying font settings for a footer, the [Footer Font Settings] dialog box is displayed. The settings are the same as those in the header font settings.
|
4.
Click [OK].
The [Detailed Settings for Headers/Footers (Print Pages)] dialog box is displayed again.
5.
Click [OK].
|
NOTE
|
|
You can also specify the font settings by performing the following operations.
Select [Font Settings] from the pull-down list of each [Header]/[Footer] in [Header/Footer Settings] on the [Page Settings] tab on the Details Window
Select [Font Settings] from the pull-down list of each [Header]/[Footer] in the [Print Pages]/[Original Pages] groups on the ribbon
|
Changing the Header/Footer Display Position
You can change the header/footer display position.
1.
Click [Detailed Settings for Header/Footer] in [Header/Footer Settings] on the [Page Settings] tab on the Details Window.
Or, follow one of the steps described below.
Select [Detailed Settings] from each [Header]/[Footer] pull-down list
Click (Header/Footer on Print) on the ribbon
(Header/Footer on Print) on the ribbonClick (Header/Footer on Original) on the ribbon
(Header/Footer on Original) on the ribbonSelect [Detailed Settings] from the pull-down list of each [Header]/[Footer] in the [Print Pages]/[Original Pages] groups on the ribbon
The [Detailed Settings for Headers/Footers (Print Pages)] dialog box is displayed.
|
NOTE
|
|
If the Details Window is not displayed, see the following.
If commands are not displayed on the ribbon of Desktop Editor, see the following to display them.
This operation can also be performed with the tool buttons on the toolbar. If tool buttons are not displayed on the toolbar of Desktop Editor, see the following to display them.
|
2.
Click [Position Adjustment].
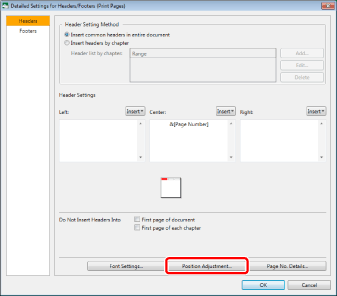
The [Detailed Position Adjustment for Headers] dialog box is displayed.
3.
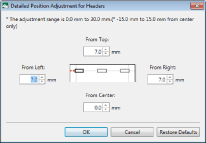
Enter the position to display the header/footer.
|
NOTE
|
|
Click [Restore Defaults] to return the header/footer to the standard position.
|
4.
Click [OK].
The [Detailed Settings for Headers/Footers (Print Pages)] dialog box is displayed again.
5.
Click [OK].
Changing the Detailed Page Number Settings
If the page numbers are to be inserted as header/footer, you can specify the detailed page number settings.
1.
Click [Detailed Settings for Header/Footer] in [Header/Footer Settings] on the [Page Settings] tab on the Details Window.
Or, follow one of the steps described below.
Select [Detailed Settings] from each [Header]/[Footer] pull-down list
Click (Header/Footer on Print) on the ribbon
(Header/Footer on Print) on the ribbonClick (Header/Footer on Original) on the ribbon
(Header/Footer on Original) on the ribbonSelect [Detailed Settings] from the pull-down list of each [Header]/[Footer] in the [Print Pages]/[Original Pages] groups on the ribbon
The [Detailed Settings for Headers/Footers (Print Pages)] dialog box is displayed.
|
NOTE
|
|
If the Details Window is not displayed, see the following.
If commands are not displayed on the ribbon of Desktop Editor, see the following to display them.
This operation can also be performed with the tool buttons on the toolbar. If tool buttons are not displayed on the toolbar of Desktop Editor, see the following to display them.
|
2.
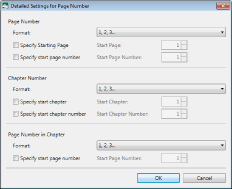
Click [Page No. Details].
The [Detailed Settings for Page Number] dialog box is displayed.
3.
Specify the detailed page number settings.
|
[Page Number]
|
Enables you to specify the detailed page number settings.
|
|
[Format]
|
Select the desired format from the pull-down list.
|
|
[Specify Starting Page]
|
Select this check box to specify the starting page.
|
|
[Start Page]
|
Enter the starting page.
The starting page can be entered when [Specify Starting Page] is selected.
|
|
[Specify start page number]
|
Select this check box to specify the starting page number.
|
|
[Start Page Number]
|
Enter the starting page number.
The starting page can be entered when [Specify start page number] is selected.
|
|
[Chapter Number]
|
Enables you to specify the detailed chapter number settings.
|
|
[Format]
|
Select the desired format from the pull-down list.
|
|
[Specify start chapter]
|
Select this check box to specify the starting chapter.
|
|
[Start Chapter]
|
Enter the starting chapter.
The starting page can be entered when [Specify start chapter] is selected.
|
|
[Specify start chapter number]
|
Select this check box to specify the starting chapter number.
|
|
[Start Chapter Number]
|
Enter the starting chapter number.
The starting page can be entered when [Specify start chapter number] is selected.
|
|
[Page Number in Chapter]
|
Enables you to specify the detailed page number settings in the chapter.
|
|
[Format]
|
Select the desired format from the pull-down list.
|
|
[Specify start page number]
|
Select this check box to specify the starting page number in the chapter.
|
|
[Start Page Number]
|
Enter the starting page number.
The starting page can be entered when [Specify start page number] is selected.
|
4.
Click [OK].
The [Detailed Settings for Headers/Footers (Print Pages)] dialog box is displayed again.
5.
Click [OK].
Canceling All Header/Footer Settings
You can cancel all header/footer settings.
1.
Deselect the [Insert Header/Footer into Print Pages] or [Insert Header/Footer into Original Pages] check box in [Header/Footer Settings] on the [Page Settings] tab on the Details Window.
Or, deselect the [Insert Header/Footer] check box in the [Print Pages]/[Original Pages] groups on the ribbon.
The display of the [Header/Footer Settings] area returns to be collapsed.
|
NOTE
|
|
If the Details Window is not displayed, see the following.
If commands are not displayed on the ribbon of Desktop Editor, see the following to display them.
This operation can also be performed with the tool buttons on the toolbar. If tool buttons are not displayed on the toolbar of Desktop Editor, see the following to display them.
|
Canceling Certain Header/Footer Settings
You can cancel certain header/footer settings.
1.
Select [None] from the pull-down list of each [Header]/[Footer] to clear in [Header/Footer Settings] on the [Page Settings] tab on the Details Window.
Or, select [None] from the pull-down list of each [Header]/[Footer] in the [Print Pages]/[Original Pages] groups on the ribbon.

The changes are reflected and the Work Window is updated.
|
NOTE
|
|
If the Details Window is not displayed, see the following.
If commands are not displayed on the ribbon of Desktop Editor, see the following to display them.
This operation can also be performed with the tool buttons on the toolbar. If tool buttons are not displayed on the toolbar of Desktop Editor, see the following to display them.
|