Specifying the Binding Location
You can specify the binding location for printing documents.
|
NOTE
|
|
This function can only be used when you select a Canon printer and the [Use print settings of Editor] check box on the [Print Settings] tab on the Details Window, the ribbon command, or the tool button.
|
1.
Select the binding location in [Detailed Settings for Printing] on the [Print Settings] tab on the Details Window.
Or, click  (Binding Location) on the ribbon and select the binding location.
(Binding Location) on the ribbon and select the binding location.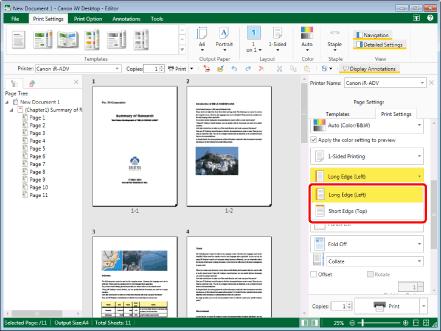
|
NOTE
|
|
If the Details Window is not displayed, see the following.
The settings that can be selected for the binding location differ according to the type of the printer selected in [Printer] and the output paper orientation setting.
If commands are not displayed on the ribbon of Desktop Editor, see the following to display them.
This operation can also be performed with the tool buttons on the toolbar. If tool buttons are not displayed on the toolbar of Desktop Editor, see the following to display them.
|
2.
Click [Gutter Settings] in [Detailed Settings for Printing] on the [Print Settings] tab on the Details Window.
Or, click  (Gutter) on the ribbon.
(Gutter) on the ribbon.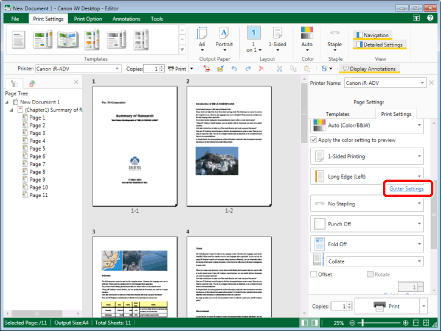
The [Gutter Settings] dialog box is displayed.
|
NOTE
|
|
If commands are not displayed on the ribbon of Desktop Editor, see the following to display them.
This operation can also be performed with the tool buttons on the toolbar. If tool buttons are not displayed on the toolbar of Desktop Editor, see the following to display them.
|
3.
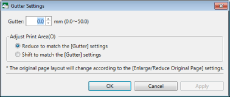
Change the gutter settings.
|
[Gutter]
|
Sets the width of the gutter.
|
|
[Adjust Print Area]
|
Adjusts the print area.
|
|
[Reduce to match the [Gutter] settings]
|
Reduces the print area to fit the width set in [Gutter].
|
|
[Shift to match the [Gutter] settings]
|
Moves the entire document without reducing it, according to the width set in [Gutter].
Therefore, some of the document may not be printed, depending on the document.
|
4.
Click [OK].
Or, click [Apply] > [OK].
The Work Window is updated according to the settings.