Configuring the Cover Sheet
When you fax documents using the [Fax Sending Settings] dialog box of the Desktop, you can use a cover sheet.
1.
In the [Fax Sending Settings] dialog box, click [Cover Sheet].
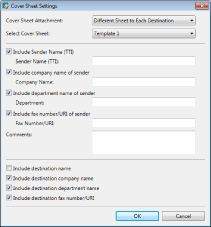
The [Cover Sheet Settings] dialog box is displayed.
2.
Configure the cover sheet settings.

The settings you can specify in the [Cover Sheet Settings] dialog box are as follows:
|
[Cover Sheet Attachment]
|
You can select one of the following:
[None]
[Different Sheet to Each Destination]
[Same Sheet to All Destinations]
|
|
[Select Cover Sheet]
|
Select the cover sheet template from the pull-down list.
|
|
[Include Sender Name (TTI)]
|
Select this check box to include the sender name, then enter it in [Sender Name (TTI)].
|
|
[Sender Name (TTI)]
|
Enter the sender name.
|
|
[Include company name of sender]
|
Select this check box to include the company name of the sender, then enter it in [Company Name].
|
|
[Company Name]
|
Enter the company name of the sender.
|
|
[Include department name of sender]
|
Select this check box to include the department name of the sender, then enter it in [Department].
|
|
[Department]
|
Enter the department name of the sender.
|
|
[Include fax number/URI of sender]
|
Select this check box to include the fax number/URI of the sender, then enter it in [Fax Number/URI].
|
|
[Fax Number/URI]
|
Enter the fax number/URI of the sender.
|
|
[Comments]
|
Enter comments about the fax.
|
|
[Include destination name]
|
Select this check box to include the destination name.
|
|
[Include destination company name]
|
Select this check box to include the destination company name.
|
|
[Include destination department name]
|
Select this check box to include the destination department name.
|
|
[Include destination fax number/URI]
|
Select this check box to include the destination fax number/URI.
|
3.
Click [OK].
The [Fax Sending Settings] dialog box is displayed again.