Previewing and Printing on the Desktop Editor Screen
By using a print settings button or printer output button on the Desktop Browser screen, you can specify print settings while checking a preview of the print results in Desktop Editor screen.
|
NOTE
|
|
To print from the output bar on the Desktop Browser screen, it is necessary to register a printer output button in the output bar. Also, to check a preview on the Desktop Editor screen using a printer output button, the [Check preview with Editor before printing] check box must be selected in addition to [Use print settings of template when printing] in the printer output button settings. For information on registering and setting buttons, see the following.
If you change the name of the printer registered in a printer output button on the Windows printer properties screen, you will not be able to print a document using the printer output button.
If you print an image whose width or height exceeds 482.6 mm (19 inches), it is reduced to fit inside 482.6 mm (19 inches), with the aspect ratio retained.
If a paper size is specified in output size settings, the image is reduced to fit the specified paper size.
If [Auto (Size)] is selected in output size settings, the image is reduced to fit the paper size specified in [Reduced Image Paper Size]. However, the paper size selected when printing may differ from the specified paper size, depending on the shape of the image.
[File] menu > [Option] > [System Settings] > [Common Settings] > [Import] > [Reduced Image Paper Size]
When multiple output paper sizes are selected (for example, A4 and A3), the image is reduced to fit the larger paper size.
If information for the resolution is not included in the image, the image is converted to 96 dpi when reduced.
|
Printing with Desktop Editor
You can use the [Print] dialog box to specify settings such as the number of copies and the print range, and print a document.
|
NOTE
|
|
For information on configuring Mail Merge printing, see the following.
If you are using an IWB document, the print settings stored in the IWB document are used when printing. For details on the print settings, see the following.
|
1.
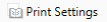
Select a document/folder to print in the File List Window, and click  (print settings button).
Or, follow one of the steps described below.
Drag and drop the document/folder to (print settings button)
Click  (printer output button)
Drag and drop the document/folder to (printer output button)
Right-click to select the document or folder, drag and drop it to (print settings button) or (printer output button), and select [Multiple Document Order Settings] from the displayed menu
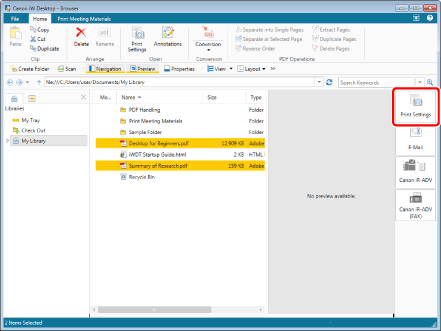
When you select a single document, Desktop Editor starts and the print preview of the document is displayed. Proceed to step 4.
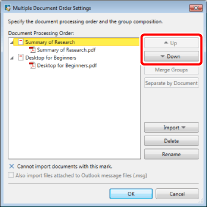
When you select multiple documents or a folder, the [Multiple Document Order Settings] dialog box is displayed. In this case, proceed to step 2.
If you selected [Multiple Document Order Settings] in step 1, proceed to step 2.
|
NOTE
|
|
You can also use one of the following methods to perform the same operation.
Click
 (Print Settings) on the ribbon (Print Settings) on the ribbonClick
 (Print Settings) displayed on the toolbar (Print Settings) displayed on the toolbarClick
 for a printer output button displayed on the ribbon or toolbar for a printer output button displayed on the ribbon or toolbarClick
 for a printer output button displayed on the ribbon or toolbar, and select [Execution] for a printer output button displayed on the ribbon or toolbar, and select [Execution]If buttons are not displayed on the ribbon or toolbar, see the following to display them.
|
2.
Select a document in [Document Processing Order] and click [Up] or [Down] to specify the order of printing the documents.
|
NOTE
|
|
For more information on the [Multiple Document Order Settings] dialog box, see the following.
|
3.
Click [OK].
Desktop Editor starts and the preview of the document to print is displayed.
4.
Check the preview displayed on the Desktop Editor screen, click  (Printer) on the ribbon, and select the printer driver to use from the pull-down list.
(Printer) on the ribbon, and select the printer driver to use from the pull-down list.Or, select the printer driver to use in (Printer Name) on the Details Window.
(Printer Name) on the Details Window.
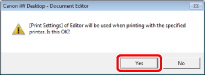
If a confirmation message is displayed, proceed to step 5.
If a confirmation message is not displayed, proceed to step 6.
|
NOTE
|
|
If you change the driver to use from a fax driver to a printer driver, [Fax] automatically changes to [Print].
If the Details Window is not displayed, see the following.
If the Desktop Editor preview quality is not good, selecting [High quality] in [System Settings] may resolve this.
[File] menu > [Option] > [System Settings] > [Common Settings] > [Display Settings] > [Select The Image Quality To Be Displayed In The Preview]
If commands are not displayed on the ribbon of Desktop Editor, see the following to display them.
This operation can also be performed with the tool buttons on the toolbar. If tool buttons are not displayed on the toolbar of Desktop Editor, see the following to display them.
|
5.
Click [Yes].
6.
Click  for
for  (Print) on the ribbon, and select [Display Print Dialog].
for (Print) on the ribbon, and select [Display Print Dialog].Or, follow one of the steps described below.
Click  (Print Dialog) on the ribbon
(Print Dialog) on the ribbonClick  (Print) on the ribbon
(Print) on the ribbonClick  for
for  on the Details Window, and select [Display Print Dialog]
Select the [File] menu > [Print]
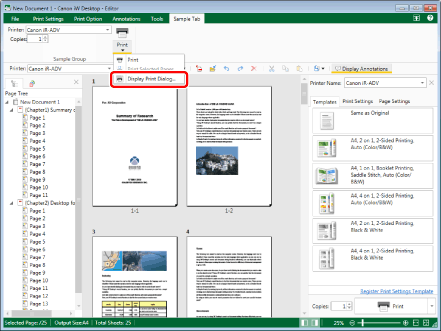
The [Print] dialog box is displayed.
|
NOTE
|
|
When printing a document with Mail Merge fields set, [Print] automatically switches to [Mail Merge Print]. To execute Mail Merge printing, perform one of the following operations.
Click
 for for  (Mail Merge Print) on the ribbon (Mail Merge Print) on the ribbonClick
 for (Mail Merge Print) on the ribbon, and select [Mail Merge Print] for (Mail Merge Print) on the ribbon, and select [Mail Merge Print]Click
The [Mail Merge Print] dialog box is displayed.
Printing starts when you specify the number of copies in
 (Copies) on the ribbon or Details Window, and perform one of the following operations. (Copies) on the ribbon or Details Window, and perform one of the following operations.Click
 for (Print) on the ribbon or for (Print) on the ribbon or Click
for (Print) on the ribbon or However, if the [Display print/send fax dialog] check box is deselected, a confirmation message is displayed if you perform an operation when annotations are hidden. To print the annotations, click [Print with annotations].
The [Print] dialog box is displayed if the [Display print/send fax dialog] check box is selected. In this case, proceed to step 7.
[File] menu > [Option] > [System Settings] > [Common Settings] > [Print/Fax] > [Display print/send fax dialog]
If commands are not displayed on the ribbon of Desktop Editor, see the following to display them.
This operation can also be performed with the tool buttons on the toolbar. If tool buttons are not displayed on the toolbar of Desktop Editor, see the following to display them.
|
7.
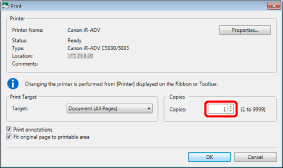
To specify the number of copies to print, enter the number in [Copies].
8.
To specify the pages to print, select [Print Pages] in [Target] and specify the page number in the displayed [Range].
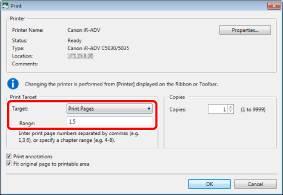
You can use the following formats to specify a range of page numbers.
When printing from page "a" to the last page: a-
("a" indicates the page number to start printing)
When printing from the first page to page "b": -b
("b" indicates the page number to end printing)
When printing continuous pages: a-b
("a" and "b" indicate the page numbers to start and end printing respectively)
When printing discontinuous pages: c,d
("c" and "d" indicate the individual page numbers to print, separated by commas)
|
NOTE
|
|
The entry order of [Range] is not the order of printing. Regardless of whether you enter "1,2" or "2,1", pages are printed in the order "1,2."
If 2-sided printing is set, both sides are printed even if only one side is specified in the range.
|
9.
Select the [Print annotations] check box to include annotations when printing.
|
NOTE
|
|
Annotations added with something other than Desktop Editor may be printed regardless of whether you select the [Print annotations] check box, depending on the type of annotation.
|
10.
Select the [Fit original page to printable area] check box to print according to the valid print area.
11.
When printing a document with Mail Merge print settings, select the record to print in [Target Records].
|
NOTE
|
|
If you selected [Print specified records], follow the procedure below to specify the record to print.
1. Click [Specify Records].
The [Specify Records] dialog box is displayed.
2. Select the check box for the record to print in [Record List].
3. Click [OK].
|
12.
Click [OK].
Printing of the document starts.
|
NOTE
|
|
For more information on the operations when you specify a fax driver in [Printer], see the following.
For more information on the print job status, see the following.
A confirmation message is displayed if the header/footer of the page to print overlaps the paper margins. Adjust the position of the header/footer based on the paper margins displayed in the message.
|
Printing Selected Pages with Desktop Editor
You can print the pages selected in the Navigation Window or Work Window of Desktop Editor.
|
NOTE
|
|
If the following print settings are specified in the document, you cannot print selected pages.
When booklet printing is set in the print settings
When [Staple Each Chapter] is set in the stapling settings
When front cover/back cover/tab paper/sheets are specified in the sheet insertion settings
When Mail Merge printing is set
|
1.
Select a document/folder to print in the File List Window, and click (print settings button).
Or, follow one of the steps described below.
Drag and drop the document/folder to (print settings button)
Click (printer output button)
Drag and drop the document/folder to (printer output button)
Right-click to select the document or folder, drag and drop it to (print settings button) or (printer output button), and select [Multiple Document Order Settings] from the displayed menu
When you select a single document, Desktop Editor starts and the print preview of the document is displayed. Proceed to step 4.
When you select multiple documents or a folder, the [Multiple Document Order Settings] dialog box is displayed. In this case, proceed to step 2.
If you selected [Multiple Document Order Settings] in step 1, proceed to step 2.
|
NOTE
|
|
You can also use one of the following methods to perform the same operation.
Click
(Print Settings) on the ribbonClick
(Print Settings) displayed on the toolbarClick
for a printer output button displayed on the ribbon or toolbarClick
for a printer output button displayed on the ribbon or toolbar, and select [Execution] If buttons are not displayed on the ribbon or toolbar, see the following to display them.
|
2.
Select a document in [Document Processing Order] and click [Up] or [Down] to specify the order of printing the documents.
|
NOTE
|
|
For more information on the [Multiple Document Order Settings] dialog box, see the following.
|
3.
Click [OK].
Desktop Editor starts and the preview of the document to print is displayed.
4.
Check the preview displayed on the Desktop Editor screen, click (Printer) on the ribbon, and select the printer driver to use from the pull-down list.
(Printer) on the ribbon, and select the printer driver to use from the pull-down list.Or, select the printer driver to use in (Printer Name) on the Details Window.
(Printer Name) on the Details Window.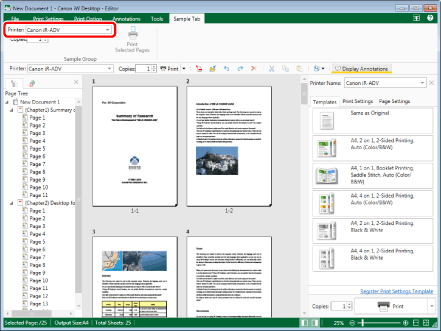
If a confirmation message is displayed, proceed to step 5.
If a confirmation message is not displayed, proceed to step 6.
|
NOTE
|
|
If you change the driver to use from a fax driver to a printer driver, [Fax] automatically changes to [Print].
If the Details Window is not displayed, see the following.
If the Desktop Editor preview quality is not good, selecting [High quality] in [System Settings] may resolve this.
[File] menu > [Option] > [System Settings] > [Common Settings] > [Display Settings] > [Select The Image Quality To Be Displayed In The Preview]
If commands are not displayed on the ribbon of Desktop Editor, see the following to display them.
This operation can also be performed with the tool buttons on the toolbar. If tool buttons are not displayed on the toolbar of Desktop Editor, see the following to display them.
|
5.
Click [Yes].
6.
Select the pages to print in the Navigation Window or Work Window.
|
NOTE
|
|
For information on how to select a page, see the following.
If 2-sided printing is set, both sides are printed even if only one side of the page to print is specified in the range.
|
7.
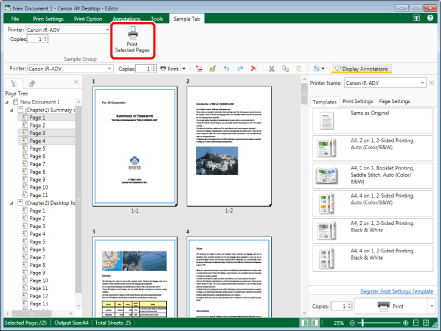
Click  (Print Selected Pages) on the ribbon.
(Print Selected Pages) on the ribbon. Or, follow one of the steps described below.
Click for (Print) on the ribbon, and select [Print Selected Pages]
for (Print) on the ribbon, and select [Print Selected Pages]Click for on the Details Window, and select [Print Selected Pages]
Printing of the document starts.
|
NOTE
|
|
If the [Display print/send fax dialog] check box is deselected, a confirmation message is displayed if you perform an operation when annotations are hidden. To print the annotations, click [Print with annotations].
If the [Display print/send fax dialog] check box is selected, the [Print] dialog box is displayed. For more information on using the [Print] dialog box to print documents, see the following.
[File] menu > [Option] > [System Settings] > [Common Settings] > [Print/Fax] > [Display print/send fax dialog]
For more information on the print job status, see the following.
A confirmation message is displayed if the header/footer of the page to print overlaps the paper margins. Adjust the position of the header/footer based on the paper margins displayed in the message.
If commands are not displayed on the ribbon of Desktop Editor, see the following to display them.
This operation can also be performed with the tool buttons on the toolbar. If tool buttons are not displayed on the toolbar of Desktop Editor, see the following to display them.
|