Converting a Document into a PDF by Using the Advanced Settings
You can convert a document saved in a library in Desktop Browser to a PDF, even if that document has been passworded, compressed, etc. in the advanced settings.
1.
Select the documents to convert from the File List View Window.
2.
Click  for
for  (Conversion) on the ribbon, and select [Set Details and Convert to PDF Document].
for (Conversion) on the ribbon, and select [Set Details and Convert to PDF Document].Or, follow one of the steps described below.
Click  (Convert to PDF (Detailed Settings)) on the ribbon
(Convert to PDF (Detailed Settings)) on the ribbonRight-click the File List View Window, and select [Set Details and Convert to PDF Document]
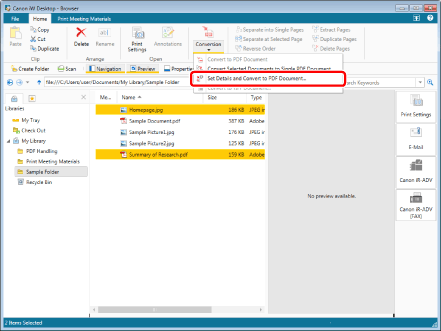
When you select a single document, the [Detailed Settings for PDF Document] dialog box is displayed. Proceed to step 4.
When you select multiple documents, the [Multiple Document Order Settings] dialog box is displayed. Proceed to step 3.
|
NOTE
|
|
This operation can also be performed with the tool buttons on the toolbar. If tool buttons are not displayed on the toolbar of Desktop Browser, see the following to display them.
|
3.
Specify the document order, then click [OK].
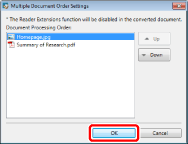
|
[Up]
|
The selected document is moved up one level.
|
|
[Down]
|
The selected document is moved down one level.
|
The [Detailed Settings for PDF Document] dialog box is displayed.
4.
Configure the advanced settings of the PDF document, then click [OK].
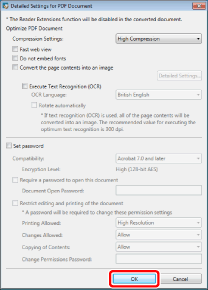
|
[Compression Settings]
|
Set the compression level of the PDF document.
|
|
[Fast web view]
|
Select this check box to optimize the PDF document for display on the Web.
Converting a PDF document with this check box selected enables the document to be downloaded page by page (with byte-serving) when the PDF has been uploaded to the Web.
|
|
[Do not embed fonts]
|
Select this check box to convert without using embedded fonts when creating the PDF document.
Converting a PDF document without using embedded fonts enables the size of the PDF document to be reduced.
|
|
[Convert the page contents into an image]
|
Select this check box to convert all pages in a document that will be converted to a PDF document into TIFF format images.
|
|
[Detailed Settings]
|
Enables you to configure how to convert images.
[Color Mode]: Specifies the color.
[Resolution]: Specifies the resolution.
|
|
[Execute Text Recognition (OCR)]
|
Select this check box to enable text searches for documents converted to TIFF images (OCR function).
If this check box is selected, a check mark is automatically displayed for the [Convert the page contents into an image] check box. When you convert a large size document, it may take time. |
|
[OCR Language]
|
Select the language to use for the OCR function from the pull-down list.
|
|
[Rotate automatically]
|
If this check box is selected, the vertical orientation of the document is corrected. Select this check box when the document includes both vertically and horizontally-oriented pages.
|
|
[Set password]
|
If you want to restrict PDF access, printing, and editing for security reasons, select this check box.
|
|
[Compatibility]
|
Select security compatibility settings for the PDF document.
|
|
[Require a password to open this document]
|
Select this check box to set a password for opening the document.
|
|
[Document Open Password]
|
Enter the password for the PDF document.
|
|
[Restrict editing and printing of the document]
|
Select this check box to restrict printing, editing, and copying of the PDF document.
|
|
[Printing Allowed]
|
Set print permission for the PDF document.
|
|
[Changes Allowed]
|
Set edit permission of the PDF document.
|
|
[Copying of Contents]
|
Set copy permission for the contents of the PDF document.
|
|
[Change Permissions Password]
|
Enter the password to release print and editing restrictions in the document.
|
The document is converted to a PDF document and saved in the original folder.
When a password to open the document is set, the [Confirm Document Open Password] dialog box is displayed. In this case, enter the same password you have entered in [Document Open Password], and click [OK].
When printing or editing the document is restricted, the [Confirm Permissions Password] dialog box is displayed. In this case, enter the same password you have entered in [Change Permissions Password], and click [OK].
Enter all the passwords again then click [OK] and the PDF document is created.
If conversion takes 60 seconds or longer, a confirmation message is displayed. Selecting [No] cancels conversion to a PDF document.
|
IMPORTANT
|
|
If you convert to a PDF document with the [Do not embed fonts] check box selected, the PDF document may not be displayed correctly. This is because the fonts used in the PDF document are not installed in the computer used to view the PDF document. To display the document correctly, install the fonts or convert to a PDF document without selecting the [Do not embed fonts] check box.
|
|
NOTE
|
|
If you select the [Execute Text Recognition (OCR)] check box, be wary of the following.
The maximum paper size for the original document is A3.
Because original skew is automatically corrected, the paper size of the created PDF document may become larger than the paper size of the original document. In this case, if you print/fax using the same paper size as the original document, the created document may appear smaller.
Additional hard disk space is required along with free space for the created PDF document. If there is a large number of pages, up to 1 GB of free space will be used.
When inconvertible documents are included in the selected documents, documents which cannot be converted and an error message are displayed.
The name of the converted PDF document is as follows.
If only one document is selected: the original file name with the file extension changed to '.pdf'. If the original document is a PDF, a '(2)' is added at the end of the new document name
If multiple documents are selected: the name of the first document with the file extension changed to '.pdf'. If the first document is a PDF, a '(2)' is added at the end of the original document name
The values set in the [Detailed Settings for PDF Document] dialog box are retained for next time.
The settings in the [Detailed Settings for PDF Document] dialog box are the same as the dialog box in "Sending Documents via E-Mail as PDF Documents" but the settings are saved separately. For information on "Sending Documents via E-Mail as PDF Documents", see the following.
The [Enter Version Comments] dialog box is displayed when combining a PDF document in a library with [Create Version] set. The [Enter Version Comments] dialog box can be hidden. For more information, see the following.
If you convert an image whose width or height exceeds 482.6 mm (19 inches), it is reduced to fit the size set in [Reduced Image Paper Size] and converted to a PDF.
If information for the resolution is not included in the image, the image is converted to 96 dpi when reduced.
[File] menu > [Option] > [System Settings] > [Common Settings] > [Import] > [Reduced Image Paper Size]
If there are annotations created using Desktop V2.0.1 or earlier, the annotations are deleted when the [Convert the page contents into an image] check box is selected.
|