Registering a Personal Button in the Quick Menu of an imageRUNNER ADVANCE
You can set to store scanned data in a library of Desktop when a Personal Button in the Quick Menu of an imageRUNNER ADVANCE is pressed.
|
NOTE
|
|
You cannot register more than one Personal button for the same device using a single user account.
|
Registering a Personal Button
You can register a Personal Button in the Quick Menu of an imageRUNNER ADVANCE device.
|
NOTE
|
|
If [Register Shared Buttons] in [Restrict Quick Menu Use] is set to [OFF] in the Quick Menu settings of a device, a Personal Button cannot be registered to the Quick Menu of that device.
|
1.
Select the [File] menu > [Tools] > [Personal Button Settings] > [Create].
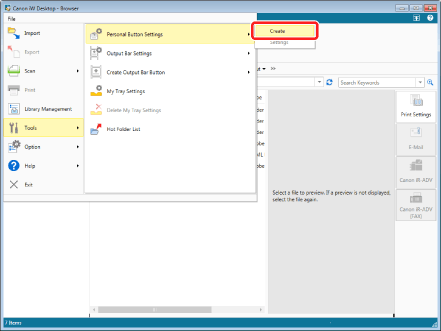
The [Scan Document Destination Settings] wizard is displayed.
2.
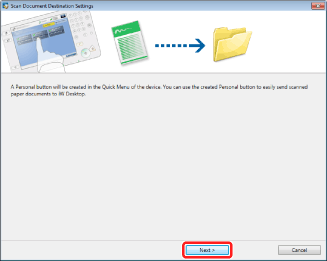
Confirm the displayed settings and click [Next].
3.
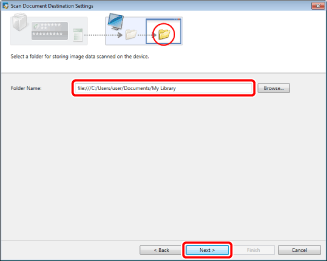
In [Folder Name], specify the destination folder for image data scanned with the device, and then click [Next].
4.
Specify the device to configure with the Personal button and click [Next].
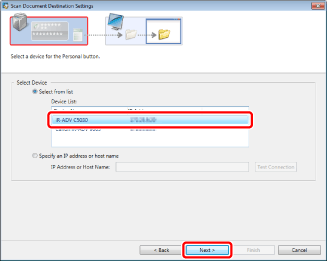
The following items are displayed in the device settings screen:
|
[Select Device]
|
Select the device to set the "personal button" for.
|
|
[Select from list]
|
Select one of the devices displayed in [Device List].
|
|
[Device List]
|
Displays devices that can be configured.
|
|
[Specify an IP address or host name]
|
Specify a device by entering the IP address or host name.
|
|
[IP Address or Host Name]
|
Enter an IP address or host name.
|
|
[Test Connection]
|
Confirm the connection to the device.
|
|
NOTE
|
|
When the authentication information differs between the device and computer, the login screen for the device is displayed. Enter one of the following, and then log in.
[User Name]/[Password]/[Login Destination]
[Department ID]/[PIN]
The printers for IPP port are not displayed in [Device List].
If multiple devices have the same IP address, only one of them is displayed in [Device List].
If the computer you are using and the device are connected but the device is not displayed in [Select Device], try the following.
Wait for a while.
You may not be able to connect to the device after restarting it.
Log in to the device through the operation panel.
If you cannot login, the authentication server may not be functioning.
If this does not resolve the problem, contact your system administrator or support center.
|
5.
Specify the information to register in the Quick Menu of the device, and then click [Scan Settings].
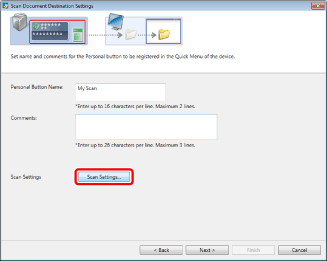
The following items are displayed in the Quick Menu settings screen for the device:
|
[Personal Button Name]
|
Enter up to 16 characters (2 lines maximum.)
|
|
[Comments]
|
Enter up to 26 characters (3 lines maximum.)
|
|
[Scan Settings]
|
The [Scan Settings] screen is displayed.
|
6.
Configure the advanced scan settings, then click [OK].
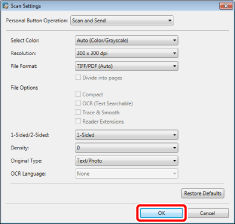
The following items can be configured in the [Scan Settings] screen:
|
[Personal Button Operation]
|
Configure the operation to execute when the Personal button is pressed.
|
|
[Scan and Send]
|
Specifies to scan and send data without displaying the settings screen.
|
|
[Display Settings Screen]
|
Specifies to display the settings screen.
|
|
[Display Setting Confirmation Screen]
|
Specifies to display the setting confirmation screen.
|
|
[Select Color]
|
Select a color used when scanning.
|
|
[Auto (Color/Grayscale)]
|
Automatically switches between color and grayscale.
|
|
[Auto (Color/B&W)]
|
Automatically switches between color and B&W.
|
|
[Full Color]
|
Scans in full color.
|
|
[Grayscale]
|
Scans in grayscale.
|
|
[Black & White]
|
Scans in black and white.
|
|
[Resolution]
|
Select the scan resolution.
|
|
[100 x 100 dpi]
|
Sets the scan resolution to [100 x 100 dpi].
|
|
[150 x 150 dpi]
|
Sets the scan resolution to [150 x 150 dpi].
|
|
[200 x 200 dpi]
|
Sets the scan resolution to [200 x 200 dpi].
|
|
[300 x 300 dpi]
|
Sets the scan resolution to [300 x 300 dpi].
|
|
[600 x 600 dpi]
|
Sets the scan resolution to [600 x 600 dpi].
|
|
[File Format]
|
Select the file format of scanned images.
|
|
[TIFF/PDF (Auto)]
|
Automatically switches between TIFF and PDF.
|
|
[TIFF/XPS (Auto)]
|
Automatically switches between TIFF and XPS.
|
|
[TIFF/JPEG (Auto)]
|
Automatically switches between TIFF and JPEG.
|
|
[PDF]
|
Saves as a PDF document.
|
|
[XPS]
|
Saves as an XPS document.
|
|
[OOXML (PowerPoint)]
|
Saves as an OOXML-POWERPOINT document.
|
|
[OOXML (Word)]
|
Saves as an OOXML-WORD document.
|
|
[JPEG]
|
Saves as a JPEG document.
|
|
[TIFF]
|
Saves as a TIFF document.
|
|
[Divide into pages]
|
Specifies to divide into pages.
|
|
[File Options]
|
Configure the file format options.
|
|
[Compact]
|
Saves as a highly compressed PDF document.
|
|
[OCR (Text Searchable)]
|
Saves as a searchable PDF document using OCR (optical character recognition).
|
|
[Trace & Smooth]
|
Saves as a PDF document in which text and line art images are outlined.
|
|
[Reader Extensions]
|
Saves as a PDF document in the Reader Extensions format.
|
|
[1-Sided/2-Sided]
|
Select the read method.
|
|
[1-Sided]
|
Specifies to scan 1-side only.
|
|
[2-Sided (Book Type)]
|
Specifies to scan 2-sides (book type.)
|
|
[2-Sided (Calendar Type)]
|
Specifies to scan 2-sides (calendar type.)
|
|
[Density]
|
Configure the scan density.
Select the density, [-4]/[-3]/[-2]/[-1]/[0]/[1]/[2]/[3]/[4].
|
|
[Original Type]
|
Specify the type of original documents.
|
|
[Text/Photo]
|
Specify this option when the original document consists of text and photos.
|
|
[Photo]
|
Specify this option when the original document consists of photos.
|
|
[Text]
|
Specify this option when the original document consists of text.
|
|
[OCR Language]
|
Select the language to use when using OCR.
|
|
[Restore Defaults]
|
Resets all settings to default.
|
The Quick Menu settings screen for the device appears again.
|
NOTE
|
|
The items that can be configured in device and are frequently used are provided as the setting items on the [Scan Settings] screen.
[OOXML (Word)] may not be displayed depending on your device.
|
7.
Click [Next].
8.
Configure the folder for forwarding, and click [Next].
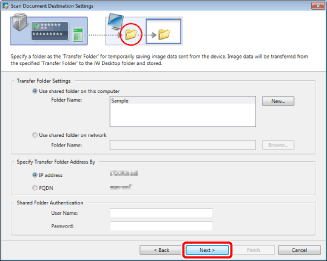
The items available in the transfer folder's settings screen are as follows.
|
[Transfer Folder Settings]
|
Specify a folder to receive a scanned document before transmitting it to the destination folder.
|
|
[Use shared folder on this computer]
|
Select this option when you want to use the shared folder on the computer you are currently operating.
|
|
[New]
|
Specify a folder to use and register it as a shared folder.
|
|
[Use shared folder on network]
|
Select this option when you want to use the shared folder on a network.
|
|
[Specify Transfer Folder Address By]
|
Specifies the address format of the destination of the scan document.
|
|
[IP address]
|
Registers the host information of the transfer folder with an IP address.
|
|
[FQDN]
|
Registers the host information of the transfer folder with an FQDN.
|
|
[Shared Folder Authentication]
|
Enter the authentication information for accessing the shared folder.
|
|
[User Name]
|
Enter the user name used to access the shared folder.
|
|
[Password]
|
Enter the password used to access the shared folder.
|
|
NOTE
|
|
The transfer folder specified here must be enabled for sharing. Follow the steps below to share a folder:
1. Select a folder to be shared, right-click it, and select [Sharing] > [Specific User].
2. Configure the users to allow access and their access permission level in the [File Share] dialog box.
Be sure to configure or change the sharing settings as a user with a necessary privilege. For more information, see the Windows manual.
If the shared folder you set cannot be used as a transfer folder, try the following steps. If, after performing this procedure you still cannot use this folder as a transfer folder, it might be a problem with Windows. For more information, see the Windows manual.
1. Enter "\\computer name" or "\\computer IP address" in the address bar of Windows Explorer.
2. The set shared folder is displayed.
3. Open the shared folder set as the transfer folder.
4. The network error 0x80070035 is displayed.
You cannot specify the following folders as transfer folders.
Recycle Bin
CD-ROMs, DVD-ROMs, RAM disks, removable devices
C:\Users, C:\WINDOWS, C:\Program Files, C:\ProgramData, and all their subfolders
Already registered as the transfer source of Hot Folder or My Tray
Transfer folders already registered as a personal button
A folder whose portion of the path that follows "file:///" or "file:" matches the corresponding portion of the path of an already registered destination folder
Folders Already Registered as Libraries
|
The Personal button registration completion screen is displayed.
9
Click [Exit].
Changing the Personal Button Registration
You can change a Personal Button registered in the Quick Menu of an imageRUNNER ADVANCE device.
1.
Select the [File] menu > [Tools] > [Personal Button Settings] > [Settings] > (Personal button name) > [Change].
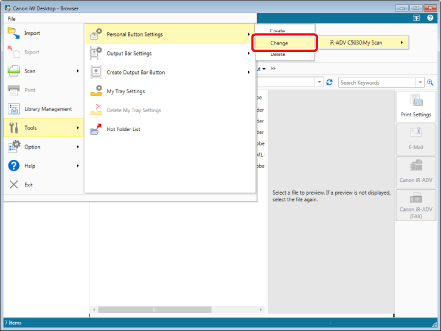
The [Scan Document Destination Settings] wizard is displayed.
2.
Confirm the displayed settings and click [Next].

3.
Select an item to change and change the settings.
For details on the various settings, see the following.
Deleting Personal Buttons
You can delete a Personal Button registered in the Quick Menu of an imageRUNNER ADVANCE device.
1.
Select the [File] menu > [Tools] > [Personal Button Settings] > [Settings] > (Personal button name) > [Delete].
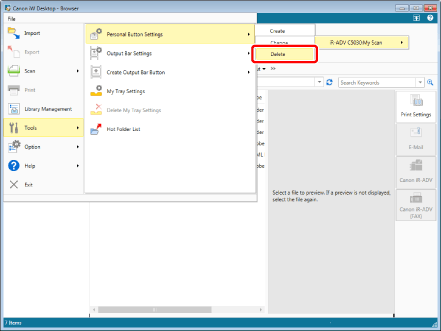
A message confirming to delete the selected item is displayed.
2.
Click [Yes].
The personal button is deleted.
|
NOTE
|
|
The registered Personal Button is deleted from Desktop Browser, but the button for the Quick Menu of the imageRUNNER ADVANCE device is not deleted.
|